![[ Substance 3D Painter ] マテリアル、テクスチャのインポート方法](https://www.plamophy.com/wp-content/uploads/substance3dpainter-ec-resource-import-01.jpg)
マテリアルやテクスチャのインポート時に、Usage(用途)やインポート場所などいくつか設定項目があります。また、設定しておくことで、インポート後にカテゴリーごとに仕分けして管理することができます。
マテリアルは Substance 3D Designer で作成する方法の他に、Substance 3D Assets ライブラリからダウンロードできます。
本記事では、マテリアル、テクスチャ素材のインポート方法について確認したいと思います。
マテリアルのインポート方法について
Substance 3D Assets ライブラリのマテリアルはここからダウンロードできます。
Substance 3D Assets ライブラリ
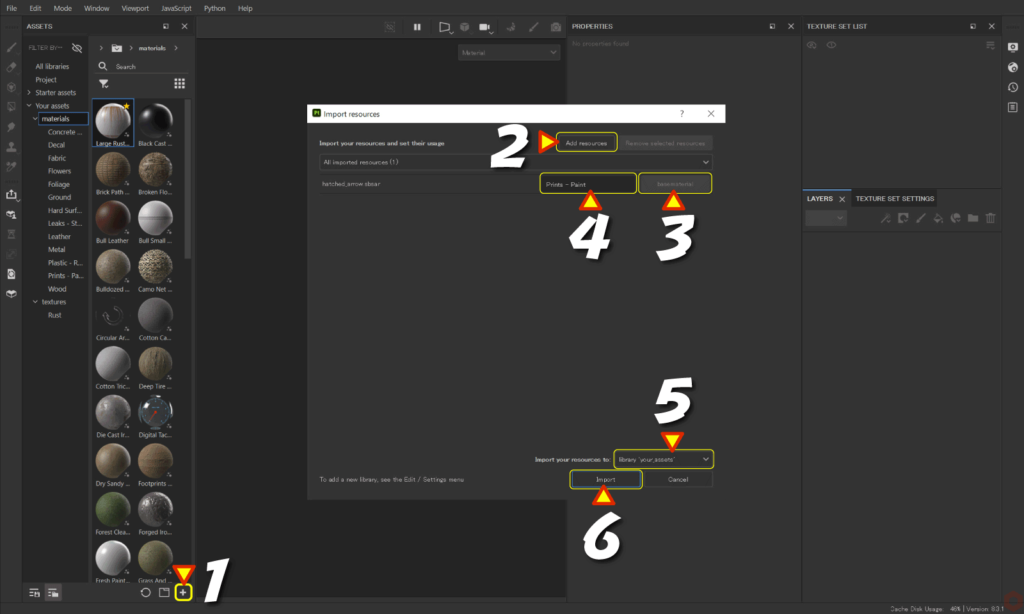
- インポートするには File -> Import resources を選択します。
又は、[ Assets ] ウィンドウの [ + ]ボタンをクリックします。![]()
- 新しいウィンドウが開くので、[ Add resources ] ボタンをクリックして、インポートするファイルを選択します。
- [ Usage ] を設定します。
![]()
インポートする素材の用途にあわせて項目を選択します。
マテリアル素材の場合は [ basematerial ] を、テクスチャ素材の場合は [ texture ] 選択します。
Substance 3D Assets ライブラリからダウンロードしたファイルは、用途が定義され固定されている場合があります。 - [ Prefix ] を設定します。
![]()
ここで指定した名前が、インポート先のフォルダー名になります。 - [ Import your resources to ] を設定します。
![]()
・current session
一時的にインポートされます。
アプリケーションを再起動するとリソースはなくなります。
・ project
作業中のファイル(プロジェクト)にだけインポートされます。
他のファイルではこのリソースは使えません。
・ library 'your assets'
ライブラリーにインポートされます。
インポート後はいつでもリソースを使用することができます。 - [ Import ] ボタンをクリックします。
インポートすると Assets ウィンドウの Your assets のなかに Prefix で設定した名前のフォルダーにインポートされます。
テクスチャのインポート方法について
テクスチャ素材はここからダウンロードできます。
Textures.com
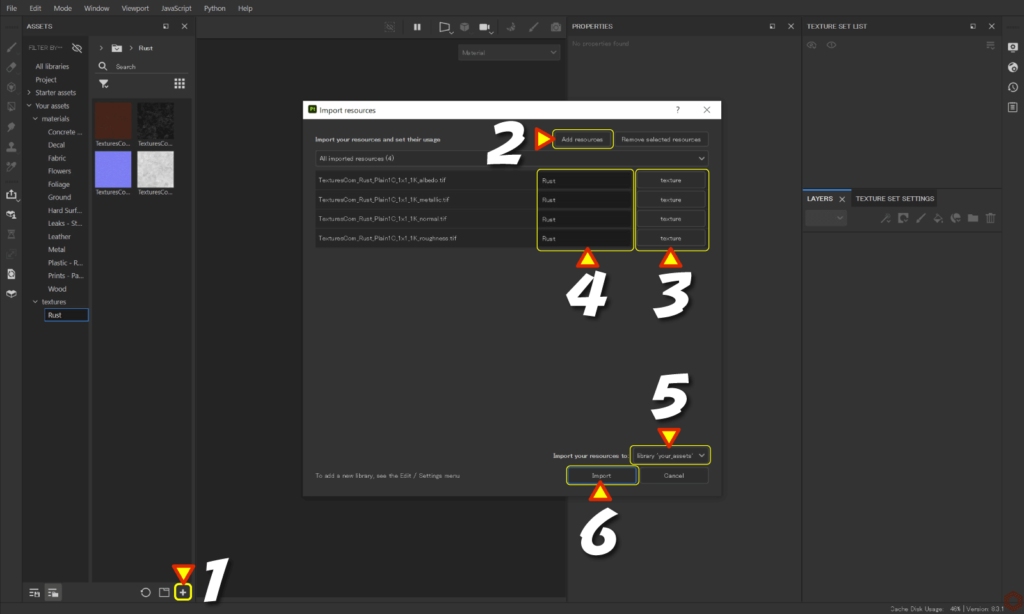
- インポートするには File -> Import resources を選択します。
又は、[ Assets ] ウィンドウの [ + ]ボタンをクリックします。![]()
- [ Add resources ] ボタン をクリックして、インポートするテクスチャ素材を選択します。
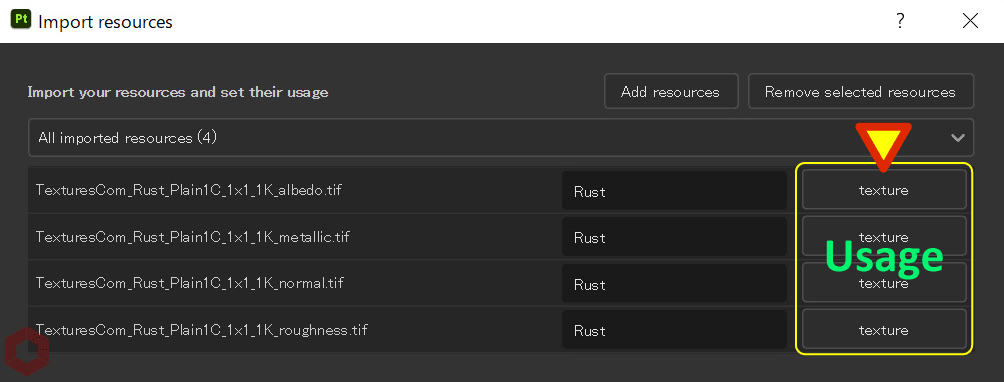
- [ Usage ] を設定します。
![]()
インポートする素材の用途にあわせて項目を選択します。
ここでは、テクスチャ素材のため [ texture ] を選択します。
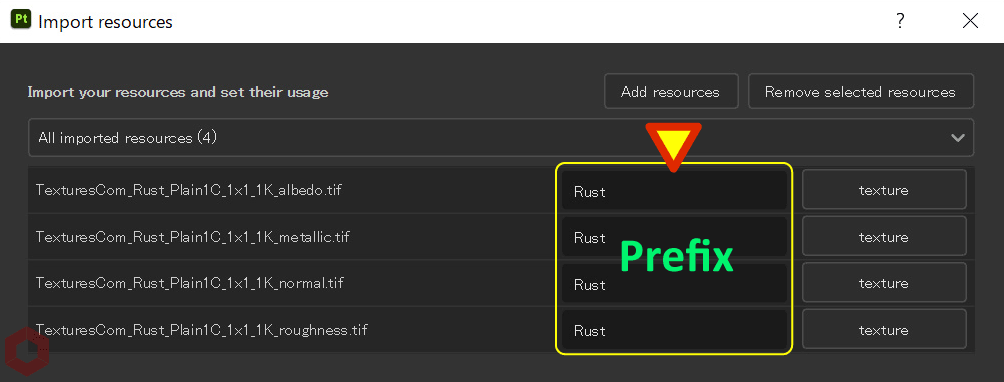
複数リソースがある場合は、全部選択した状態にしてから変更するとすべて変更されます。 - [ Prefix ] を設定します。
![]()
ここで指定した名前が、インポート先のフォルダー名になります。 - [ Import your resources to ] を設定します。
![]()
・ current session
一時的にインポートされます。
アプリケーションを再起動するとリソースはなくなります。
・ project
作業中のファイル(プロジェクト)にだけインポートされます。
他のファイルではこのリソースは使えません。
・ library 'your assets'
ライブラリーにインポートされます。
インポート後はいつでもリソースを使用することができます。 - [ Import ] ボタンをクリックします。
インポートすると Assets ウィンドウの Your assets のなかに Prefix で設定した名前のフォルダーにインポートされます。
まとめ
マテリアルとテクスチャのインポート方法について確認いたしました。
リソースの再読み込みや、削除、インポート先のフォルダー場所を確認したい場合は、リソースを選択した状態から右クリックすると項目を選択できます。
次のページでは、インポートしたマテリアルの設定方法について確認します!
次のページへ Let’s go!
こちらのページでは、インポートしたテクスチャの設定方法について確認します!
このページへ Let's go!


![[ Substance 3D Painter ] レンダリングの設定項目](https://www.plamophy.com/wp-content/uploads/substance3dpainter-ec-rendering-01.jpg)
![[ Substance 3D Painter ] Hard Surface 素材を使用してノーマルにペイントする方法](https://www.plamophy.com/wp-content/uploads/substance3dpainter-ec-painting-brush-normal-01.jpg)
![[ Substance 3D Painter ] シンメトリーを使用したペイント方法](https://www.plamophy.com/wp-content/uploads/substance3dpainter-ec-painting-brush-symmetry-01.jpg)
![[ Youtube ] おすすめの一覧です](https://www.plamophy.com/wp-content/uploads/youtube-recommended-list.jpg)
![[ Zbrush ] データの保存とロード方法について](https://www.plamophy.com/wp-content/uploads/ZBrush_data_storage_format_01.jpg)
![[ Substance 3D Painter ] ペイントブラシの設定方法](https://www.plamophy.com/wp-content/uploads/substance3dpainter-ec-painting-brush-setting-01.jpg)
![[ Zbrush ] UIをカスタムする方法について](https://www.plamophy.com/wp-content/uploads/ZBrush_ui-customization_01.jpg)


![[ Substance 3D Painter ] ハイトマップの追加と調整方法](https://www.plamophy.com/wp-content/uploads/substance3dpainter-ec-painting-height-map-01-300x125.png)
![[ Substance 3D Painter ] インポートしたマテリアルの設定方法](https://www.plamophy.com/wp-content/uploads/substance3dpainter-ec-painting-decal-import-01-300x125.jpg)
![[ Substance 3D Designer 入門 ] Substance 3D Painter に出力するまでの基本的な手順について](https://www.plamophy.com/wp-content/uploads/substance3ddesigner-ec-camouflage-01.jpg)
![[ Unreal Engine 5.3.1 ] Procedural Content Generation (PCG) の使用方法について](https://www.plamophy.com/wp-content/uploads/unrealengine-ec-pcg-01.png)
![[ Substance 3D Painter ] サフィックスを利用したベイク方法](https://www.plamophy.com/wp-content/uploads/substance3dpainter-ec-baking-mode-suffix-01-150x150.jpg)
![[ Substance 3D Painter ] Hard surface 素材を使用したノーマルに AO(陰影)をつける方法](https://www.plamophy.com/wp-content/uploads/substance3dpainter-ec-painting-filter-ao-01-150x150.png)
![[ Substance 3D Painter ] インポートしたテクスチャの設定方法](https://www.plamophy.com/wp-content/uploads/substance3dpainter-ec-painting-filllayer-texture-01-150x150.jpg)
![[ Substance 3D Painter ] 塗りつぶしレイヤーの作成方法](https://www.plamophy.com/wp-content/uploads/substance3dpainter-ec-painting-filllayer-02-150x150.jpg)
![[ Substance 3D Painter ] マテリアル、テクスチャのインポート方法](https://www.plamophy.com/wp-content/uploads/substance3dpainter-ec-resource-import-01-300x125.jpg)
![[ Substance 3D Painter ] ベイクの手順と共通設定](https://www.plamophy.com/wp-content/uploads/substance3dpainter-ec-baking-mode-01-300x125.png)
![[ Substance 3D Painter ] テクスチャエクスポートの設定方法](https://www.plamophy.com/wp-content/uploads/substance3dpainter-ec-export-textures-01-300x125.jpg)
![[ Substance 3D Painter ] 半透明マテリアルのシェーダー設定方法](https://www.plamophy.com/wp-content/uploads/substance3dpainter-ec-shader-settings-alpha-blending-01-300x125.png)
![[ Substance 3D Painter ] ペイントブラシの設定方法](https://www.plamophy.com/wp-content/uploads/substance3dpainter-ec-painting-brush-setting-01-300x125.jpg)
![[ Substance 3D Painter ] シンメトリーを使用したペイント方法](https://www.plamophy.com/wp-content/uploads/substance3dpainter-ec-painting-brush-symmetry-01-300x125.jpg)
![[ Substance 3D Painter ] ポリゴン塗りつぶしツールを使用したマスキング方法](https://www.plamophy.com/wp-content/uploads/substance3dpainter-ec-masking-polygon-fill-01-300x125.jpg)
![[ Substance 3D Painter ] 色相の変更とグラデーションの作成方法](https://www.plamophy.com/wp-content/uploads/substance3dpainter-ec-painting-color-variations-01-300x125.jpg)
![[ Substance 3D Painter ] レンダリングの設定項目](https://www.plamophy.com/wp-content/uploads/substance3dpainter-ec-rendering-01-300x125.jpg)
![[ Substance 3D Painter ] 環境マップの設定と明るさの調整方法](https://www.plamophy.com/wp-content/uploads/substance3dpainter-ec-display-settings-01-300x125.jpg)
![[ Zbrush ] データの保存とロード方法について](https://www.plamophy.com/wp-content/uploads/ZBrush_data_storage_format_01-300x169.jpg)
![[ Zbrush ] UIをカスタムする方法について](https://www.plamophy.com/wp-content/uploads/ZBrush_ui-customization_01-300x169.jpg)
![[ Zbrush ] 起動時に LihgtBox を非表示にする設定方法](https://www.plamophy.com/wp-content/uploads/ZBrush_lightbbox_01-300x169.jpg)
![[ Zbrush ] スカルプトするまでの手順](https://www.plamophy.com/wp-content/uploads/ZBrush_3d-edit-mode_03-300x169.jpg)
![[ Zbrush ] ドキュメントサイズの設定方法](https://www.plamophy.com/wp-content/uploads/ZBrush_document-size_10-300x169.jpg)
