![[ Substance 3D Painter ] Hard Surface 素材を使用してノーマルにペイントする方法](https://www.plamophy.com/wp-content/uploads/substance3dpainter-ec-painting-brush-normal-01.jpg)
![[ Zbrush ] UIをカスタムする方法について](https://www.plamophy.com/wp-content/uploads/ZBrush_ui-customization_01.jpg)
![[ Substance 3D Designer 入門 ] Substance 3D Painter に出力するまでの基本的な手順について](https://www.plamophy.com/wp-content/uploads/substance3ddesigner-ec-camouflage-01.jpg)
![[ Substance 3D Painter ] 半透明マテリアルのシェーダー設定方法](https://www.plamophy.com/wp-content/uploads/substance3dpainter-ec-shader-settings-alpha-blending-01.png)
![[ Zbrush ] データの保存とロード方法について](https://www.plamophy.com/wp-content/uploads/ZBrush_data_storage_format_01.jpg)
![[ Substance 3D Painter ] シンメトリーを使用したペイント方法](https://www.plamophy.com/wp-content/uploads/substance3dpainter-ec-painting-brush-symmetry-01.jpg)
![[ Unreal Engine 5.3.1 ] Procedural Content Generation (PCG) の使用方法について](https://www.plamophy.com/wp-content/uploads/unrealengine-ec-pcg-01.png)
![[ Substance 3D Painter ] インポートしたマテリアルの設定方法](https://www.plamophy.com/wp-content/uploads/substance3dpainter-ec-painting-decal-import-01.jpg)
インポートしたマテリアルの設定方法は、ビューポート上で直接メッシュにドラッグアンドドロップする方法、または ID Map をベイクしている場合は Ctrl キーを押しながらドラッグアンドドロップして割り当てる方法があります。その他に、デカール素材のマテリアルの場合、Alt キーを押しながらドラッグアンドドロップして割り当てる方法があります。
本記事では、インポートしたデカール素材のマテリアルを Alt キーを使用した設定方法について確認したいと思います。
インポート方法については、詳しくはこちらのページをご参照ください。
インポートしたデカール素材の設定方法
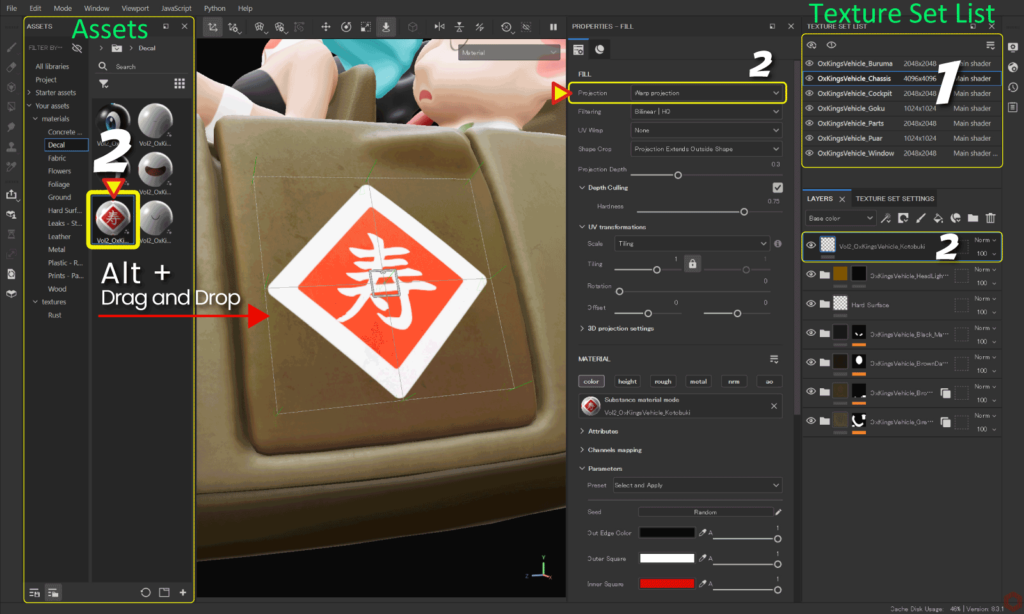
- [ Texture Set List ] から、編集するテクスチャセットを選択します。
- インポートしたデカール素材を [ Alt ] キーを押しながらメッシュに直接ドラッグアンドドロップします。
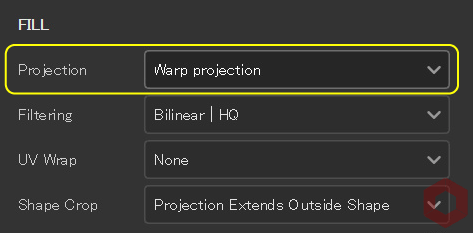
[ Alt ] キーを押しながら追加することで、投影方法が自動的に Wrap projection の状態になります。![]()
また、[ Layers ] ウィンドウにレイヤーが自動的に作成されます。 - ビューポート上で位置、角度、スケールの調整とパラメータの調整を行います。
マニピュレータについて
マニピュレータの表示、非表示の切り替えや、移動、回転、拡大はビューポート上部のアイコンから行います。![]()
マニピュレータでの位置、角度、スケールの値は [ 3D projection settings ] に反映されます。![]()
Warp projectionについて
Warp projection は、メッシュに沿って適合してくれる投影方法です。また、テクスチャを歪めて形状を調整することができます。詳しくはこちらのページをご参照ください。
Substance 3D ドキュメンテーション
まとめ
Alt キーを使用したデカール素材のマテリアルの設定方法について確認いたしました。
Alt キーを使用することで、投影方法が自動的に Wrap projection の状態になり、その後の調整を楽にすることができます!
次のページでは、インポートしたテクスチャの設定方法について確認します!
次のページへ Let's go!
![[ Substance 3D Painter ] マテリアル、テクスチャのインポート方法](https://www.plamophy.com/wp-content/uploads/substance3dpainter-ec-resource-import-01-300x125.jpg)
![[ Substance 3D Painter ] インポートしたテクスチャの設定方法](https://www.plamophy.com/wp-content/uploads/substance3dpainter-ec-painting-filllayer-texture-01-300x125.jpg)
![[ Substance 3D Painter ] ペイントブラシの設定方法](https://www.plamophy.com/wp-content/uploads/substance3dpainter-ec-painting-brush-setting-01.jpg)
![[ Substance 3D Painter ] ジオメトリマスクを使用したマスキング方法](https://www.plamophy.com/wp-content/uploads/substance3dpainter-ec-masking-geometry-mask-01-150x150.png)
![[ Zbrush ] 起動時に LihgtBox を非表示にする設定方法](https://www.plamophy.com/wp-content/uploads/ZBrush_lightbbox_01-150x150.jpg)
![[ Substance 3D Painter ] 新規作成とノーマルに関する設定項目](https://www.plamophy.com/wp-content/uploads/substance3dpainter-ec-newproject-creation-01-150x150.jpg)
![[ Substance 3D Painter ] 環境マップの設定と明るさの調整方法](https://www.plamophy.com/wp-content/uploads/substance3dpainter-ec-display-settings-01-150x150.jpg)
![[ Substance 3D Painter ] ベイクの手順と共通設定](https://www.plamophy.com/wp-content/uploads/substance3dpainter-ec-baking-mode-01-300x125.png)
![[ Substance 3D Painter ] テクスチャエクスポートの設定方法](https://www.plamophy.com/wp-content/uploads/substance3dpainter-ec-export-textures-01-300x125.jpg)
![[ Substance 3D Painter ] 半透明マテリアルのシェーダー設定方法](https://www.plamophy.com/wp-content/uploads/substance3dpainter-ec-shader-settings-alpha-blending-01-300x125.png)
![[ Substance 3D Painter ] ペイントブラシの設定方法](https://www.plamophy.com/wp-content/uploads/substance3dpainter-ec-painting-brush-setting-01-300x125.jpg)
![[ Substance 3D Painter ] シンメトリーを使用したペイント方法](https://www.plamophy.com/wp-content/uploads/substance3dpainter-ec-painting-brush-symmetry-01-300x125.jpg)
![[ Substance 3D Painter ] ポリゴン塗りつぶしツールを使用したマスキング方法](https://www.plamophy.com/wp-content/uploads/substance3dpainter-ec-masking-polygon-fill-01-300x125.jpg)
![[ Substance 3D Painter ] 色相の変更とグラデーションの作成方法](https://www.plamophy.com/wp-content/uploads/substance3dpainter-ec-painting-color-variations-01-300x125.jpg)
![[ Substance 3D Painter ] 環境マップの設定と明るさの調整方法](https://www.plamophy.com/wp-content/uploads/substance3dpainter-ec-display-settings-01-300x125.jpg)
![[ Substance 3D Painter ] レンダリングの設定項目](https://www.plamophy.com/wp-content/uploads/substance3dpainter-ec-rendering-01-300x125.jpg)
![[ Zbrush ] データの保存とロード方法について](https://www.plamophy.com/wp-content/uploads/ZBrush_data_storage_format_01-300x169.jpg)
![[ Zbrush ] UIをカスタムする方法について](https://www.plamophy.com/wp-content/uploads/ZBrush_ui-customization_01-300x169.jpg)
![[ Zbrush ] 起動時に LihgtBox を非表示にする設定方法](https://www.plamophy.com/wp-content/uploads/ZBrush_lightbbox_01-300x169.jpg)
![[ Zbrush ] スカルプトするまでの手順](https://www.plamophy.com/wp-content/uploads/ZBrush_3d-edit-mode_03-300x169.jpg)
![[ Zbrush ] ドキュメントサイズの設定方法](https://www.plamophy.com/wp-content/uploads/ZBrush_document-size_10-300x169.jpg)