![[ Substance 3D Painter ] レンダリングの設定項目](https://www.plamophy.com/wp-content/uploads/substance3dpainter-ec-rendering-01.jpg)
![[ Substance 3D Painter ] 半透明マテリアルのシェーダー設定方法](https://www.plamophy.com/wp-content/uploads/substance3dpainter-ec-shader-settings-alpha-blending-01.png)
![[ Substance 3D Painter ] ペイントブラシの設定方法](https://www.plamophy.com/wp-content/uploads/substance3dpainter-ec-painting-brush-setting-01.jpg)
![[ Substance 3D Designer 入門 ] Substance 3D Painter に出力するまでの基本的な手順について](https://www.plamophy.com/wp-content/uploads/substance3ddesigner-ec-camouflage-01.jpg)
![[ Substance 3D Painter ] Hard Surface 素材を使用してノーマルにペイントする方法](https://www.plamophy.com/wp-content/uploads/substance3dpainter-ec-painting-brush-normal-01.jpg)
![[ Substance 3D Painter ] シンメトリーを使用したペイント方法](https://www.plamophy.com/wp-content/uploads/substance3dpainter-ec-painting-brush-symmetry-01.jpg)
![[ Youtube ] おすすめの一覧です](https://www.plamophy.com/wp-content/uploads/youtube-recommended-list.jpg)
![[ Zbrush ] データの保存とロード方法について](https://www.plamophy.com/wp-content/uploads/ZBrush_data_storage_format_01.jpg)
![[ Substance 3D Painter ] デカール(シール)の作成方法](https://www.plamophy.com/wp-content/uploads/substance3dpainter-ec-painting-decal-01.jpg)
Assets の素材を使用して文字や記号などデカールを作成することができます。またブレンドモードの Light Max を使用することで、複数のデカール素材を重ねることができます。
本記事では、以下のデカール(シール)の作成方法について確認したいと思います。
・デカール(シール)の作成方法
・デカール(シール)のブレンド方法
デカール(シール)の作成方法
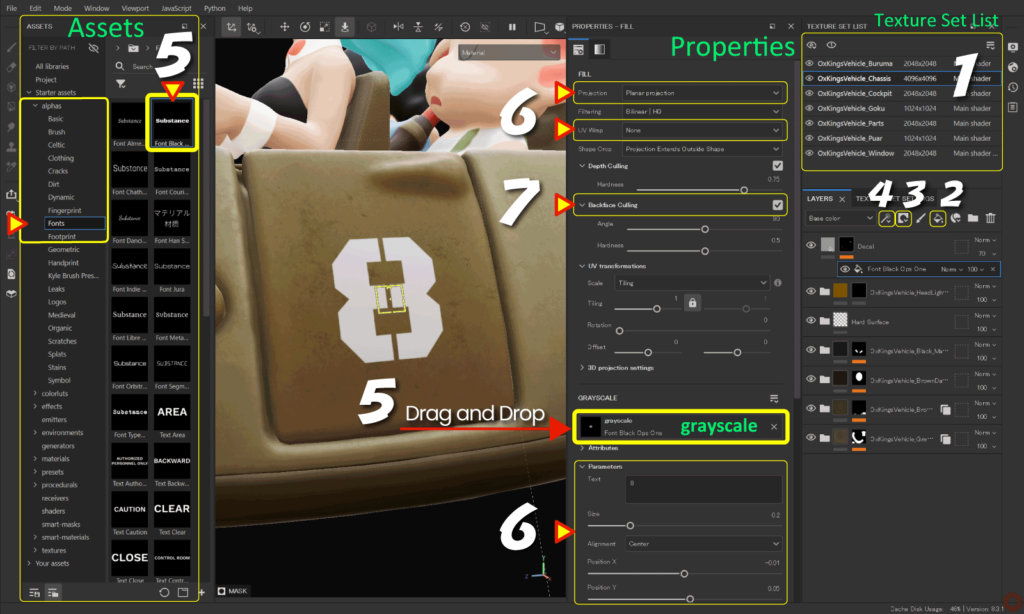
- [ Texture Set List ] から、編集するテクスチャセットを選択します。
- [ Add Fill layer ] のアイコンをクリックして塗りつぶしレイヤーを追加します。
![]()
![]()
デカールのベースとなる色、質感などを設定します。
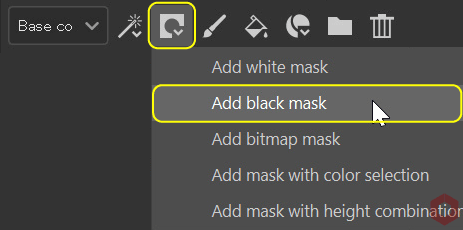
塗りつぶしレイヤーについては、詳しくはこちらのページをご参照ください。 - [ Add mask ] のアイコンをクリックして [ Add black mask ] を選択します。
![]()
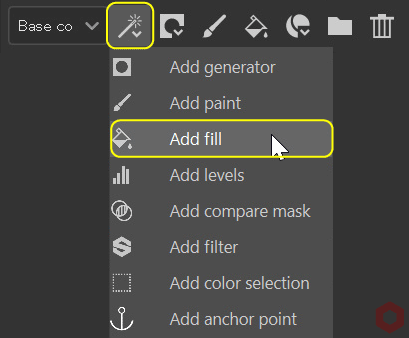
- [ Add effect ] のアイコンをクリックして [ Add fill ] を選択します。
![]()
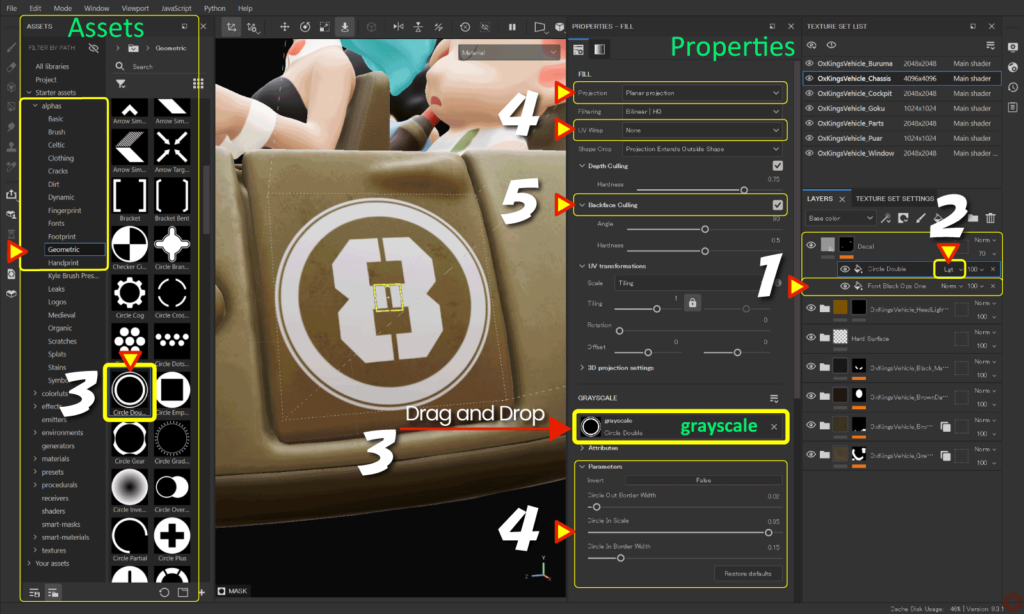
- [ Assets ] から [ alphas > Fonts ] を選択して、任意のフォントを [ grayscale ] にドラッグアンドドロップします。
![]()
例:ここでは [ Font Black Ops One ] を使用してます。
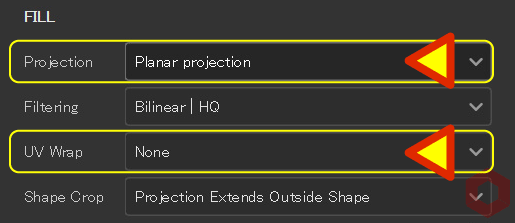
[ Font Black Ops One ] はテキストの内容を変更できます。 - パラメータの調整、テクスチャ投影方法の変更、位置の調整、またリピートなど調整します。
例:ここでは投影方法を Planar projection に、リピートの設定 None にしてます。![]()
Planar projection に変更すると、マニピュレータ が表示され、画面上部に [ Surface tool ] が表示されるようになります。[ Surface tool ] を使用すると、メッシュの表面に沿って調整を行うことができます。![]()
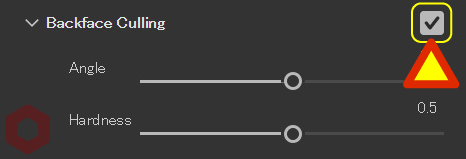
- 裏側のメッシュにデカールが表示されている場合は、[ Backface Culling ] を有効にします。
![]()
マニピュレータについて
マニピュレータの表示、非表示の切り替えや、移動、回転、拡大はビューポート上部のアイコンから行います。![]()
マニピュレータでの位置、角度、スケールの値は [ 3D projection settings ] に反映されます。![]()
デカール(シール)のブレンド方法
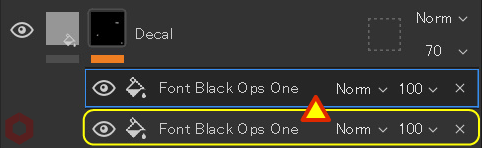
- 作成したデカールの塗りつぶしを選択した状態から、Ctrl + [ D ] キーで複製します。
![]()
- ブレンドモードを [ Lighten Max ] に変更します。
![]()
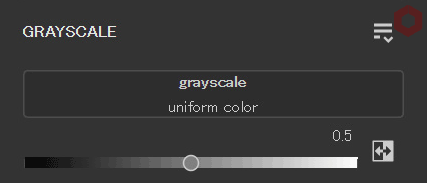
- [ Assets ] から [ alphas > Geometric ] を選択して、任意の素材を [ grayscale ] にドラッグアンドドロップします。
![]()
例:ここでは [ Circle Double ] を使用してます。 - パラメータの調整、テクスチャ投影方法の変更、位置の調整、またリピートなど調整します。
例:ここでは投影方法を Planar projection に、リピートの設定 None にしてます。![]()
- 裏側のメッシュにデカールが表示されている場合は、[ Backface Culling ] を有効にします。
![]()
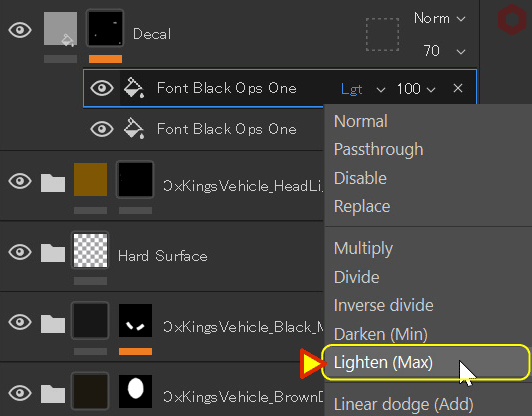
ブレンドモードを [ Lighten Max ] に変更することで、重なった状態でも下層レイヤーのデカールが見えるようになります。
まとめ
Assets の素材を使用してデカール(シール)の作成方法について確認いたしました。
作成したデカールにさらにグランジ素材を重ねてブレンドすると、かすれた表現などを追加することができます。
グランジ素材のブレンド方法については、詳しくはこちらのページをご参照ください。
次のページでは、Alpha 素材を使用してハイトマップの追加と調整方法について確認します!
次のページへ Let’s go!
![[ Substance 3D Painter ] 半透明マテリアルのシェーダー設定方法](https://www.plamophy.com/wp-content/uploads/substance3dpainter-ec-shader-settings-alpha-blending-01-300x125.png)
![[ Substance 3D Painter ] ハイトマップの追加と調整方法](https://www.plamophy.com/wp-content/uploads/substance3dpainter-ec-painting-height-map-01-300x125.png)
![[ Zbrush ] UIをカスタムする方法について](https://www.plamophy.com/wp-content/uploads/ZBrush_ui-customization_01.jpg)

![[ Substance 3D Painter ] サフィックスを利用したベイク方法](https://www.plamophy.com/wp-content/uploads/substance3dpainter-ec-baking-mode-suffix-01-150x150.jpg)
![[ Substance 3D Painter ] 新規作成とノーマルに関する設定項目](https://www.plamophy.com/wp-content/uploads/substance3dpainter-ec-newproject-creation-01-150x150.jpg)
![[ Substance 3D Painter ] ジェネレータ Dirt の作成方法](https://www.plamophy.com/wp-content/uploads/substance3dpainter-ec-painting-dirt-01-150x150.png)
![[ Zbrush ] 起動時に LihgtBox を非表示にする設定方法](https://www.plamophy.com/wp-content/uploads/ZBrush_lightbbox_01-150x150.jpg)
![[ Substance 3D Painter ] マテリアル、テクスチャのインポート方法](https://www.plamophy.com/wp-content/uploads/substance3dpainter-ec-resource-import-01-300x125.jpg)
![[ Substance 3D Painter ] ベイクの手順と共通設定](https://www.plamophy.com/wp-content/uploads/substance3dpainter-ec-baking-mode-01-300x125.png)
![[ Substance 3D Painter ] テクスチャエクスポートの設定方法](https://www.plamophy.com/wp-content/uploads/substance3dpainter-ec-export-textures-01-300x125.jpg)
![[ Substance 3D Painter ] ペイントブラシの設定方法](https://www.plamophy.com/wp-content/uploads/substance3dpainter-ec-painting-brush-setting-01-300x125.jpg)
![[ Substance 3D Painter ] シンメトリーを使用したペイント方法](https://www.plamophy.com/wp-content/uploads/substance3dpainter-ec-painting-brush-symmetry-01-300x125.jpg)
![[ Substance 3D Painter ] ポリゴン塗りつぶしツールを使用したマスキング方法](https://www.plamophy.com/wp-content/uploads/substance3dpainter-ec-masking-polygon-fill-01-300x125.jpg)
![[ Substance 3D Painter ] 色相の変更とグラデーションの作成方法](https://www.plamophy.com/wp-content/uploads/substance3dpainter-ec-painting-color-variations-01-300x125.jpg)
![[ Substance 3D Painter ] レンダリングの設定項目](https://www.plamophy.com/wp-content/uploads/substance3dpainter-ec-rendering-01-300x125.jpg)
![[ Substance 3D Painter ] 環境マップの設定と明るさの調整方法](https://www.plamophy.com/wp-content/uploads/substance3dpainter-ec-display-settings-01-300x125.jpg)
![[ Zbrush ] データの保存とロード方法について](https://www.plamophy.com/wp-content/uploads/ZBrush_data_storage_format_01-300x169.jpg)
![[ Zbrush ] UIをカスタムする方法について](https://www.plamophy.com/wp-content/uploads/ZBrush_ui-customization_01-300x169.jpg)
![[ Zbrush ] 起動時に LihgtBox を非表示にする設定方法](https://www.plamophy.com/wp-content/uploads/ZBrush_lightbbox_01-300x169.jpg)
![[ Zbrush ] スカルプトするまでの手順](https://www.plamophy.com/wp-content/uploads/ZBrush_3d-edit-mode_03-300x169.jpg)
![[ Zbrush ] ドキュメントサイズの設定方法](https://www.plamophy.com/wp-content/uploads/ZBrush_document-size_10-300x169.jpg)