![[ Substance 3D Painter ] レンダリングの設定項目](https://www.plamophy.com/wp-content/uploads/substance3dpainter-ec-rendering-01.jpg)
![[ Substance 3D Painter ] ペイントブラシの設定方法](https://www.plamophy.com/wp-content/uploads/substance3dpainter-ec-painting-brush-setting-01.jpg)
![[ Unreal Engine 5.3.1 ] Procedural Content Generation (PCG) の使用方法について](https://www.plamophy.com/wp-content/uploads/unrealengine-ec-pcg-01.png)
![[ Substance 3D Painter ] Hard Surface 素材を使用してノーマルにペイントする方法](https://www.plamophy.com/wp-content/uploads/substance3dpainter-ec-painting-brush-normal-01.jpg)
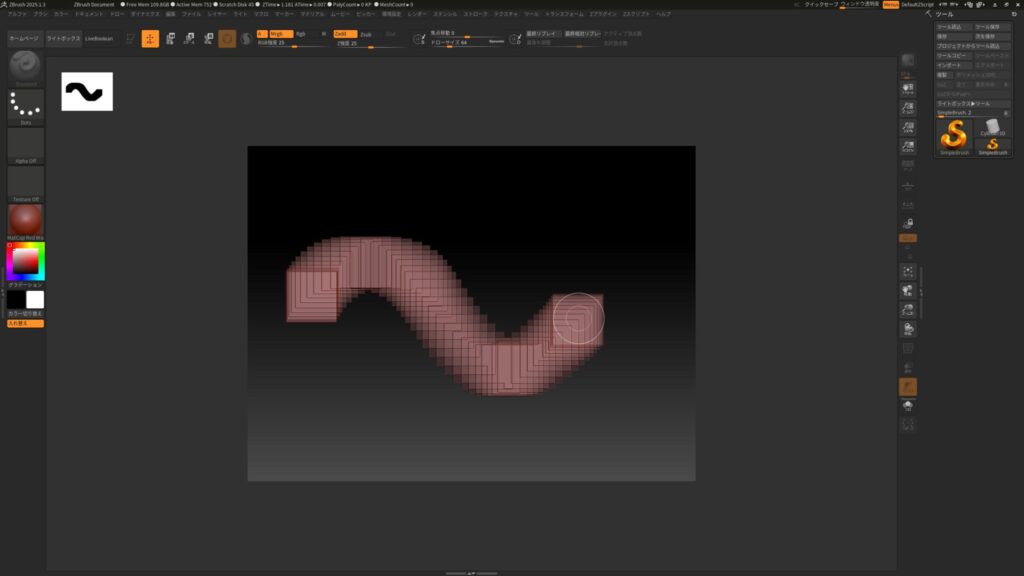
![[ Zbrush ] UIをカスタムする方法について](https://www.plamophy.com/wp-content/uploads/ZBrush_ui-customization_01.jpg)
![[ Youtube ] おすすめの一覧です](https://www.plamophy.com/wp-content/uploads/youtube-recommended-list.jpg)
![[ Substance 3D Painter ] 半透明マテリアルのシェーダー設定方法](https://www.plamophy.com/wp-content/uploads/substance3dpainter-ec-shader-settings-alpha-blending-01.png)
![[ Zbrush ] データの保存とロード方法について](https://www.plamophy.com/wp-content/uploads/ZBrush_data_storage_format_01.jpg)
![[ Substance 3D Painter ] 塗りつぶしレイヤーの作成方法](https://www.plamophy.com/wp-content/uploads/substance3dpainter-ec-painting-filllayer-02.jpg)
ベイクの次は、いよいよテクスチャ作成に本格的に入っていきます!
テクスチャを作成をするには、まず始めに塗りつぶしレイヤーを作成してベースカラー、ラフネス、メタリックなど基本となる質感を作成していきます。
本記事では、以下の2つの塗りつぶしレイヤーの作成方法ついて確認したいと思います。
・塗りつぶしレイヤーの作成方法について
・Assets のマテリアルから追加する方法
塗りつぶしレイヤーの作成方法について
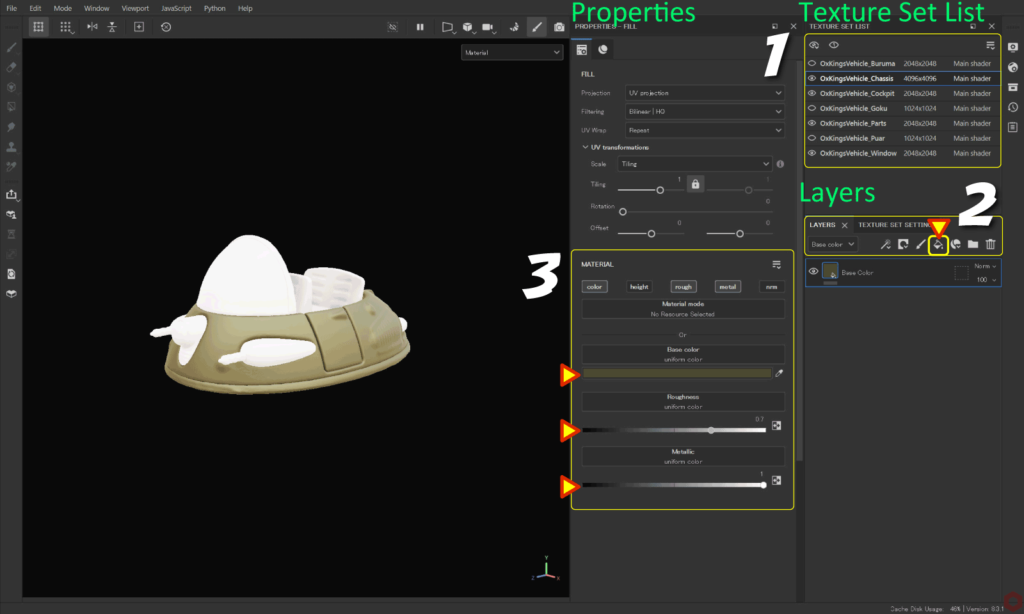
- [ Texture Set List ] から、編集するテクスチャセットを選択します。
- [ Add Fill layer ] のアイコンをクリックして塗りつぶしレイヤーを追加します。
![]()
- [ color ] [ rough ] [ metal ] の 3 つ選択します。
[ Base Color ] をクリックして色を調整します。
[ Roughness ] の数値を調整します。
[ Metallic ] の数値を調整します。
環境マップを明るく調整したい場合は、詳しくはこちらのページをご参照ください。
メタリックの数値について
メタリックの数値は通常 0(非金属) 又は 1(金属) になります。
[ C ] キーでチャンネルを切り替えて状態を確認できます。
[ M ] キーで元の状態に戻ります。
Assets のマテリアルから追加する方法
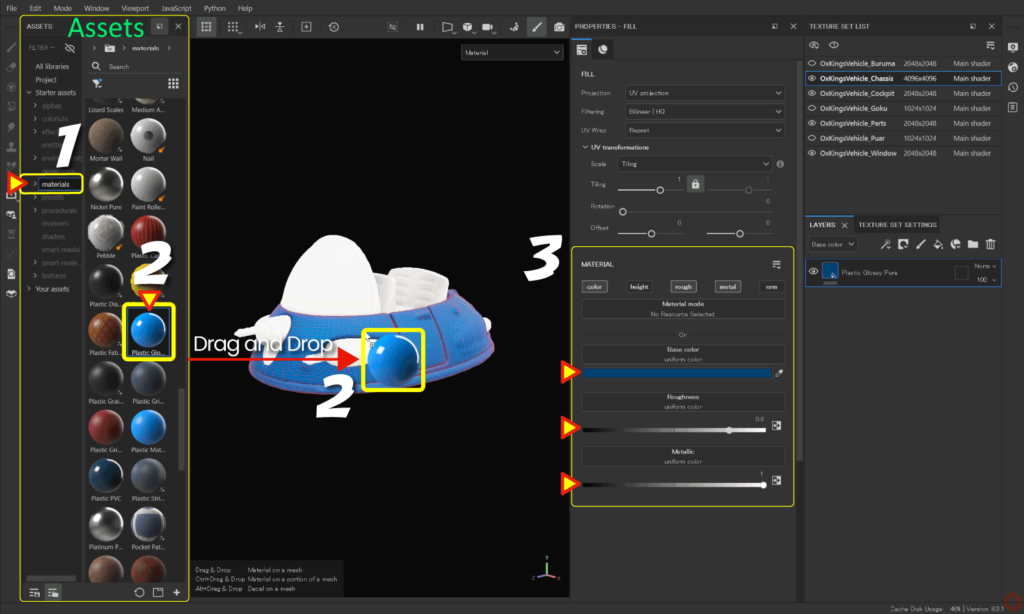
- [ Assets ] から [ materials ] を選択します。
- 任意のマテリアルを編集するメッシュに直接ドラッグアンドドロップします。
- ベースカラーなどを調整します。
ビューポートに直接ドラッグアンドドロップする方法のほかに、[ Layers ] ウィンドウにドラッグアンドドロップすることもできます。
まとめ
塗りつぶしレイヤーの作成方法について確認いたしました。
ベースとなる色や質感を作成したあとは、そのテクスチャを使用する環境で、意図した色や質感になっているか確認してみましょう。Substance 3D Painter 上での見た目と、開発環境下の実際のライティングでの見た目とを確認しつつ、テクスチャの作成を進めていきます。
テクスチャの出力方法については、詳しくはこちらのページをご参照ください。
環境マップの明るさの調整が必要な場合は、詳しくはこちらのページをご参照ください。
次のページでは、金属質感のフィルターの追加方法について確認します!
次のページへ Let’s go!
![[ Substance 3D Painter ] ID Map のベイク方法](https://www.plamophy.com/wp-content/uploads/substance3dpainter-ec-baking-id-map-01-300x125.png)
![[ Substance 3D Painter ] 金属質感のフィルターの追加方法](https://www.plamophy.com/wp-content/uploads/substance3dpainter-ec-painting-filter-01-300x125.jpg)
![[ Substance 3D Designer 入門 ] Substance 3D Painter に出力するまでの基本的な手順について](https://www.plamophy.com/wp-content/uploads/substance3ddesigner-ec-camouflage-01.jpg)

![[ Substance 3D Painter ] シンメトリーを使用したペイント方法](https://www.plamophy.com/wp-content/uploads/substance3dpainter-ec-painting-brush-symmetry-01.jpg)
![[ Substance 3D Painter ] テクスチャエクスポートの設定方法](https://www.plamophy.com/wp-content/uploads/substance3dpainter-ec-export-textures-01-150x150.jpg)
![[ Substance 3D Painter ] テクスチャセットごとに解像度、Cage を変更したベイク方法](https://www.plamophy.com/wp-content/uploads/substance3dpainter-ec-baking-mode-syncparameters-01-150x150.jpg)
![[ Substance 3D Painter ] ID Map を使用したマスキング方法](https://www.plamophy.com/wp-content/uploads/substance3dpainter-ec-masking-id-map-01-150x150.png)
![[ Substance 3D Painter ] マテリアル、テクスチャのインポート方法](https://www.plamophy.com/wp-content/uploads/substance3dpainter-ec-resource-import-01-300x125.jpg)
![[ Substance 3D Painter ] ベイクの手順と共通設定](https://www.plamophy.com/wp-content/uploads/substance3dpainter-ec-baking-mode-01-300x125.png)
![[ Substance 3D Painter ] テクスチャエクスポートの設定方法](https://www.plamophy.com/wp-content/uploads/substance3dpainter-ec-export-textures-01-300x125.jpg)
![[ Substance 3D Painter ] 半透明マテリアルのシェーダー設定方法](https://www.plamophy.com/wp-content/uploads/substance3dpainter-ec-shader-settings-alpha-blending-01-300x125.png)
![[ Substance 3D Painter ] ペイントブラシの設定方法](https://www.plamophy.com/wp-content/uploads/substance3dpainter-ec-painting-brush-setting-01-300x125.jpg)
![[ Substance 3D Painter ] シンメトリーを使用したペイント方法](https://www.plamophy.com/wp-content/uploads/substance3dpainter-ec-painting-brush-symmetry-01-300x125.jpg)
![[ Substance 3D Painter ] ポリゴン塗りつぶしツールを使用したマスキング方法](https://www.plamophy.com/wp-content/uploads/substance3dpainter-ec-masking-polygon-fill-01-300x125.jpg)
![[ Substance 3D Painter ] 色相の変更とグラデーションの作成方法](https://www.plamophy.com/wp-content/uploads/substance3dpainter-ec-painting-color-variations-01-300x125.jpg)
![[ Substance 3D Painter ] 環境マップの設定と明るさの調整方法](https://www.plamophy.com/wp-content/uploads/substance3dpainter-ec-display-settings-01-300x125.jpg)
![[ Substance 3D Painter ] レンダリングの設定項目](https://www.plamophy.com/wp-content/uploads/substance3dpainter-ec-rendering-01-300x125.jpg)
![[ Zbrush ] データの保存とロード方法について](https://www.plamophy.com/wp-content/uploads/ZBrush_data_storage_format_01-300x169.jpg)
![[ Zbrush ] UIをカスタムする方法について](https://www.plamophy.com/wp-content/uploads/ZBrush_ui-customization_01-300x169.jpg)
![[ Zbrush ] 起動時に LihgtBox を非表示にする設定方法](https://www.plamophy.com/wp-content/uploads/ZBrush_lightbbox_01-300x169.jpg)
![[ Zbrush ] スカルプトするまでの手順](https://www.plamophy.com/wp-content/uploads/ZBrush_3d-edit-mode_03-300x169.jpg)
![[ Zbrush ] ドキュメントサイズの設定方法](https://www.plamophy.com/wp-content/uploads/ZBrush_document-size_10-300x169.jpg)