![[ Substance 3D Painter ] シンメトリーを使用したペイント方法](https://www.plamophy.com/wp-content/uploads/substance3dpainter-ec-painting-brush-symmetry-01.jpg)
![[ Unreal Engine 5.3.1 ] Procedural Content Generation (PCG) の使用方法について](https://www.plamophy.com/wp-content/uploads/unrealengine-ec-pcg-01.png)
![[ Substance 3D Painter ] Hard Surface 素材を使用してノーマルにペイントする方法](https://www.plamophy.com/wp-content/uploads/substance3dpainter-ec-painting-brush-normal-01.jpg)
![[ Zbrush ] UIをカスタムする方法について](https://www.plamophy.com/wp-content/uploads/ZBrush_ui-customization_01.jpg)
![[ Zbrush ] データの保存とロード方法について](https://www.plamophy.com/wp-content/uploads/ZBrush_data_storage_format_01.jpg)

![[ Substance 3D Painter ] ペイントブラシの設定方法](https://www.plamophy.com/wp-content/uploads/substance3dpainter-ec-painting-brush-setting-01.jpg)
![[ Substance 3D Designer 入門 ] Substance 3D Painter に出力するまでの基本的な手順について](https://www.plamophy.com/wp-content/uploads/substance3ddesigner-ec-camouflage-01.jpg)
![[ Substance 3D Painter ] ステンシルを使用したペイント方法](https://www.plamophy.com/wp-content/uploads/substance3dpainter-ec-painting-brush-stencil-01.jpg)
こちらの記事でデカールの作成方法について記載いたしましたが、ステンシルを使用したペイント方法でも同じようにデカールを作成することができます。ステンシルを使用すると、Alpha画像をカメラの視点にあわせてペイントすることができます。
本記事では、このステンシルを使用したペイント方法について確認したいと思います。
ステンシルの使用方法について
- [ Texture Set List ] から、編集するテクスチャセットを選択します。
- [ Add Fill layer ] のアイコンをクリックして塗りつぶしレイヤーを追加します。
![]()
ステンシルのベースとなる色、質感などを設定します。
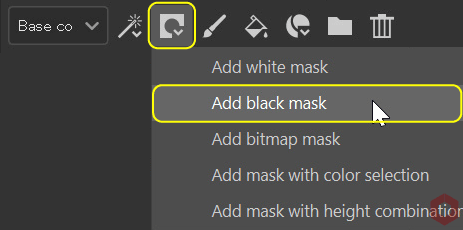
塗りつぶしレイヤーについては、詳しくはこちらのページをご参照ください。 - [ Add mask ] のアイコンをクリックして [ Add black mask ] を選択します。
![]()
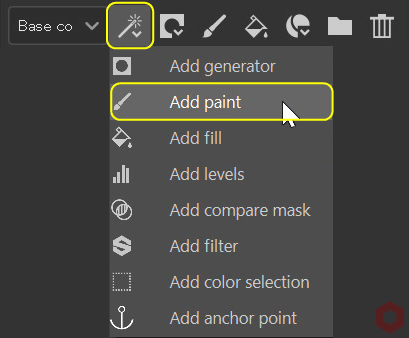
- [ Add effect ] のアイコンをクリックして [ Add paint ] を選択します。
![]()
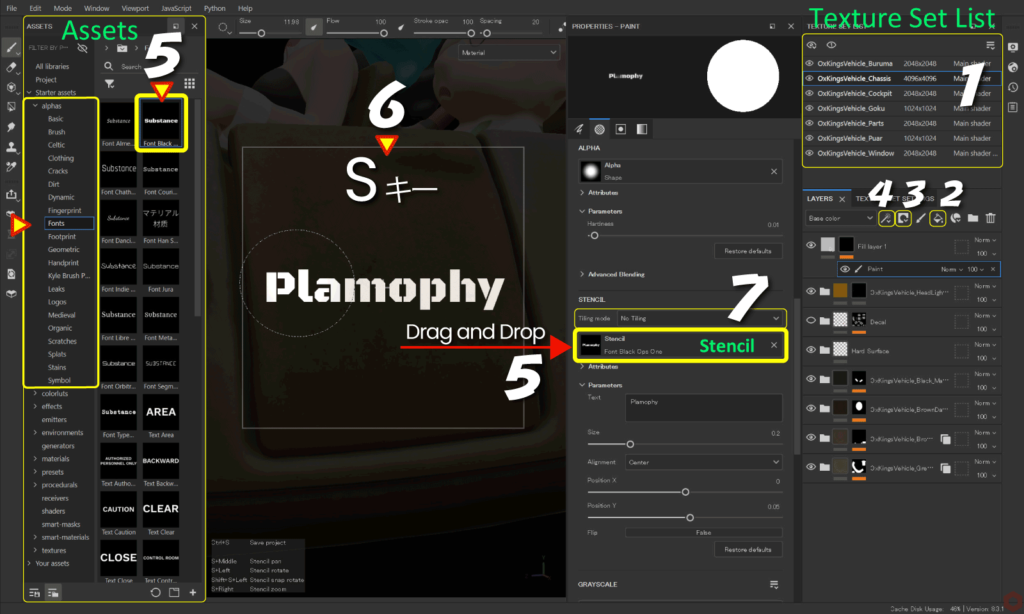
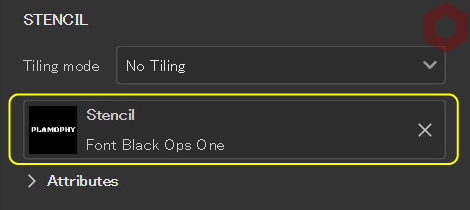
- [ Assets ] から [ alphas > Fonts ] を選択して、任意のフォントを [ Stencil ] にドラッグアンドドロップします。
![]()
例:ここでは [ Font Black Ops One ] を使用してます。
[ Font Black Ops One ] はテキストの内容を変更できます。 - ビューポート上で [ S ] キーを押しながら、以下のマウスのボタンと組み合わせて、プロジェクションの位置、角度、スケールを調整できます。
・位置を変更 [ S ] キー + 中クリック
・スケールを調整 [ S ] キー + 右クリック
・角度を調整 [ S ] キー + 左クリック
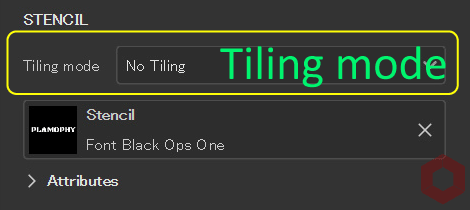
・角度をスナップ [ S ] キー + 左クリック + Shift - タイリングが必要な場合はこちらから設定します。
![]()
- [ Assets ] から [ presets > brushes ] を選択して、任意のブラシを選択します。
ブラシのサイズや不透明度、角度、ぼかし具合などの設定します。
ブラシの選択方法については、こちらのページを、
ブラシの設定方法については、詳しくはこちらのページをご参照ください。
ペイントがおわりましたら、[ Stencil ] ボタンの [ X ] ボタン をクリックしてステンシルを削除します。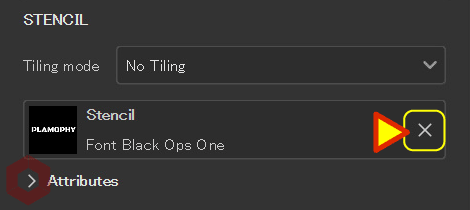
ブラシのショートカット
・サイズを変更 Ctrl + 右クリック + 左右にスライド
・ぼかし具合を調整 Ctrl + 右クリック + 上下にスライド
・不透明度を調整 Ctrl + 左クリック + 左右にスライド
・角度を調整 Ctrl + 左クリック + 上下にスライド
ステンシルの表示設定
ステンシルの表示設定については、画面右側の [ Display Settings ] のアイコンから変更できます。
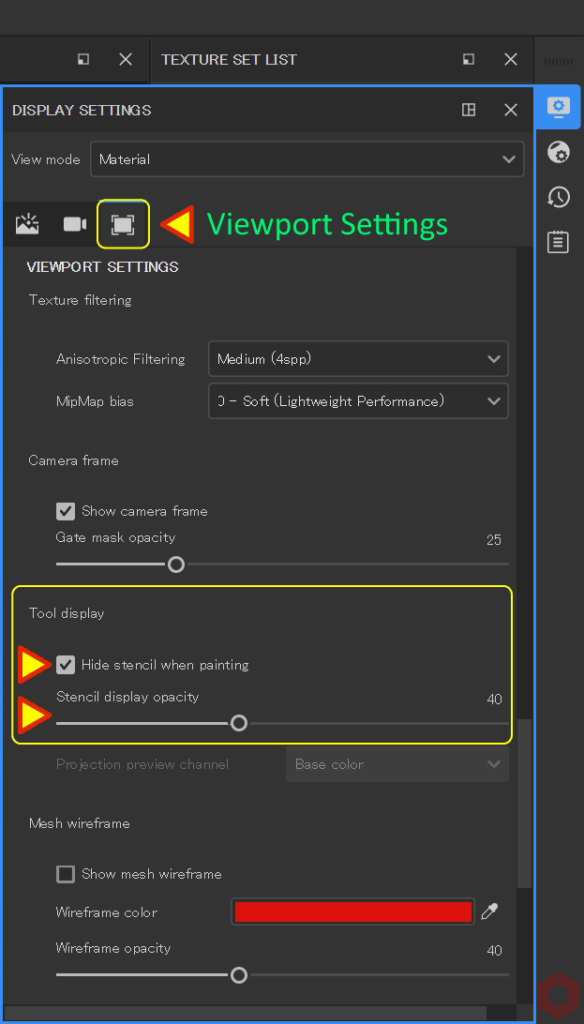
・ Hide stencil when painting
ペイントする時に、ステンシルの表示、非表示を切り替えることができます。
・ Stencil display opacity
ステンシルの不透明度を変更できます。
まとめ
ステンシルを使用したペイント方法と表示設定について確認いたしました。
作成したステンシルにさらにグランジ素材を重ねてブレンドすると、かすれた表現などを追加することができます。
グランジ素材のブレンド方法については、詳しくはこちらのページをご参照ください。
次のページでは、テクスチャエクスポートの設定方法について確認します!
次のページへ Let’s go!
![[ Substance 3D Painter ] プロジェクションツールを使用したペイント方法](https://www.plamophy.com/wp-content/uploads/substance3dpainter-ec-painting-brush-projection-01-300x125.jpg)
![[ Substance 3D Painter ] テクスチャエクスポートの設定方法](https://www.plamophy.com/wp-content/uploads/substance3dpainter-ec-export-textures-01-300x125.jpg)
![[ Substance 3D Painter ] 半透明マテリアルのシェーダー設定方法](https://www.plamophy.com/wp-content/uploads/substance3dpainter-ec-shader-settings-alpha-blending-01.png)
![[ Substance 3D Painter ] レンダリングの設定項目](https://www.plamophy.com/wp-content/uploads/substance3dpainter-ec-rendering-01.jpg)
![[ Substance 3D Painter ] 半透明マテリアルのシェーダー設定方法](https://www.plamophy.com/wp-content/uploads/substance3dpainter-ec-shader-settings-alpha-blending-01-150x150.png)
![[ Substance 3D Painter ] Hard Surface 素材を使用してノーマルにペイントする方法](https://www.plamophy.com/wp-content/uploads/substance3dpainter-ec-painting-brush-normal-01-150x150.jpg)
![[ Substance 3D Painter ] Texture Set List(テクスチャセットリスト) の表示内容について](https://www.plamophy.com/wp-content/uploads/substance3dpainter-ec-texture-set-list-01-150x150.jpg)
![[ Substance 3D Painter ] 塗りつぶしレイヤーの作成方法](https://www.plamophy.com/wp-content/uploads/substance3dpainter-ec-painting-filllayer-02-150x150.jpg)
![[ Substance 3D Painter ] マテリアル、テクスチャのインポート方法](https://www.plamophy.com/wp-content/uploads/substance3dpainter-ec-resource-import-01-300x125.jpg)
![[ Substance 3D Painter ] ベイクの手順と共通設定](https://www.plamophy.com/wp-content/uploads/substance3dpainter-ec-baking-mode-01-300x125.png)
![[ Substance 3D Painter ] 半透明マテリアルのシェーダー設定方法](https://www.plamophy.com/wp-content/uploads/substance3dpainter-ec-shader-settings-alpha-blending-01-300x125.png)
![[ Substance 3D Painter ] ペイントブラシの設定方法](https://www.plamophy.com/wp-content/uploads/substance3dpainter-ec-painting-brush-setting-01-300x125.jpg)
![[ Substance 3D Painter ] シンメトリーを使用したペイント方法](https://www.plamophy.com/wp-content/uploads/substance3dpainter-ec-painting-brush-symmetry-01-300x125.jpg)
![[ Substance 3D Painter ] ポリゴン塗りつぶしツールを使用したマスキング方法](https://www.plamophy.com/wp-content/uploads/substance3dpainter-ec-masking-polygon-fill-01-300x125.jpg)
![[ Substance 3D Painter ] 色相の変更とグラデーションの作成方法](https://www.plamophy.com/wp-content/uploads/substance3dpainter-ec-painting-color-variations-01-300x125.jpg)
![[ Substance 3D Painter ] 環境マップの設定と明るさの調整方法](https://www.plamophy.com/wp-content/uploads/substance3dpainter-ec-display-settings-01-300x125.jpg)
![[ Substance 3D Painter ] レンダリングの設定項目](https://www.plamophy.com/wp-content/uploads/substance3dpainter-ec-rendering-01-300x125.jpg)
![[ Zbrush ] データの保存とロード方法について](https://www.plamophy.com/wp-content/uploads/ZBrush_data_storage_format_01-300x169.jpg)
![[ Zbrush ] UIをカスタムする方法について](https://www.plamophy.com/wp-content/uploads/ZBrush_ui-customization_01-300x169.jpg)
![[ Zbrush ] 起動時に LihgtBox を非表示にする設定方法](https://www.plamophy.com/wp-content/uploads/ZBrush_lightbbox_01-300x169.jpg)
![[ Zbrush ] スカルプトするまでの手順](https://www.plamophy.com/wp-content/uploads/ZBrush_3d-edit-mode_03-300x169.jpg)
![[ Zbrush ] ドキュメントサイズの設定方法](https://www.plamophy.com/wp-content/uploads/ZBrush_document-size_10-300x169.jpg)