![[ Substance 3D Painter ] レンダリングの設定項目](https://www.plamophy.com/wp-content/uploads/substance3dpainter-ec-rendering-01.jpg)
![[ Substance 3D Painter ] ペイントブラシの設定方法](https://www.plamophy.com/wp-content/uploads/substance3dpainter-ec-painting-brush-setting-01.jpg)
![[ Youtube ] おすすめの一覧です](https://www.plamophy.com/wp-content/uploads/youtube-recommended-list.jpg)
![[ Substance 3D Painter ] 半透明マテリアルのシェーダー設定方法](https://www.plamophy.com/wp-content/uploads/substance3dpainter-ec-shader-settings-alpha-blending-01.png)
![[ Substance 3D Designer 入門 ] Substance 3D Painter に出力するまでの基本的な手順について](https://www.plamophy.com/wp-content/uploads/substance3ddesigner-ec-camouflage-01.jpg)
![[ Substance 3D Painter ] Hard Surface 素材を使用してノーマルにペイントする方法](https://www.plamophy.com/wp-content/uploads/substance3dpainter-ec-painting-brush-normal-01.jpg)
![[ Substance 3D Painter ] シンメトリーを使用したペイント方法](https://www.plamophy.com/wp-content/uploads/substance3dpainter-ec-painting-brush-symmetry-01.jpg)
![[ Substance 3D Painter ] グランジ素材を使用してラフネスを調整する方法](https://www.plamophy.com/wp-content/uploads/substance3dpainter-ec-painting-roughness-add-01.jpg)
ベースとなる色や質感を作成した次は、キズや汚れなどの表現をラフネス(またはベースカラー)に追加していきます。キズや汚れなどの素材は Assets のグランジ素材を使用して質感を追加することができます。
本記事では、グランジ素材を2つ使用し、ブレンドさせてラフネスを調整する方法を確認したいと思います。
ラフネスにグランジ素材を追加する方法
まず始めに、塗りつぶしレイヤーを追加します。
- [ Add Fill layer ] のアイコンをクリックして塗りつぶしレイヤーを追加します。
![]()
[ rough ] だけ選択して、[ Roughness ] の数値を調整します。
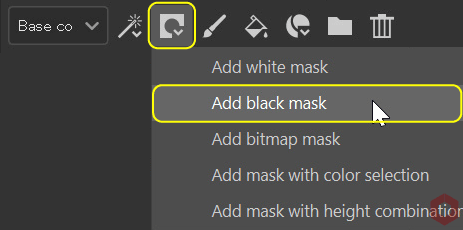
塗りつぶしレイヤーについては、詳しくはこちらのページをご参照ください。 - [ Add mask ] のアイコンをクリックして [ Add black mask ] を選択します。
![]()
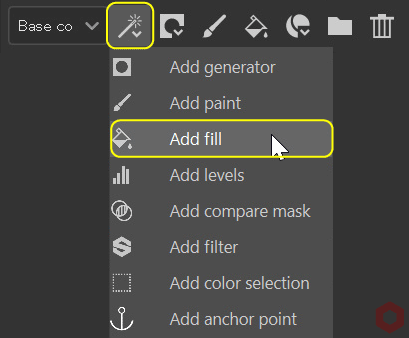
- [ Add effect ] のアイコンをクリックして [ Add fill ] を選択します。
![]()
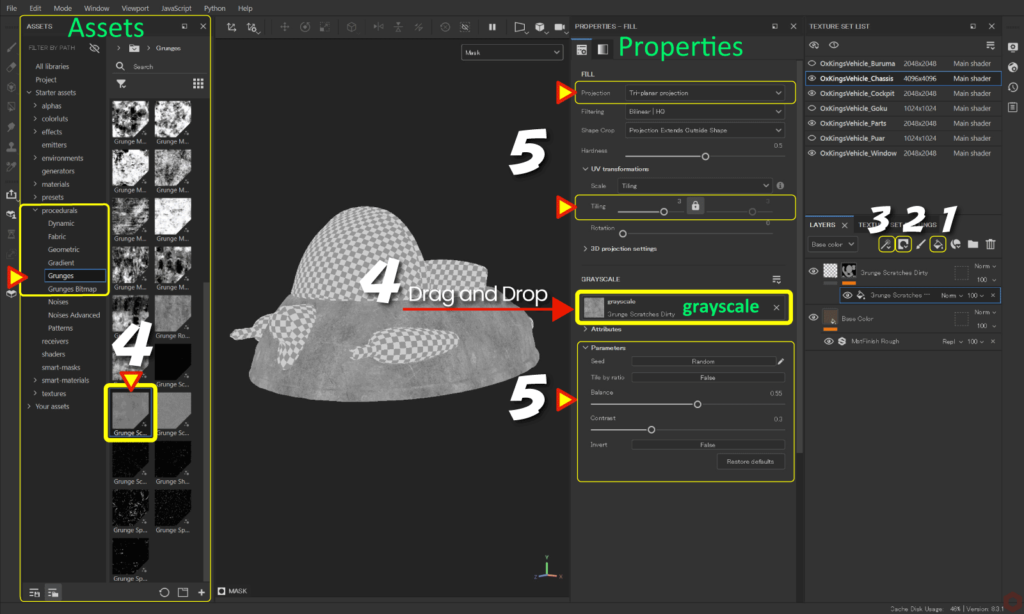
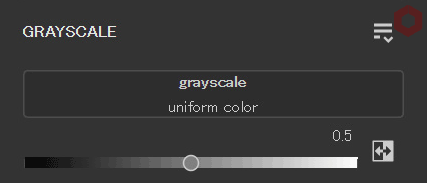
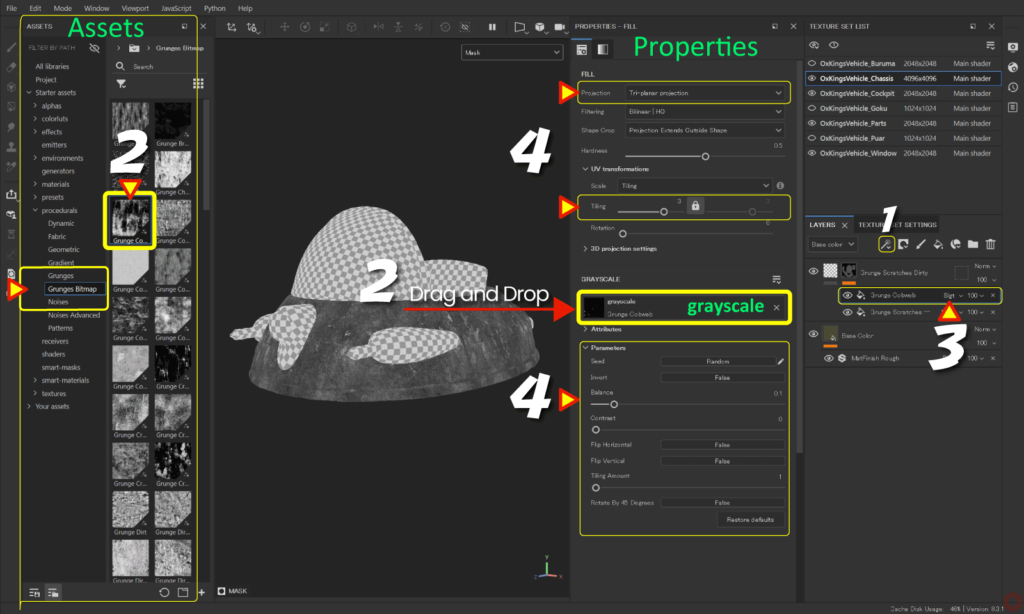
- [ Assets ] から [ procedurals > Grunges ] を選択して、
任意のグランジ素材を [ grayscale ] にドラッグアンドドロップします。![]()
例:ここでは [ Grunge Scratches Dirty ] を使用してます。 - パラメータの調整、テクスチャ投影方法の変更、位置の調整、またタイリングなど調整します。
例:ここでは投影方法を Tri-planar projection にしてます。
Tri-planar projection
3D空間に投影される投影方法です。xyz 軸にまたがって投影されるため、UVの切れ目がなくなり、マニピュレータを使用して位置の調整を自由に行えます。
マニピュレータの表示、非表示の切り替えや、移動、回転、拡大はビューポート上部のアイコンから行います。![]()
マニピュレータでの位置、角度、スケールの値は [ 3D projection settings ] に反映されます。![]()
グランジ素材をブレンドする方法
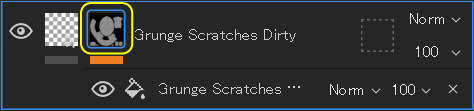
- マスクを選択した状態から、
![]()
[ Add effect ] のアイコンをクリックして [ Add fill ] を選択します。![]()
![]()
- [ Assets ] から [ procedurals > Grunges Bitmap ] を選択して、
任意のグランジ素材を [ grayscale ] にドラッグアンドドロップします。![]()
例:ここでは [ Grunge Cobweb ] を使用してます。![]()
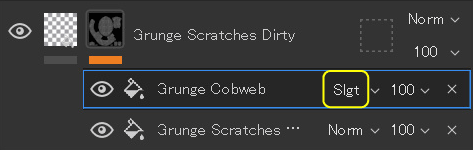
- ブレンドモードを変更します。
![]()
例:ここでは [ Soft light ] を使用してます。![]()
- パラメータの調整、テクスチャ投影方法の変更、位置の調整、またタイリングなど調整します。
例:ここでは投影方法を Tri-planar projection にしてます。


[ C ] キーでマスク、ラフネスのチャンネルに切り替えつつ状態を確認するとパラメータの調整しやすくなります。
[ M ] キーで元の状態に戻ります。
まとめ
グランジ素材を使用して、ラフネスの調整方法について確認いたしました。
Assets のグランジ素材は多数用意されていますので、作成するテクスチャに合わせて使用していきましょう!
次のページでは、Curvature(エッジ ウェア)の作成方法について確認します!
次のページへ Let’s go!
![[ Substance 3D Painter ] 金属質感のフィルターの追加方法](https://www.plamophy.com/wp-content/uploads/substance3dpainter-ec-painting-filter-01-300x125.jpg)
![[ Substance 3D Painter ] Curvature(エッジ ウェア)の作成方法](https://www.plamophy.com/wp-content/uploads/substance3dpainter-ec-painting-curvature-01-300x125.png)
![[ Unreal Engine 5.3.1 ] Procedural Content Generation (PCG) の使用方法について](https://www.plamophy.com/wp-content/uploads/unrealengine-ec-pcg-01.png)
![[ Zbrush ] データの保存とロード方法について](https://www.plamophy.com/wp-content/uploads/ZBrush_data_storage_format_01.jpg)
![[ Zbrush ] UIをカスタムする方法について](https://www.plamophy.com/wp-content/uploads/ZBrush_ui-customization_01.jpg)
![[ Substance 3D Painter ] インポートしたテクスチャの設定方法](https://www.plamophy.com/wp-content/uploads/substance3dpainter-ec-painting-filllayer-texture-01-150x150.jpg)
![[ Substance 3D Painter ] ステンシルを使用したペイント方法](https://www.plamophy.com/wp-content/uploads/substance3dpainter-ec-painting-brush-stencil-01-150x150.jpg)
![[ Substance 3D Painter ] Texture Set List(テクスチャセットリスト) の表示内容について](https://www.plamophy.com/wp-content/uploads/substance3dpainter-ec-texture-set-list-01-150x150.jpg)
![[ Substance 3D Painter ] マテリアル、テクスチャのインポート方法](https://www.plamophy.com/wp-content/uploads/substance3dpainter-ec-resource-import-01-300x125.jpg)
![[ Substance 3D Painter ] ベイクの手順と共通設定](https://www.plamophy.com/wp-content/uploads/substance3dpainter-ec-baking-mode-01-300x125.png)
![[ Substance 3D Painter ] テクスチャエクスポートの設定方法](https://www.plamophy.com/wp-content/uploads/substance3dpainter-ec-export-textures-01-300x125.jpg)
![[ Substance 3D Painter ] 半透明マテリアルのシェーダー設定方法](https://www.plamophy.com/wp-content/uploads/substance3dpainter-ec-shader-settings-alpha-blending-01-300x125.png)
![[ Substance 3D Painter ] ペイントブラシの設定方法](https://www.plamophy.com/wp-content/uploads/substance3dpainter-ec-painting-brush-setting-01-300x125.jpg)
![[ Substance 3D Painter ] シンメトリーを使用したペイント方法](https://www.plamophy.com/wp-content/uploads/substance3dpainter-ec-painting-brush-symmetry-01-300x125.jpg)
![[ Substance 3D Painter ] ポリゴン塗りつぶしツールを使用したマスキング方法](https://www.plamophy.com/wp-content/uploads/substance3dpainter-ec-masking-polygon-fill-01-300x125.jpg)
![[ Substance 3D Painter ] 色相の変更とグラデーションの作成方法](https://www.plamophy.com/wp-content/uploads/substance3dpainter-ec-painting-color-variations-01-300x125.jpg)
![[ Substance 3D Painter ] レンダリングの設定項目](https://www.plamophy.com/wp-content/uploads/substance3dpainter-ec-rendering-01-300x125.jpg)
![[ Substance 3D Painter ] 環境マップの設定と明るさの調整方法](https://www.plamophy.com/wp-content/uploads/substance3dpainter-ec-display-settings-01-300x125.jpg)
![[ Zbrush ] データの保存とロード方法について](https://www.plamophy.com/wp-content/uploads/ZBrush_data_storage_format_01-300x169.jpg)
![[ Zbrush ] UIをカスタムする方法について](https://www.plamophy.com/wp-content/uploads/ZBrush_ui-customization_01-300x169.jpg)
![[ Zbrush ] 起動時に LihgtBox を非表示にする設定方法](https://www.plamophy.com/wp-content/uploads/ZBrush_lightbbox_01-300x169.jpg)
![[ Zbrush ] スカルプトするまでの手順](https://www.plamophy.com/wp-content/uploads/ZBrush_3d-edit-mode_03-300x169.jpg)
![[ Zbrush ] ドキュメントサイズの設定方法](https://www.plamophy.com/wp-content/uploads/ZBrush_document-size_10-300x169.jpg)