![[ Unreal Engine 5.3.1 ] Procedural Content Generation (PCG) の使用方法について](https://www.plamophy.com/wp-content/uploads/unrealengine-ec-pcg-01.png)
![[ Substance 3D Painter ] 半透明マテリアルのシェーダー設定方法](https://www.plamophy.com/wp-content/uploads/substance3dpainter-ec-shader-settings-alpha-blending-01.png)
![[ Youtube ] おすすめの一覧です](https://www.plamophy.com/wp-content/uploads/youtube-recommended-list.jpg)
![[ Substance 3D Painter ] シンメトリーを使用したペイント方法](https://www.plamophy.com/wp-content/uploads/substance3dpainter-ec-painting-brush-symmetry-01.jpg)
![[ Zbrush ] データの保存とロード方法について](https://www.plamophy.com/wp-content/uploads/ZBrush_data_storage_format_01.jpg)
![[ Substance 3D Painter ] ペイントブラシの設定方法](https://www.plamophy.com/wp-content/uploads/substance3dpainter-ec-painting-brush-setting-01.jpg)

![[ Substance 3D Painter ] Hard Surface 素材を使用してノーマルにペイントする方法](https://www.plamophy.com/wp-content/uploads/substance3dpainter-ec-painting-brush-normal-01.jpg)
![[ Substance 3D Painter ] ハイトマップの追加と調整方法](https://www.plamophy.com/wp-content/uploads/substance3dpainter-ec-painting-height-map-01.png)
[ Height ]チャンネルを有効にすることで、Alpha 素材を使用してスタンプ(ペイント)した文字や記号に凹凸の表現を追加することができます。さらに、AO フィルターを追加することで、ハイトマップに陰影をつけることもできます。
本記事では、Alpha 素材を使用して、以下のハイトマップの追加方法ついて確認したいと思います。
・ハイトマップの追加方法について
・AO フィルターの追加方法について
ハイトマップの追加方法について
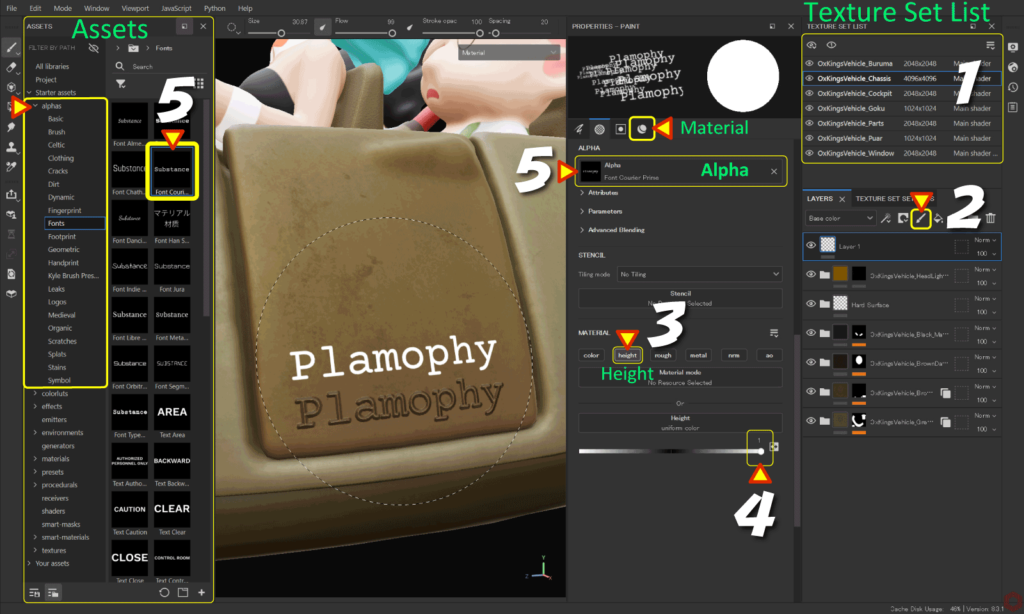
- [ Texture Set List ] から、編集するテクスチャセットを選択します。
- [ Add layer ] のアイコン をクリックして、ペイントレイヤーを追加します。
![]()
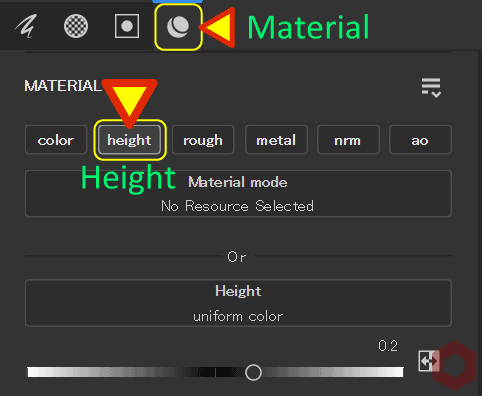
- [ Material ] アイコンをクリックして、[ Height ] だけ有効にします。
[ Height ] のチェックボックスで、Alt + 左クリックすると、ほかのチャンネルが解除されます。![]()
![]()
- [ Height ] のパラメータを調整します。
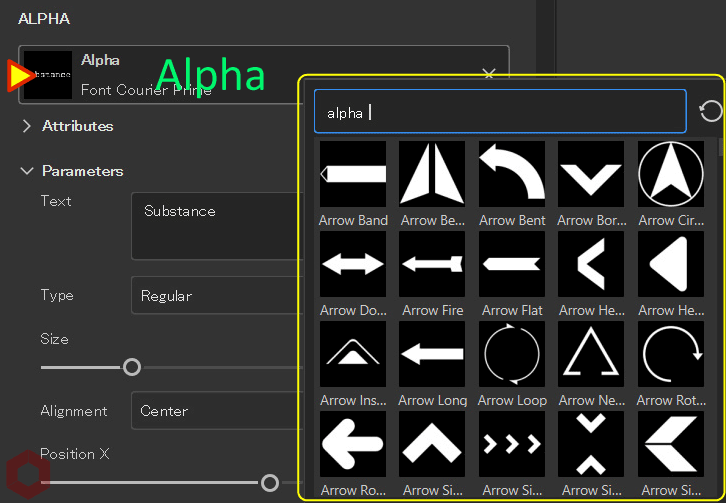
パラメータをプラスにすると凸形状、マイナスにすると 凹形状になります。 - [ Alpha ] ボタン から任意の素材を選択します。
又は、[ Assets ] の [ alphas ] から任意の素材を選択します。![]()
- ブラシのサイズ、角度を調整してペイントします。
訂正したい場合は、消しゴムツールに切り替えてペイントします。
ブラシの設定方法については、詳しくはこちらのページをご参照ください。

ブラシのショートカット
・サイズを変更 Ctrl + 右クリック + 左右にスライド
・ぼかし具合を調整 Ctrl + 右クリック + 上下にスライド
・不透明度を調整 Ctrl + 左クリック + 左右にスライド
・角度を調整 Ctrl + 左クリック + 上下にスライド
AO フィルターの追加方法について
AOを設定するためには、[ Texture Set Settings ](テクスチャセット設定)から AO チャンネルを追加する必要があります。AO チャンネルを追加する方法は、詳しくはこちらのページをご参照ください。
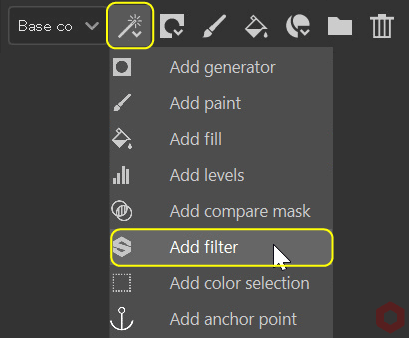
- AO を作成したいレイヤーを選択して、[ Add effect ] のアイコンをクリックして [ Add filter ] を選択します。
![]()
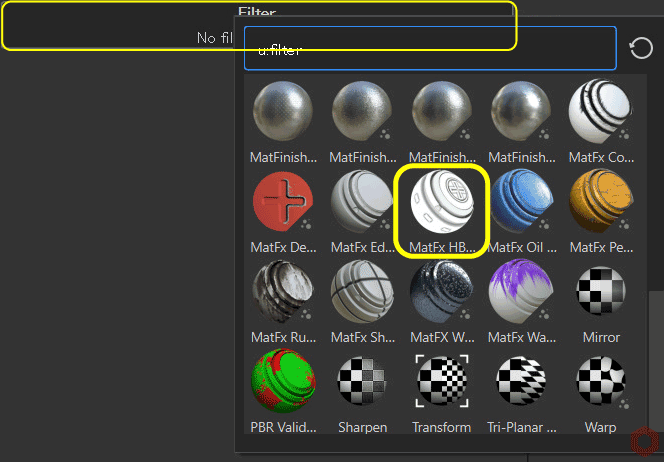
- [ Filter ] ボタンをクリックして [ MatFx HBAO ] を選択します。
![]()
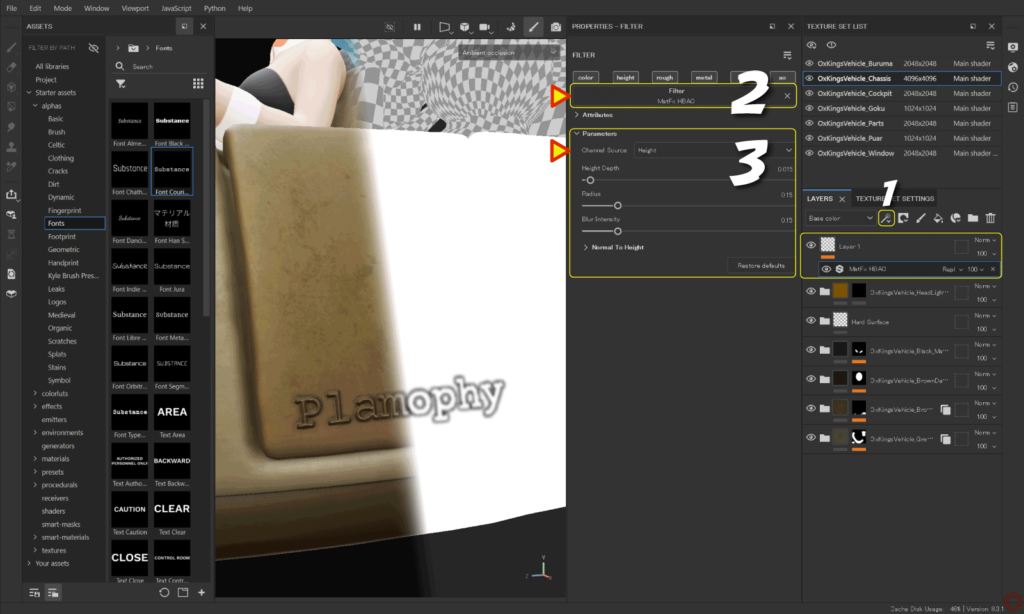
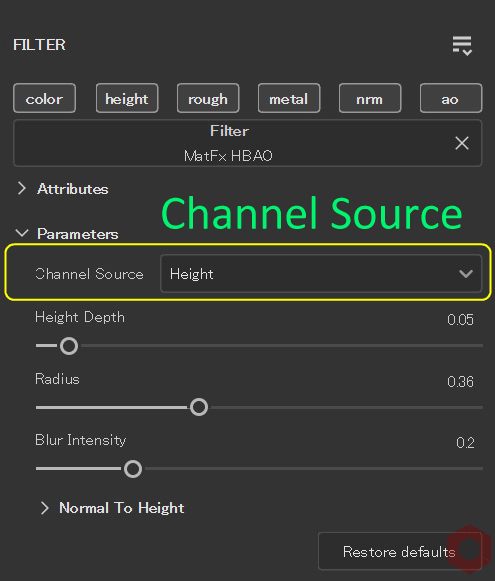
- パラメータの [ Channel Source ] が [ Height ] になっていることを確認して、パラメータを調整します。
![]()
[ C ] キーで AO チャンネルに切り替えて状態を確認するとパラメータの調整しやすくなります。
[ M ] キーで元の状態に戻ります。
まとめ
Alpha 素材を使用してハイトマップの追加と調整方法について確認いたしました。
MatFx HBAO のパラメータの [ Channel Source ] を [ Height ] にすることでハイトマップに陰影をつけることができます。
次のページでは、マテリアル、テクスチャのインポート方法について確認します!
次のページへ Let’s go!
![[ Substance 3D Painter ] デカール(シール)の作成方法](https://www.plamophy.com/wp-content/uploads/substance3dpainter-ec-painting-decal-01-300x125.jpg)
![[ Substance 3D Painter ] マテリアル、テクスチャのインポート方法](https://www.plamophy.com/wp-content/uploads/substance3dpainter-ec-resource-import-01-300x125.jpg)
![[ Zbrush ] UIをカスタムする方法について](https://www.plamophy.com/wp-content/uploads/ZBrush_ui-customization_01.jpg)
![[ Substance 3D Painter ] レンダリングの設定項目](https://www.plamophy.com/wp-content/uploads/substance3dpainter-ec-rendering-01.jpg)
![[ Substance 3D Painter ] マテリアル、テクスチャのインポート方法](https://www.plamophy.com/wp-content/uploads/substance3dpainter-ec-resource-import-01-150x150.jpg)
![[ Substance 3D Painter ] インポートしたテクスチャの設定方法](https://www.plamophy.com/wp-content/uploads/substance3dpainter-ec-painting-filllayer-texture-01-150x150.jpg)
![[ Substance 3D Painter ] レンダリングの設定項目](https://www.plamophy.com/wp-content/uploads/substance3dpainter-ec-rendering-01-150x150.jpg)
![[ Zbrush ] ドキュメントサイズの設定方法](https://www.plamophy.com/wp-content/uploads/ZBrush_document-size_10-150x150.jpg)
![[ Substance 3D Painter ] ベイクの手順と共通設定](https://www.plamophy.com/wp-content/uploads/substance3dpainter-ec-baking-mode-01-300x125.png)
![[ Substance 3D Painter ] テクスチャエクスポートの設定方法](https://www.plamophy.com/wp-content/uploads/substance3dpainter-ec-export-textures-01-300x125.jpg)
![[ Substance 3D Painter ] 半透明マテリアルのシェーダー設定方法](https://www.plamophy.com/wp-content/uploads/substance3dpainter-ec-shader-settings-alpha-blending-01-300x125.png)
![[ Substance 3D Painter ] ペイントブラシの設定方法](https://www.plamophy.com/wp-content/uploads/substance3dpainter-ec-painting-brush-setting-01-300x125.jpg)
![[ Substance 3D Painter ] シンメトリーを使用したペイント方法](https://www.plamophy.com/wp-content/uploads/substance3dpainter-ec-painting-brush-symmetry-01-300x125.jpg)
![[ Substance 3D Painter ] ポリゴン塗りつぶしツールを使用したマスキング方法](https://www.plamophy.com/wp-content/uploads/substance3dpainter-ec-masking-polygon-fill-01-300x125.jpg)
![[ Substance 3D Painter ] 色相の変更とグラデーションの作成方法](https://www.plamophy.com/wp-content/uploads/substance3dpainter-ec-painting-color-variations-01-300x125.jpg)
![[ Substance 3D Painter ] レンダリングの設定項目](https://www.plamophy.com/wp-content/uploads/substance3dpainter-ec-rendering-01-300x125.jpg)
![[ Substance 3D Painter ] 環境マップの設定と明るさの調整方法](https://www.plamophy.com/wp-content/uploads/substance3dpainter-ec-display-settings-01-300x125.jpg)
![[ Zbrush ] データの保存とロード方法について](https://www.plamophy.com/wp-content/uploads/ZBrush_data_storage_format_01-300x169.jpg)
![[ Zbrush ] UIをカスタムする方法について](https://www.plamophy.com/wp-content/uploads/ZBrush_ui-customization_01-300x169.jpg)
![[ Zbrush ] 起動時に LihgtBox を非表示にする設定方法](https://www.plamophy.com/wp-content/uploads/ZBrush_lightbbox_01-300x169.jpg)
![[ Zbrush ] スカルプトするまでの手順](https://www.plamophy.com/wp-content/uploads/ZBrush_3d-edit-mode_03-300x169.jpg)
![[ Zbrush ] ドキュメントサイズの設定方法](https://www.plamophy.com/wp-content/uploads/ZBrush_document-size_10-300x169.jpg)