![[ Zbrush ] UIをカスタムする方法について](https://www.plamophy.com/wp-content/uploads/ZBrush_ui-customization_01.jpg)
![[ Substance 3D Painter ] Hard Surface 素材を使用してノーマルにペイントする方法](https://www.plamophy.com/wp-content/uploads/substance3dpainter-ec-painting-brush-normal-01.jpg)
![[ Substance 3D Painter ] 半透明マテリアルのシェーダー設定方法](https://www.plamophy.com/wp-content/uploads/substance3dpainter-ec-shader-settings-alpha-blending-01.png)
![[ Zbrush ] データの保存とロード方法について](https://www.plamophy.com/wp-content/uploads/ZBrush_data_storage_format_01.jpg)
![[ Substance 3D Designer 入門 ] Substance 3D Painter に出力するまでの基本的な手順について](https://www.plamophy.com/wp-content/uploads/substance3ddesigner-ec-camouflage-01.jpg)
![[ Substance 3D Painter ] ペイントブラシの設定方法](https://www.plamophy.com/wp-content/uploads/substance3dpainter-ec-painting-brush-setting-01.jpg)
![[ Youtube ] おすすめの一覧です](https://www.plamophy.com/wp-content/uploads/youtube-recommended-list.jpg)
![[ Unreal Engine 5.3.1 ] Procedural Content Generation (PCG) の使用方法について](https://www.plamophy.com/wp-content/uploads/unrealengine-ec-pcg-01.png)
テクスチャをエクスポートする方法について確認していきたいと思います。
新規プロジェクト作成時もテンプレートを活用しましたが、エクスポートするときも基本的にテンプレートを使用してエクスポートします。テンプレートを使用することで設定した内容(テクスチャ名、ファイル形式、各チャンネル)でエクスポートできます。
本記事では、テンプレートを使用したテクスチャのエクスポート方法について確認したいと思います。
テクスチャエクスポートの設定方法
エクスポートするには File -> Export Textures から行います。
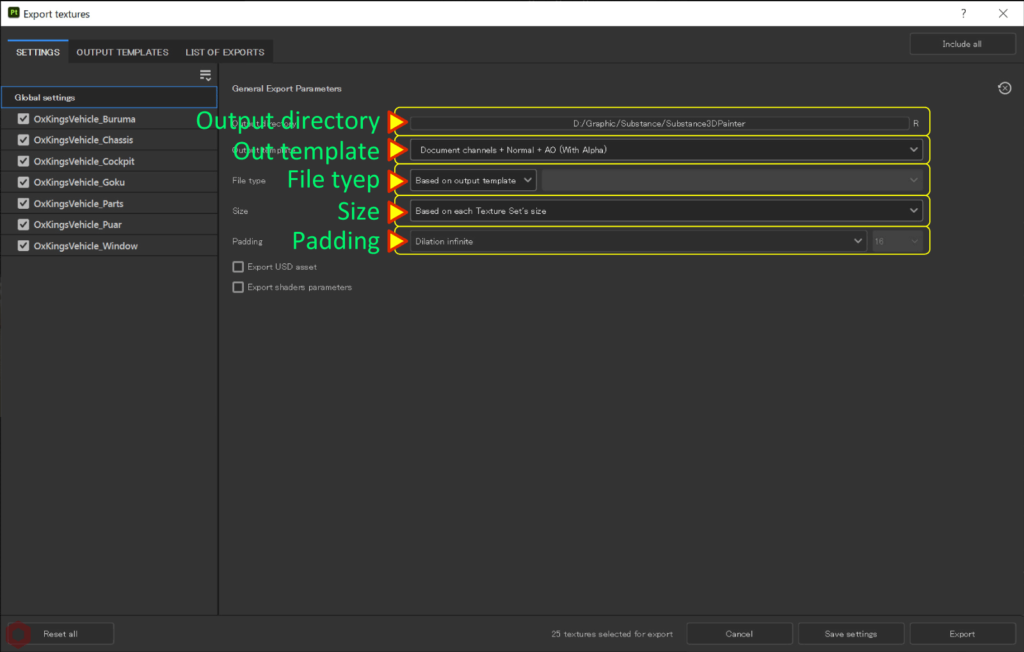
・ Output directory
出力先を指定します。
・ Output template
テンプレートを選択します。
・ File type
ファイル形式を選択します。
テンプレートを選択している場合は、Based on output template を選択します。
[ Output Templates ] で設定したファイル形式とビット深度で出力されます。
・ Size
テクスチャの解像度を指定します。
Texture Set Settings で設定した解像度で出力する場合は、Based on each Texture Set's size を選択します。
・ Padding (パディング)
UV境界の外側の領域の塗りつぶし方を指定します。
テクスチャがミップマップなどの影響で低解像度になると、UV境界の外側の色がメッシュに影響する場合があります。パディングの設定とUV展開の間隔を適切に保つことで、このような状況をさけることができます。
詳しくはこちらかのページをご参照ください。
Substance 3D ドキュメンテーション
テンプレートの設定項目
テンプレートには、各アプリケーションの設定にあった出力内容(テクスチャ名、ファイル形式、各チャンネル)で複数用意されています。
例えば、PBR ワークフローに必要なテクスチャを出力できるテンプレート PBR Metallic Roughness の場合は以下の内容でエクスポートされます。
PBR Metallic Roughnessの場合
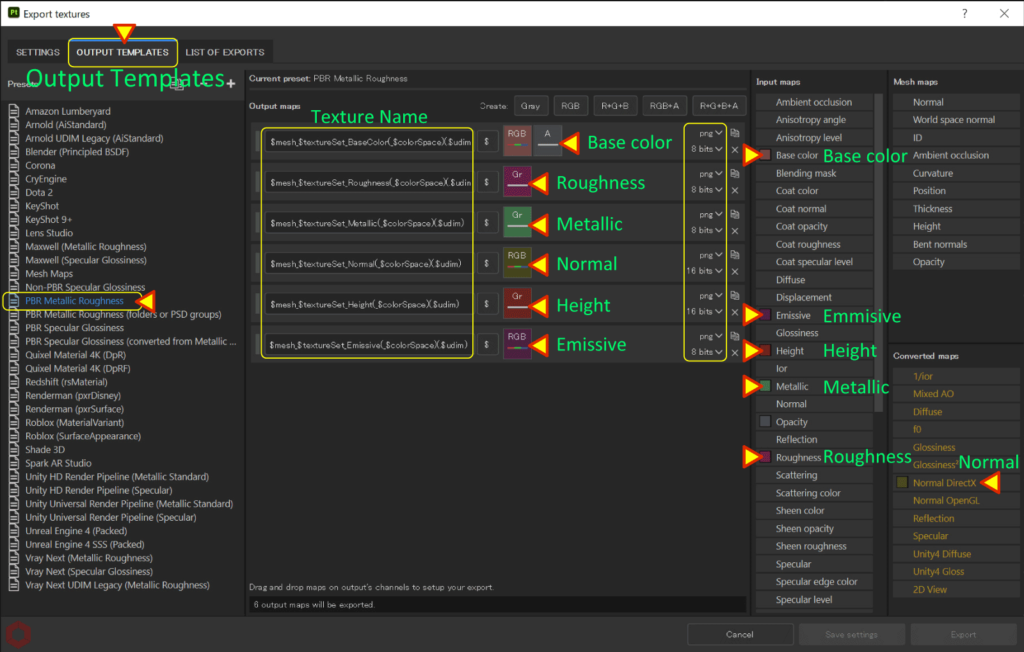
・ テクスチャ名
初期設定では左側から、以下の内容のテクスチャ名になります。
メッシュファイル名(fbx などのファイル名) _ テクスチャセット名 _ チャンネル名
・ 各チャンネル、ファイル形式、ビット深度
出力されるチャンネルと、ファイル形式、ビット深度は以下の内容になります。
・ ベースカラー : png、8bits、不透明度
・ ラフネス : png、8bits
・ メタリック : png、8bits
・ ノーマル : png、16bits、DirectX
・ ハイトマップ : png、16bits
・ エミッション : png、8bits
Unreal Engine 4 (Packed)の場合
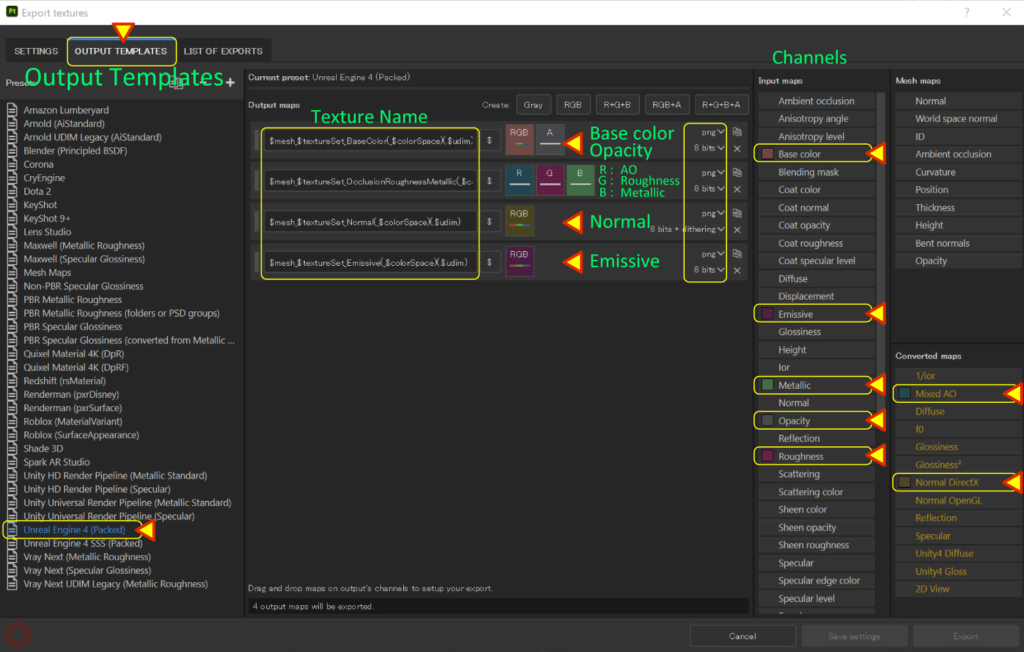
・ テクスチャ名
初期設定では左側から、以下の内容のテクスチャ名になります。
メッシュファイル名(fbx などのファイル名) _ テクスチャセット名 _ チャンネル名
・ 各チャンネル、ファイル形式、ビット深度
出力されるチャンネルと、ファイル形式、ビット深度は以下の内容になります。
・ ベースカラー : png、8bits、不透明度
・ オクルージョン(R チャンネル): png、8bits、Mixed AO(ベイクAO + TextureSet AO)
・ ラフネス(G チャンネル) : png、8bits
・ メタリック(B チャンネル) : png、8bits
・ ノーマル : png、8bits、ディザリング処理、DirectX
・ エミッション : png、8bits
Unreal Engine 4 ( Packed ) のように、AO、ラフネス、メタリックのグレースケール画像を
Rチャンネル、Gチャンネル、Bチャンネルに分けて、ひとつの画像として作成することもできます。
まとめ
テクスチャのエクスポートの設定内容について確認いたしました。
Blender、Unityなどのテンプレートでは、ノーマルは Open GL の設定になっています。
Substance 3D Painter での「Direct X」と「OpenGL」の違いについては、詳しくはこちらのページをご参照ください。
Substance 3D ドキュメンテーション
既存のテンプレートから変更を加えたい場合は、[ Duplicate ] ボタンをクリックして複製してから変更をするとオリジナルに変更を加えないで編集できます。
次のページでは、レンダリングの設定項目方法について確認します!
次のページへ Let’s go!
![[ Substance 3D Painter ] ステンシルを使用したペイント方法](https://www.plamophy.com/wp-content/uploads/substance3dpainter-ec-painting-brush-stencil-01-300x125.jpg)
![[ Substance 3D Painter ] レンダリングの設定項目](https://www.plamophy.com/wp-content/uploads/substance3dpainter-ec-rendering-01-300x125.jpg)

![[ Substance 3D Painter ] シンメトリーを使用したペイント方法](https://www.plamophy.com/wp-content/uploads/substance3dpainter-ec-painting-brush-symmetry-01.jpg)
![[ Substance 3D Painter ] レンダリングの設定項目](https://www.plamophy.com/wp-content/uploads/substance3dpainter-ec-rendering-01.jpg)
![[ Zbrush ] 起動時に LihgtBox を非表示にする設定方法](https://www.plamophy.com/wp-content/uploads/ZBrush_lightbbox_01-150x150.jpg)
![[ Substance 3D Painter ] グランジ素材を使用してラフネスを調整する方法](https://www.plamophy.com/wp-content/uploads/substance3dpainter-ec-painting-roughness-add-01-150x150.jpg)
![[ Substance 3D Painter ] 金属質感のフィルターの追加方法](https://www.plamophy.com/wp-content/uploads/substance3dpainter-ec-painting-filter-01-150x150.jpg)
![[ Zbrush ] スカルプトするまでの手順](https://www.plamophy.com/wp-content/uploads/ZBrush_3d-edit-mode_03-150x150.jpg)
![[ Substance 3D Painter ] マテリアル、テクスチャのインポート方法](https://www.plamophy.com/wp-content/uploads/substance3dpainter-ec-resource-import-01-300x125.jpg)
![[ Substance 3D Painter ] ベイクの手順と共通設定](https://www.plamophy.com/wp-content/uploads/substance3dpainter-ec-baking-mode-01-300x125.png)
![[ Substance 3D Painter ] テクスチャエクスポートの設定方法](https://www.plamophy.com/wp-content/uploads/substance3dpainter-ec-export-textures-01-300x125.jpg)
![[ Substance 3D Painter ] 半透明マテリアルのシェーダー設定方法](https://www.plamophy.com/wp-content/uploads/substance3dpainter-ec-shader-settings-alpha-blending-01-300x125.png)
![[ Substance 3D Painter ] ペイントブラシの設定方法](https://www.plamophy.com/wp-content/uploads/substance3dpainter-ec-painting-brush-setting-01-300x125.jpg)
![[ Substance 3D Painter ] シンメトリーを使用したペイント方法](https://www.plamophy.com/wp-content/uploads/substance3dpainter-ec-painting-brush-symmetry-01-300x125.jpg)
![[ Substance 3D Painter ] ポリゴン塗りつぶしツールを使用したマスキング方法](https://www.plamophy.com/wp-content/uploads/substance3dpainter-ec-masking-polygon-fill-01-300x125.jpg)
![[ Substance 3D Painter ] 色相の変更とグラデーションの作成方法](https://www.plamophy.com/wp-content/uploads/substance3dpainter-ec-painting-color-variations-01-300x125.jpg)
![[ Substance 3D Painter ] 環境マップの設定と明るさの調整方法](https://www.plamophy.com/wp-content/uploads/substance3dpainter-ec-display-settings-01-300x125.jpg)
![[ Zbrush ] データの保存とロード方法について](https://www.plamophy.com/wp-content/uploads/ZBrush_data_storage_format_01-300x169.jpg)
![[ Zbrush ] UIをカスタムする方法について](https://www.plamophy.com/wp-content/uploads/ZBrush_ui-customization_01-300x169.jpg)
![[ Zbrush ] 起動時に LihgtBox を非表示にする設定方法](https://www.plamophy.com/wp-content/uploads/ZBrush_lightbbox_01-300x169.jpg)
![[ Zbrush ] スカルプトするまでの手順](https://www.plamophy.com/wp-content/uploads/ZBrush_3d-edit-mode_03-300x169.jpg)
![[ Zbrush ] ドキュメントサイズの設定方法](https://www.plamophy.com/wp-content/uploads/ZBrush_document-size_10-300x169.jpg)