![[ Substance 3D Painter ] 環境マップの設定と明るさの調整方法](https://www.plamophy.com/wp-content/uploads/substance3dpainter-ec-display-settings-01.jpg)
Substance 3D Painter での作業時に、環境マップの変更や明るさの調整、またメッシュにワイヤーフレームを表示させて確認したい時があります。
本記事では、Display Settings から以下2つの変更方法について確認したいと思います。
・環境マップと明るさの調整方法
・メッシュにワイヤーフレームを表示させる方法
環境マップと明るさの調整方法
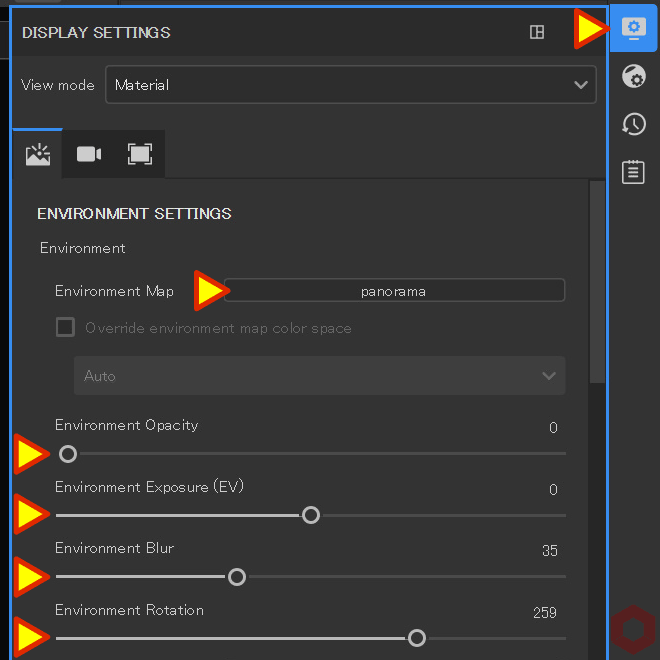
まず始めに、画面右側の [ Display Settings ] のアイコン をクリックします。

・Environment map
環境マップを変更できます。
・Environment Opacity
環境マップの不透明度を変更できます。
・Environment Exposure (EV)
露光量(明るさ)の調整ができます。
・Environment Blur
にじみ具合を調整できます。
・Environment Rotation
環境マップを回転できます。
Shift + 右クリック で環境マップを回転できます。
環境マップ(照明)について
3D ビューは、HDRI (ハイダイナミックレンジイメージ) を使用しているため、森林「Cave Entry Forest」に変更すると緑色の照明環境に、赤い大地「Canopus Ground」に変更すると赤い照明環境になります。
HDRI は輝度幅が広く、実際の明るさを表現することが可能であるため、それを照明として使用している画像になります。
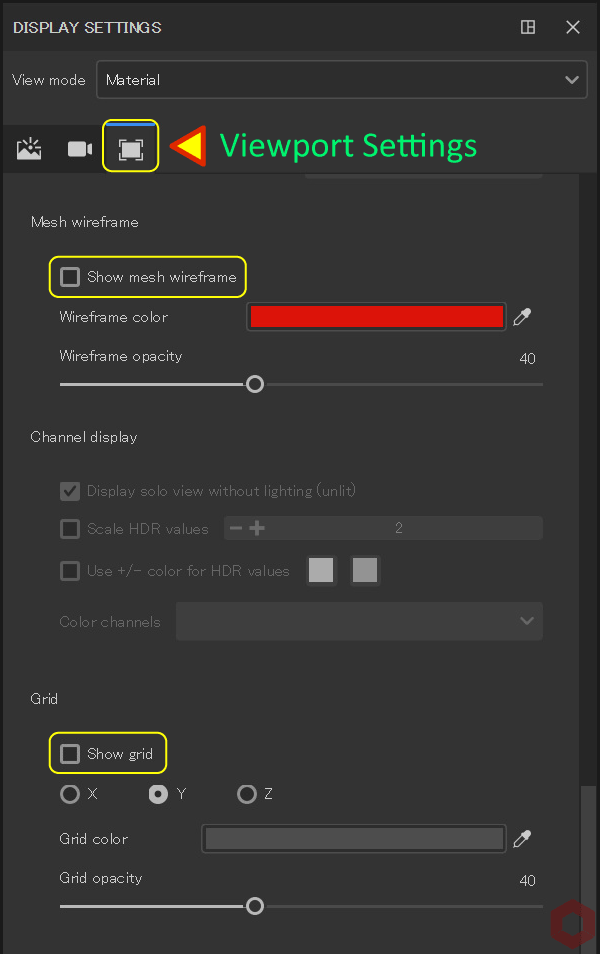
ワイヤーフレームの表示方法

▼ Show mesh wireframe
メッシュのワイヤーフレームの表示、色の設定ができます。
▼ Show grid
グリッドの表示、色の変更など設定ができます。
まとめ
環境マップの変更方法、明るさの調整方法について確認いたしました。
メタリックのテクスチャ作成をする時は、Environment Exposure (EV) の値を調整して、明るくすると作業しやすくなります。
次のページでは、Texture Set List の表示内容について確認します!
次のページへ Let’s go!


![[ Unreal Engine 5.3.1 ] Procedural Content Generation (PCG) の使用方法について](https://www.plamophy.com/wp-content/uploads/unrealengine-ec-pcg-01.png)
![[ Zbrush ] UIをカスタムする方法について](https://www.plamophy.com/wp-content/uploads/ZBrush_ui-customization_01.jpg)
![[ Substance 3D Painter ] 半透明マテリアルのシェーダー設定方法](https://www.plamophy.com/wp-content/uploads/substance3dpainter-ec-shader-settings-alpha-blending-01.png)
![[ Youtube ] おすすめの一覧です](https://www.plamophy.com/wp-content/uploads/youtube-recommended-list.jpg)
![[ Zbrush ] データの保存とロード方法について](https://www.plamophy.com/wp-content/uploads/ZBrush_data_storage_format_01.jpg)
![[ Substance 3D Painter ] ペイントブラシの設定方法](https://www.plamophy.com/wp-content/uploads/substance3dpainter-ec-painting-brush-setting-01.jpg)
![[ Substance 3D Painter ] シンメトリーを使用したペイント方法](https://www.plamophy.com/wp-content/uploads/substance3dpainter-ec-painting-brush-symmetry-01.jpg)
![[ Substance 3D Painter ] 新規作成とノーマルに関する設定項目](https://www.plamophy.com/wp-content/uploads/substance3dpainter-ec-newproject-creation-01-300x125.jpg)
![[ Substance 3D Painter ] Texture Set List(テクスチャセットリスト) の表示内容について](https://www.plamophy.com/wp-content/uploads/substance3dpainter-ec-texture-set-list-01-300x125.jpg)
![[ Substance 3D Painter ] Hard Surface 素材を使用してノーマルにペイントする方法](https://www.plamophy.com/wp-content/uploads/substance3dpainter-ec-painting-brush-normal-01.jpg)
![[ Substance 3D Designer 入門 ] Substance 3D Painter に出力するまでの基本的な手順について](https://www.plamophy.com/wp-content/uploads/substance3ddesigner-ec-camouflage-01.jpg)
![[ Substance 3D Painter ] レンダリングの設定項目](https://www.plamophy.com/wp-content/uploads/substance3dpainter-ec-rendering-01.jpg)
![[ Substance 3D Painter ] ID Map のベイク方法](https://www.plamophy.com/wp-content/uploads/substance3dpainter-ec-baking-id-map-01-150x150.png)
![[ Substance 3D Painter ] サフィックスを利用したベイク方法](https://www.plamophy.com/wp-content/uploads/substance3dpainter-ec-baking-mode-suffix-01-150x150.jpg)
![[ Substance 3D Painter ] シンメトリーを使用したペイント方法](https://www.plamophy.com/wp-content/uploads/substance3dpainter-ec-painting-brush-symmetry-01-150x150.jpg)
![[ Substance 3D Painter ] ステンシルを使用したペイント方法](https://www.plamophy.com/wp-content/uploads/substance3dpainter-ec-painting-brush-stencil-01-150x150.jpg)
![[ Substance 3D Painter ] マテリアル、テクスチャのインポート方法](https://www.plamophy.com/wp-content/uploads/substance3dpainter-ec-resource-import-01-300x125.jpg)
![[ Substance 3D Painter ] ベイクの手順と共通設定](https://www.plamophy.com/wp-content/uploads/substance3dpainter-ec-baking-mode-01-300x125.png)
![[ Substance 3D Painter ] テクスチャエクスポートの設定方法](https://www.plamophy.com/wp-content/uploads/substance3dpainter-ec-export-textures-01-300x125.jpg)
![[ Substance 3D Painter ] 半透明マテリアルのシェーダー設定方法](https://www.plamophy.com/wp-content/uploads/substance3dpainter-ec-shader-settings-alpha-blending-01-300x125.png)
![[ Substance 3D Painter ] ペイントブラシの設定方法](https://www.plamophy.com/wp-content/uploads/substance3dpainter-ec-painting-brush-setting-01-300x125.jpg)
![[ Substance 3D Painter ] シンメトリーを使用したペイント方法](https://www.plamophy.com/wp-content/uploads/substance3dpainter-ec-painting-brush-symmetry-01-300x125.jpg)
![[ Substance 3D Painter ] ポリゴン塗りつぶしツールを使用したマスキング方法](https://www.plamophy.com/wp-content/uploads/substance3dpainter-ec-masking-polygon-fill-01-300x125.jpg)
![[ Substance 3D Painter ] 色相の変更とグラデーションの作成方法](https://www.plamophy.com/wp-content/uploads/substance3dpainter-ec-painting-color-variations-01-300x125.jpg)
![[ Substance 3D Painter ] レンダリングの設定項目](https://www.plamophy.com/wp-content/uploads/substance3dpainter-ec-rendering-01-300x125.jpg)
![[ Substance 3D Painter ] 環境マップの設定と明るさの調整方法](https://www.plamophy.com/wp-content/uploads/substance3dpainter-ec-display-settings-01-300x125.jpg)
![[ Zbrush ] データの保存とロード方法について](https://www.plamophy.com/wp-content/uploads/ZBrush_data_storage_format_01-300x169.jpg)
![[ Zbrush ] UIをカスタムする方法について](https://www.plamophy.com/wp-content/uploads/ZBrush_ui-customization_01-300x169.jpg)
![[ Zbrush ] 起動時に LihgtBox を非表示にする設定方法](https://www.plamophy.com/wp-content/uploads/ZBrush_lightbbox_01-300x169.jpg)
![[ Zbrush ] スカルプトするまでの手順](https://www.plamophy.com/wp-content/uploads/ZBrush_3d-edit-mode_03-300x169.jpg)
![[ Zbrush ] ドキュメントサイズの設定方法](https://www.plamophy.com/wp-content/uploads/ZBrush_document-size_10-300x169.jpg)
