![[ Substance 3D Painter ] 半透明マテリアルのシェーダー設定方法](https://www.plamophy.com/wp-content/uploads/substance3dpainter-ec-shader-settings-alpha-blending-01.png)
![[ Substance 3D Painter ] シンメトリーを使用したペイント方法](https://www.plamophy.com/wp-content/uploads/substance3dpainter-ec-painting-brush-symmetry-01.jpg)
![[ Youtube ] おすすめの一覧です](https://www.plamophy.com/wp-content/uploads/youtube-recommended-list.jpg)
![[ Substance 3D Painter ] Hard Surface 素材を使用してノーマルにペイントする方法](https://www.plamophy.com/wp-content/uploads/substance3dpainter-ec-painting-brush-normal-01.jpg)
![[ Zbrush ] UIをカスタムする方法について](https://www.plamophy.com/wp-content/uploads/ZBrush_ui-customization_01.jpg)
![[ Substance 3D Designer 入門 ] Substance 3D Painter に出力するまでの基本的な手順について](https://www.plamophy.com/wp-content/uploads/substance3ddesigner-ec-camouflage-01.jpg)
![[ Substance 3D Painter ] ペイントブラシの設定方法](https://www.plamophy.com/wp-content/uploads/substance3dpainter-ec-painting-brush-setting-01.jpg)
![[ Unreal Engine 5.3.1 ] Procedural Content Generation (PCG) の使用方法について](https://www.plamophy.com/wp-content/uploads/unrealengine-ec-pcg-01.png)
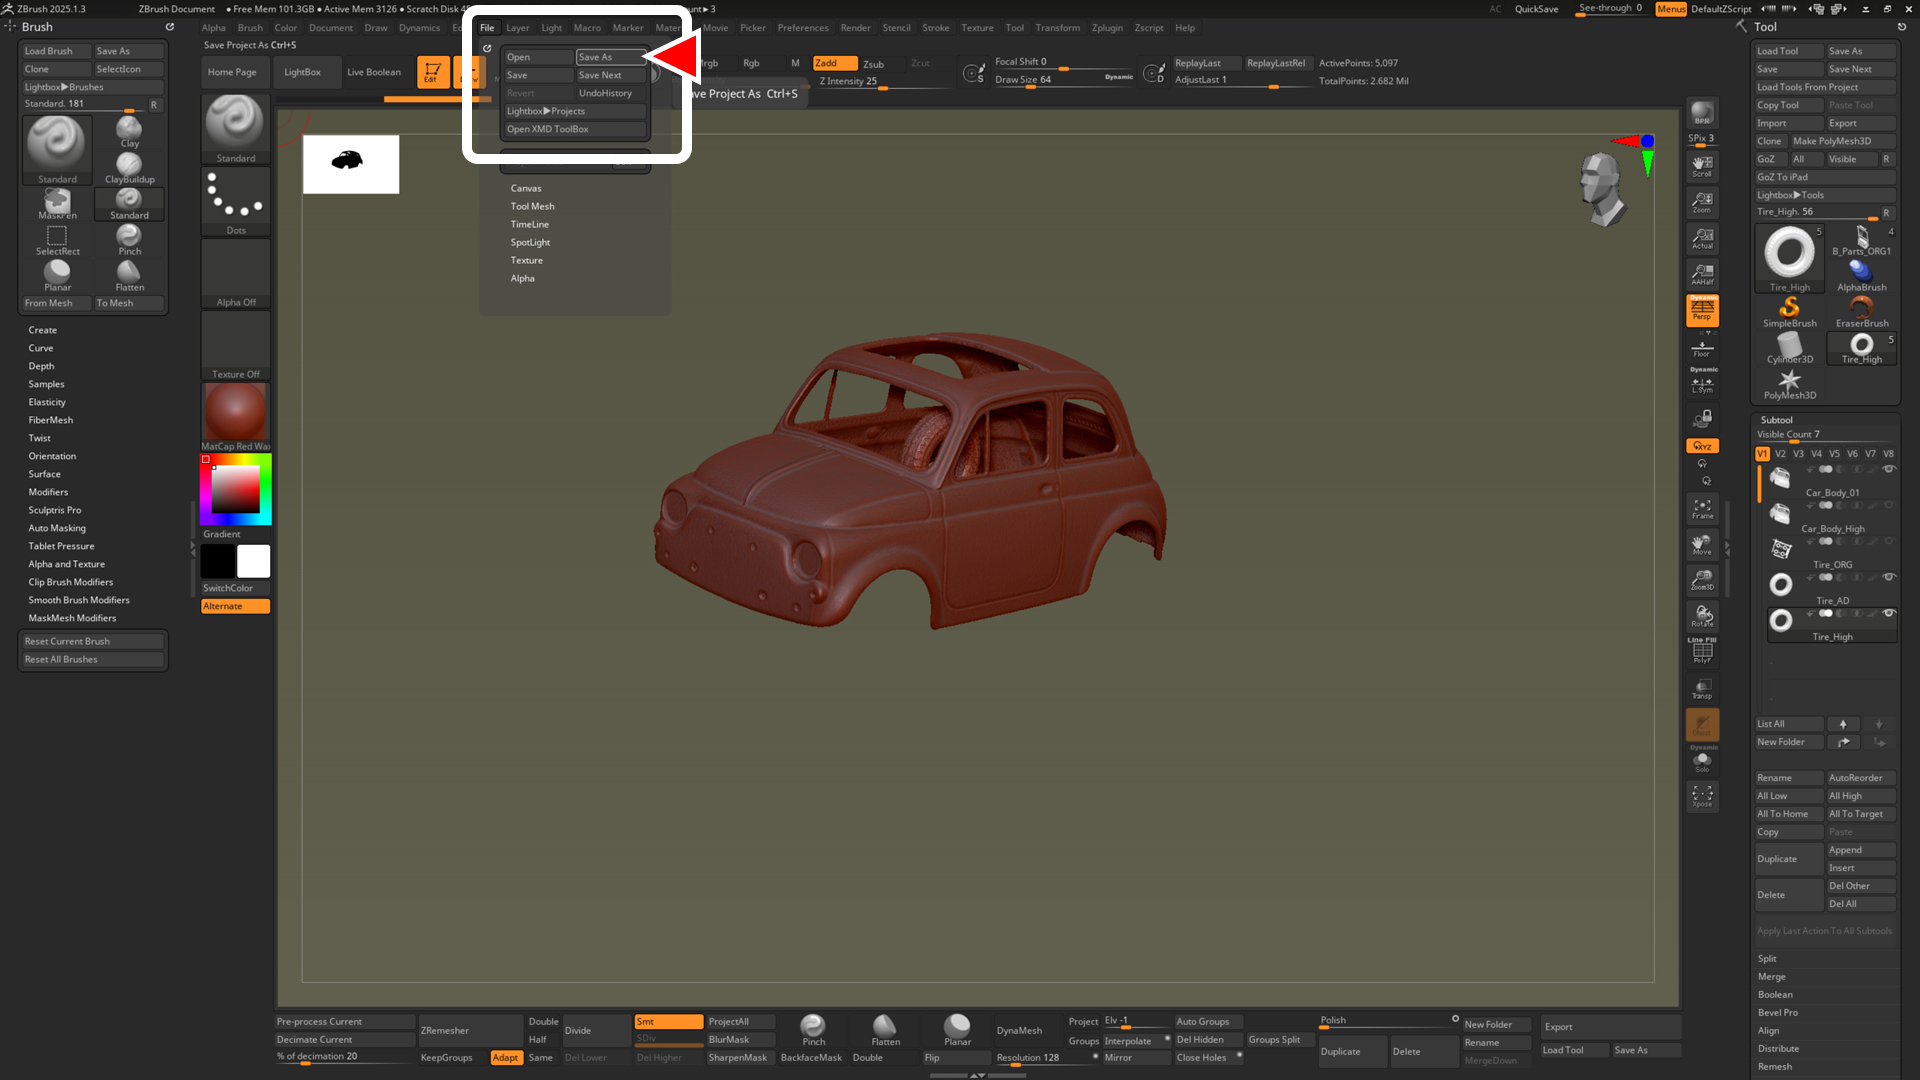
![[ Zbrush ] データの保存とロード方法について](https://www.plamophy.com/wp-content/uploads/ZBrush_data_storage_format_01.jpg)
本記事では、データの保存とロード方法についての説明となります。
ZBrush では保存方法が、ZTool(ZTL)と ZProject(ZPR)の 2 つの種類があります。
ここでは、2 つの違いについも確認していきます。
データの保存とロード方法について
まず始めに、ZTool(ZTL)の保存方法についか確認してみます。
ZTool(ZTL)の保存方法について
- [ Tool ] パレット の [ Save As ] ボタンをクリックして保存します。
ZTool で保存すると
ZTool(ZTL)で保存すると、PolyMesh3D のほかに、
ポリペイント(頂点カラー)情報、レイヤーの情報などが保存できます。
ただし、ドキュメントサイズ、背景色などシーンの情報は保存されません。
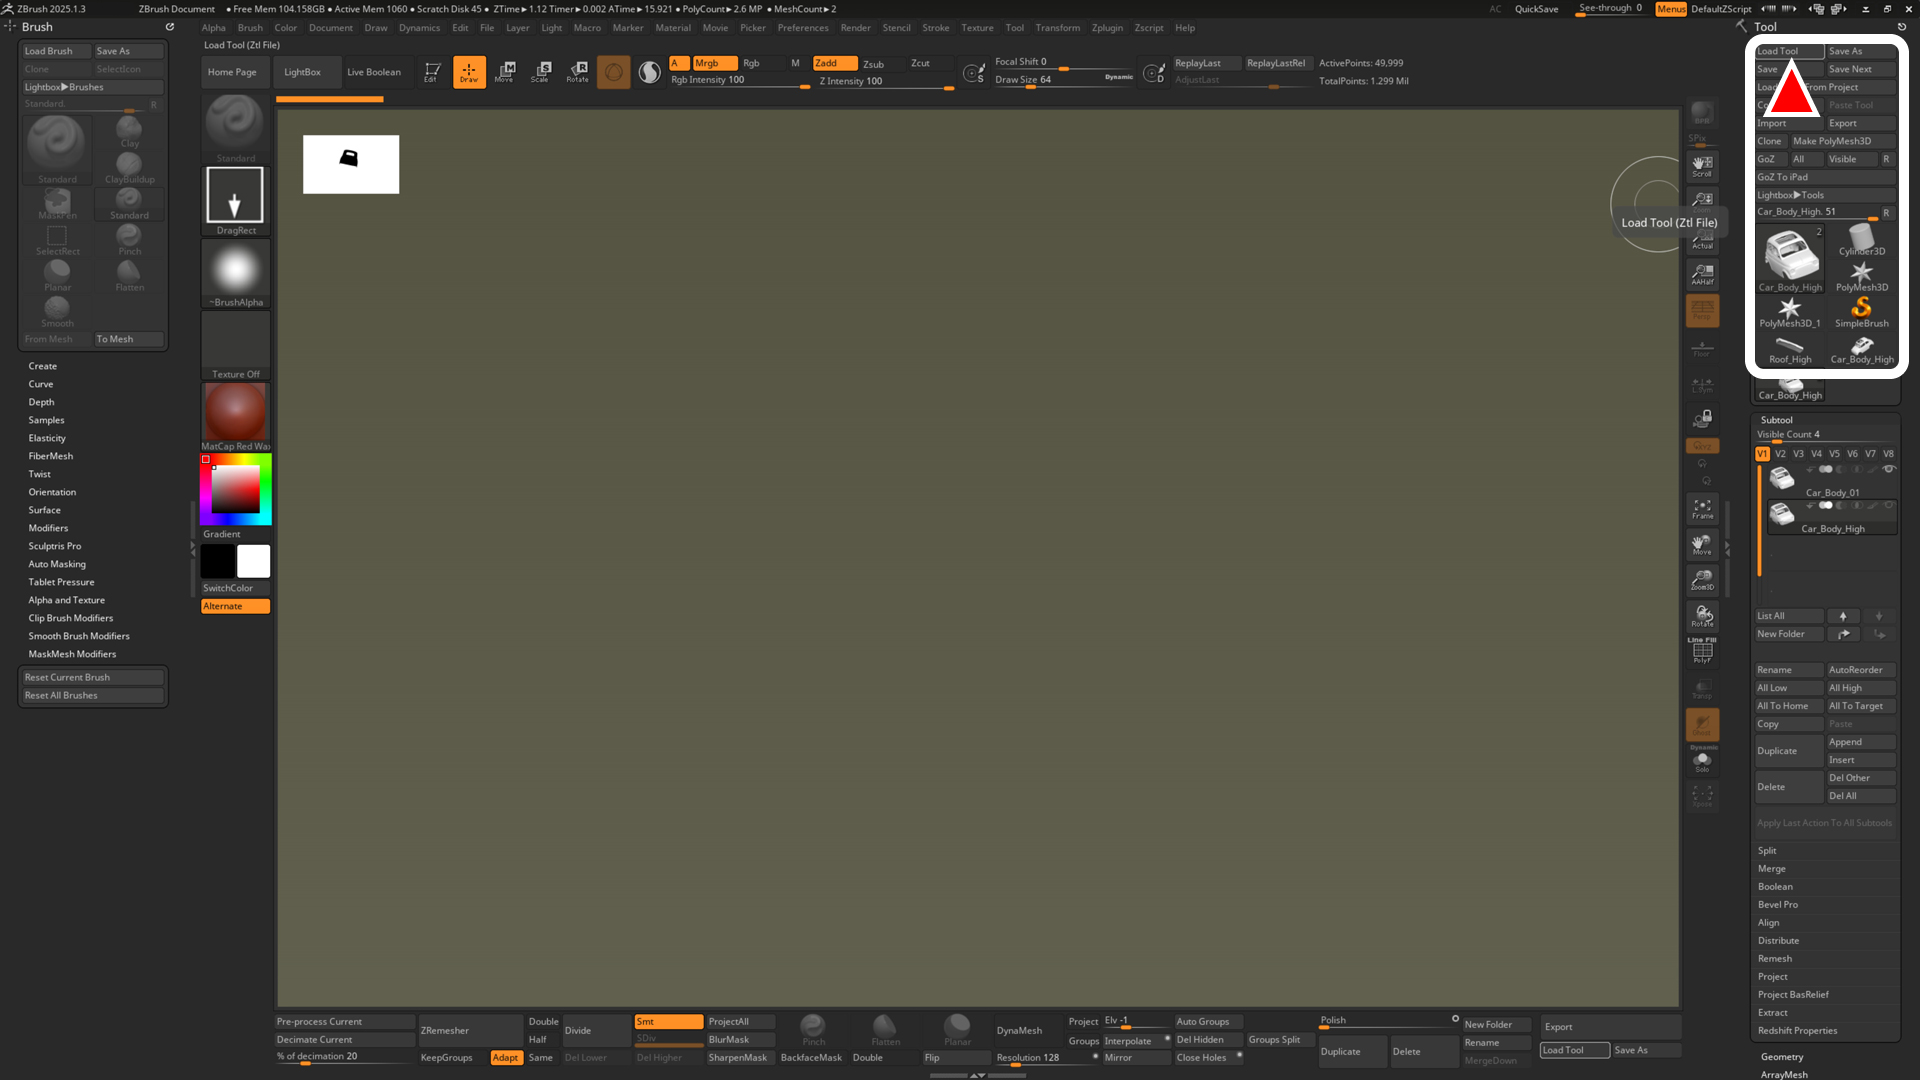
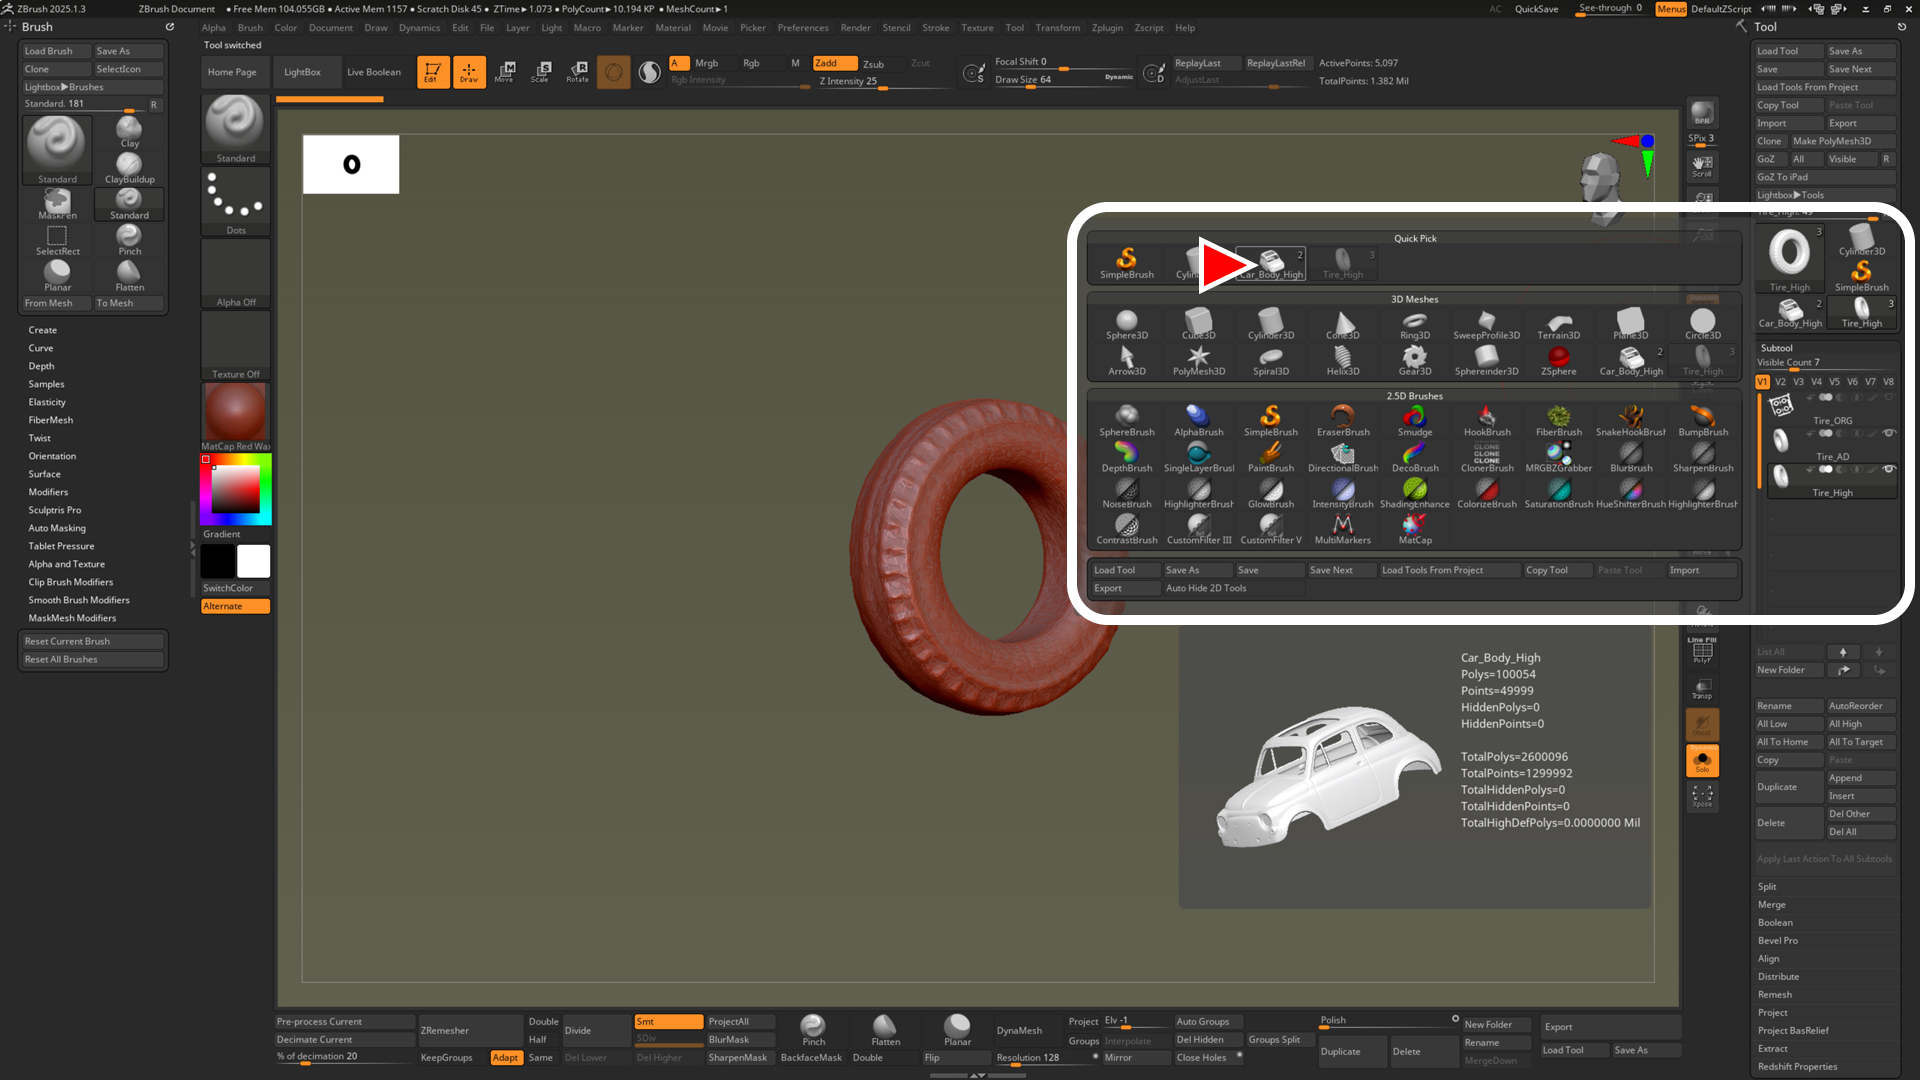
ZTool(ZTL)のロード方法(単体の場合)
- [ Tool ] パレット の [ Load Tool ] ボタンをクリックして、ZTL ファイルを選択します。
![]()
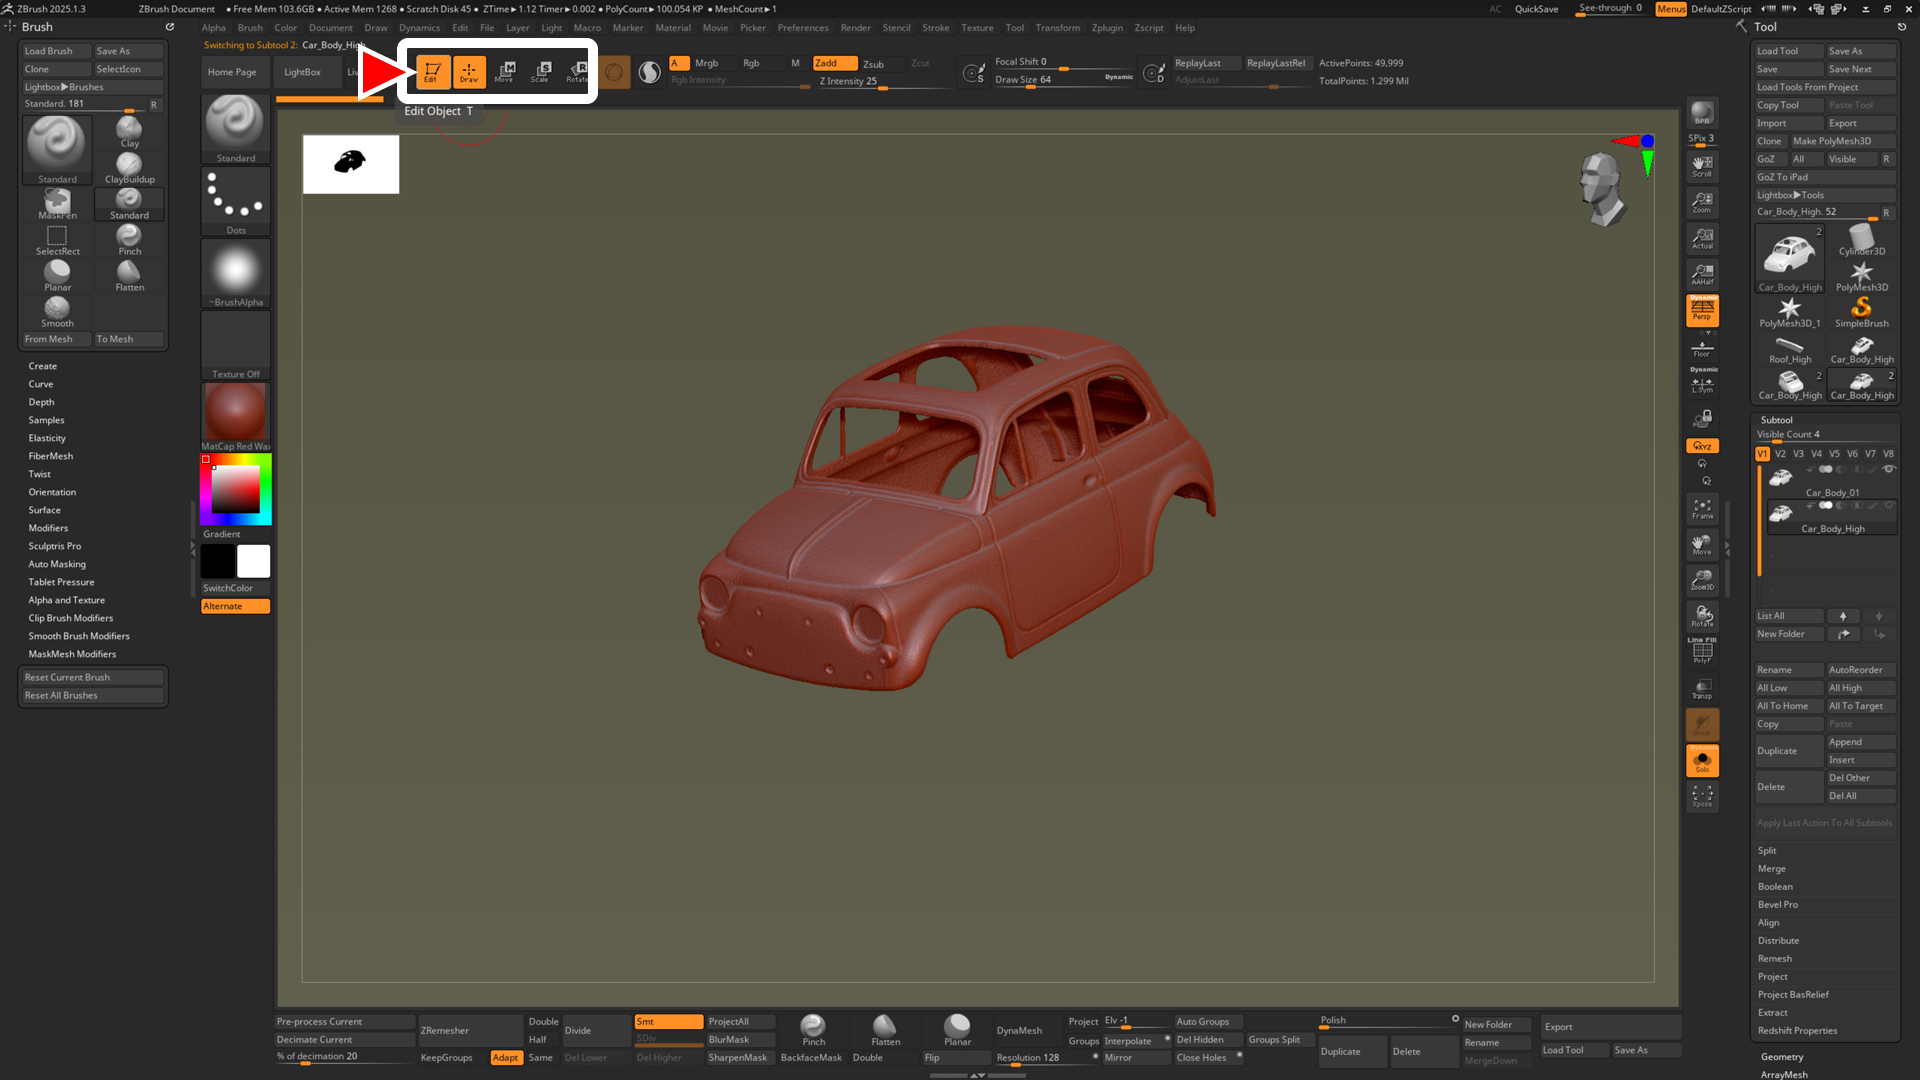
- キャンバスに描画します。
- [ Edit ] ボタンを ON にして、3D エディットモード に切り替えます。
![]()
ZTL ファイルを読み込むと [ Tool ] に追加されていきます。![]()
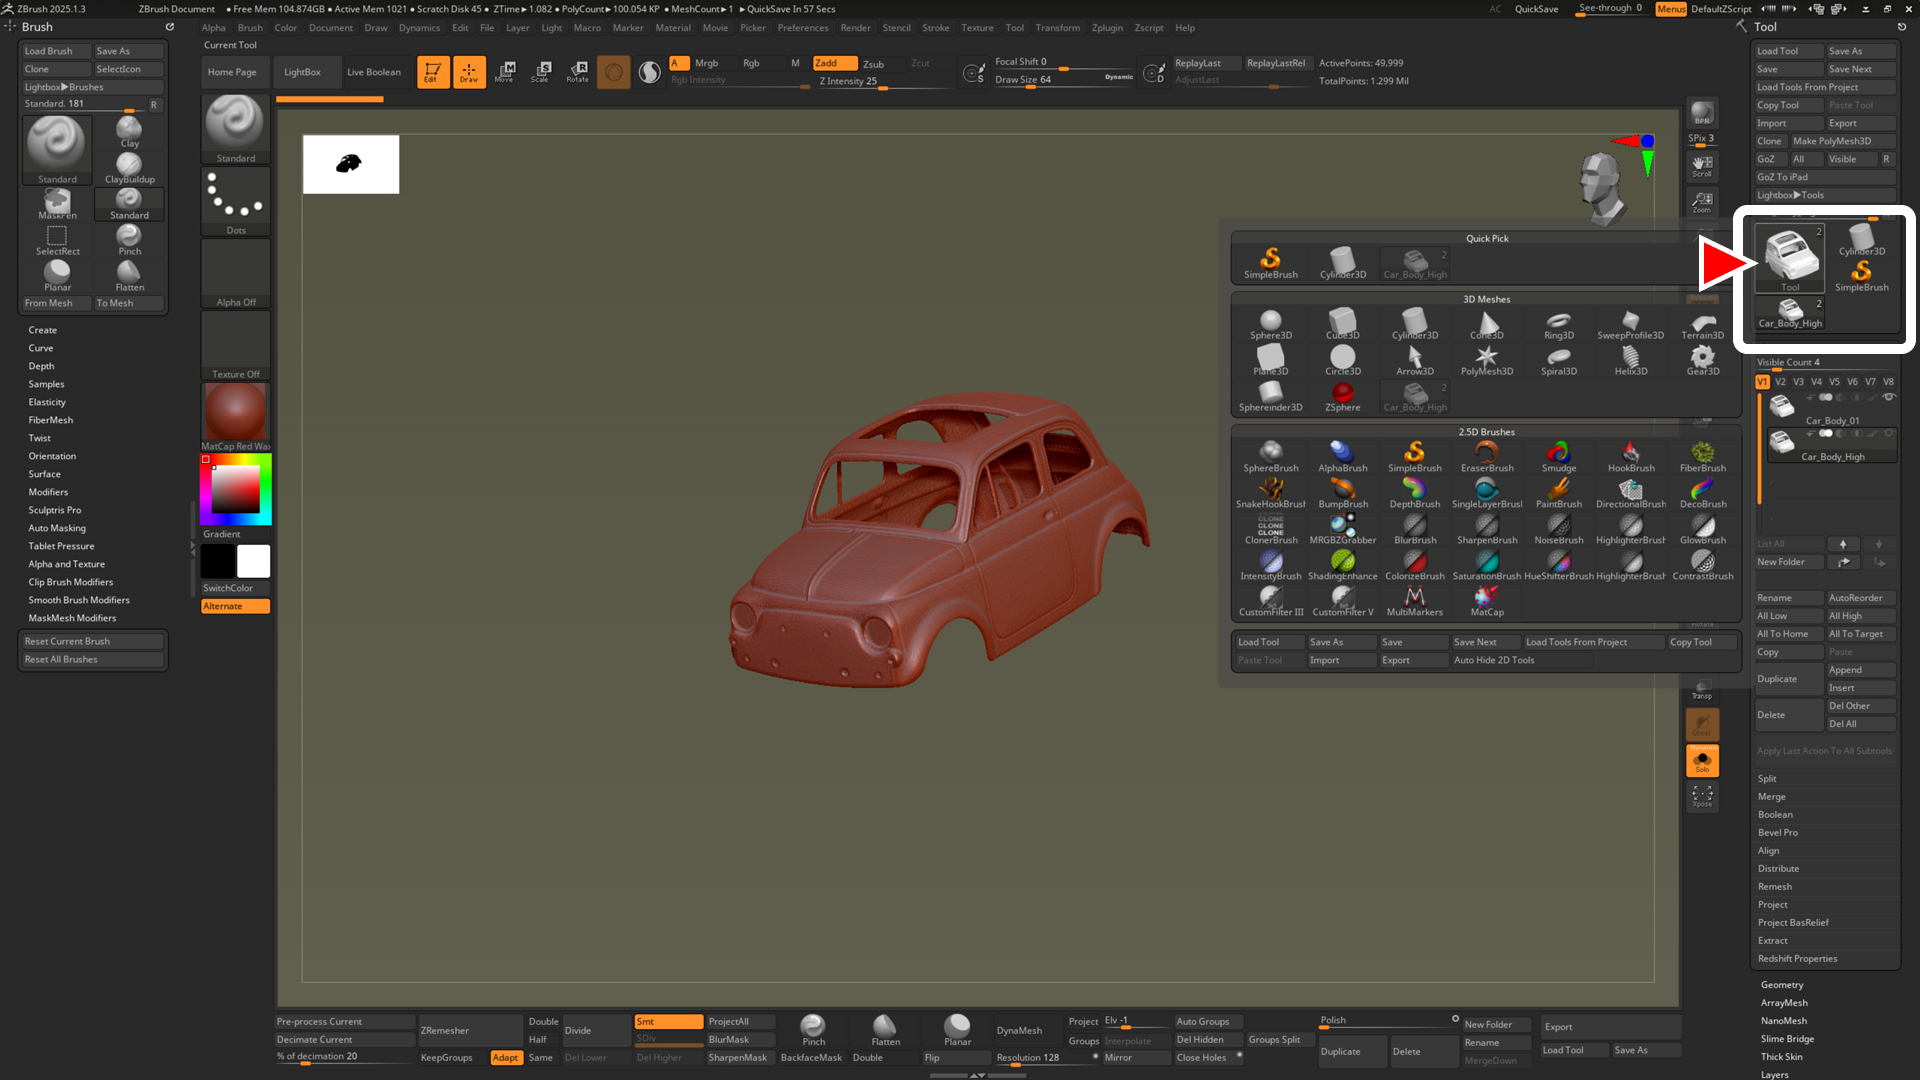
ポイント‼
Tool に追加されると、サムネイル画像の右上にレイヤーの数が表示されます。
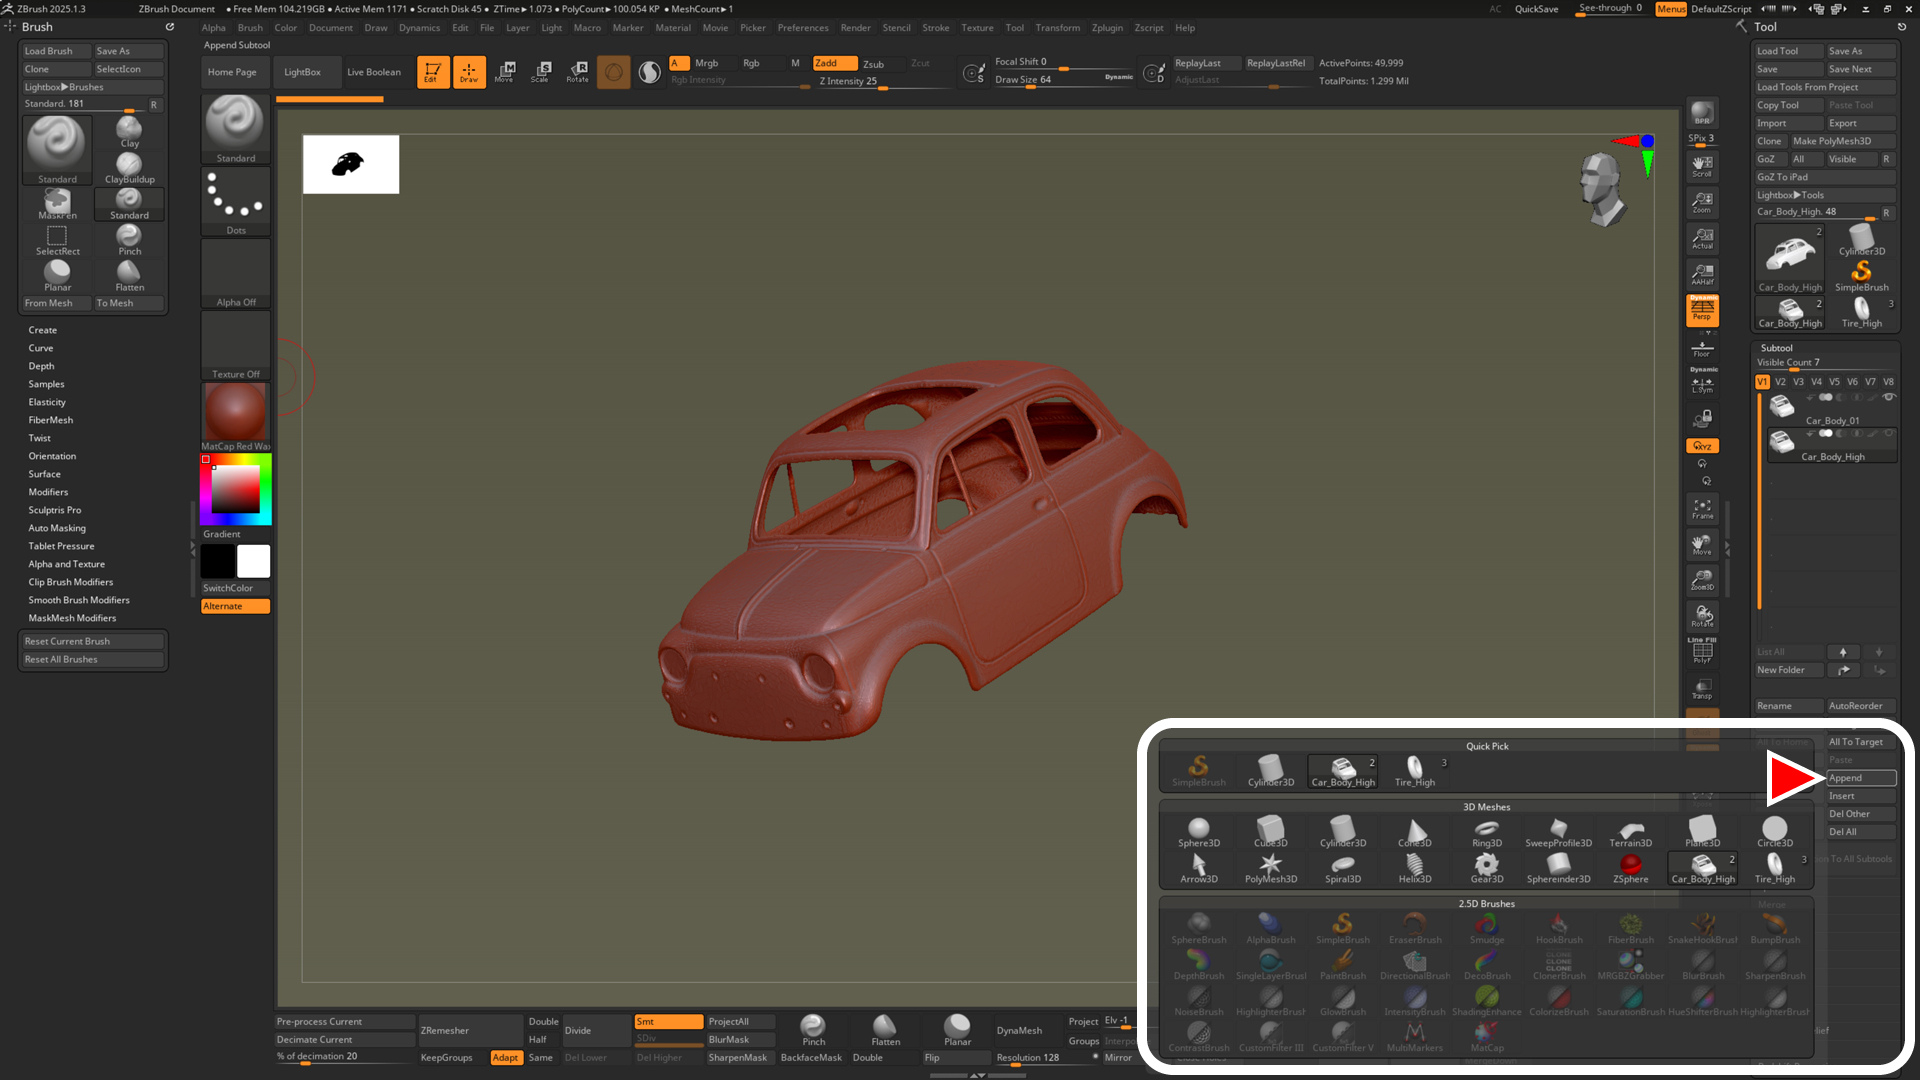
ZTool(ZTL)のロード方法(複数の場合)
上記の手順からの続きとなります。
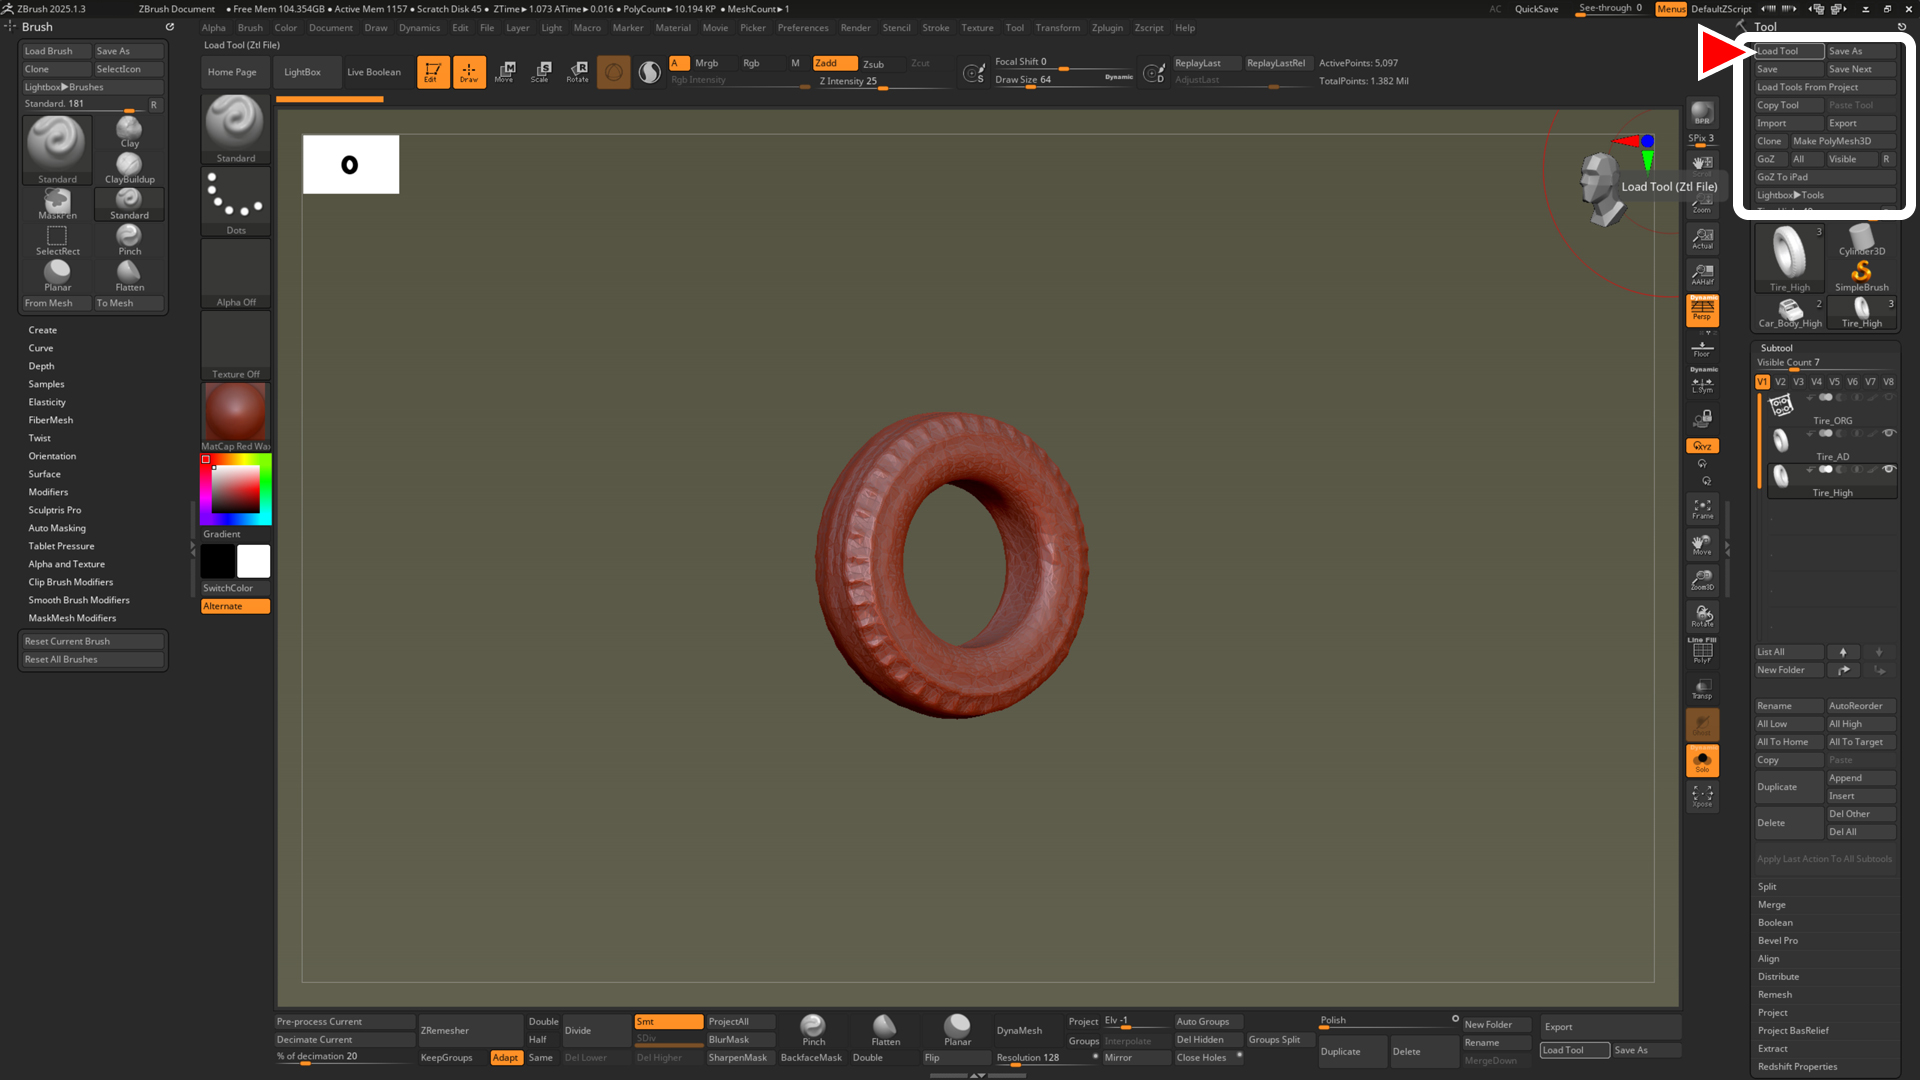
- 先ほどと同じように、[ Tool ] パレット の [ Load Tool ] ボタンをクリックして、
作業に必要な ZTL ファイルを読み込み [ Tool ] に追加していきます。![]()
- [ Tool ] から作業のメインとなる PolyMesh3D を選択します。
![]()
- [ Tool ] パレットの [ Subtool ] から [ Append ] ボタンをクリックして、
追加した ZTL ファイルを選択します。![]()
- サブツールの一番下に 1 つだけ 追加されます。
![]()
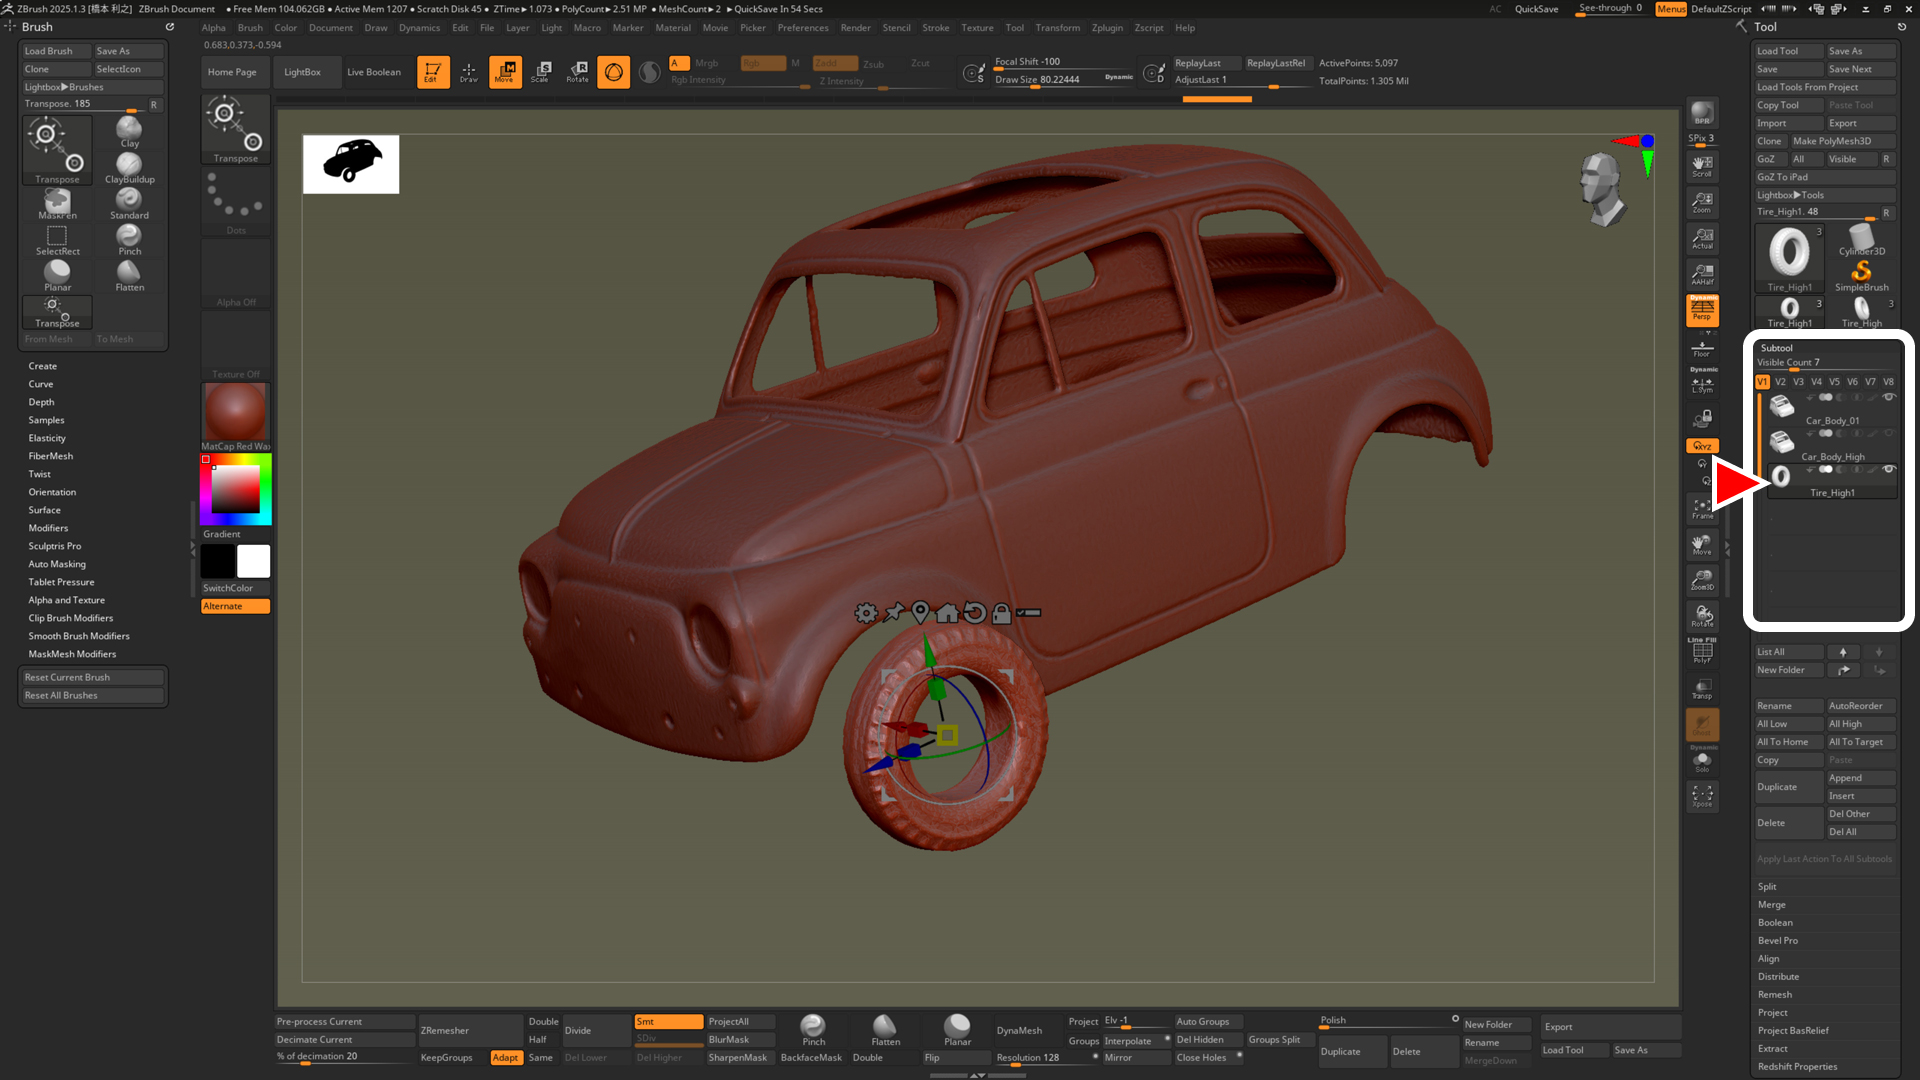
ポイント‼
[ Append ] を利用して追加すると、サブツールの一番下に 1 つだけ追加されます。
全てのレイヤーの Polymesh3D を追加したい場合は、以下の手順が必要です!!
[ Zplugin ] パレットの [ Subtool Master ] から [ MultiAppend ] を使用します。
複数で構成された PolyMesh3D を追加できます。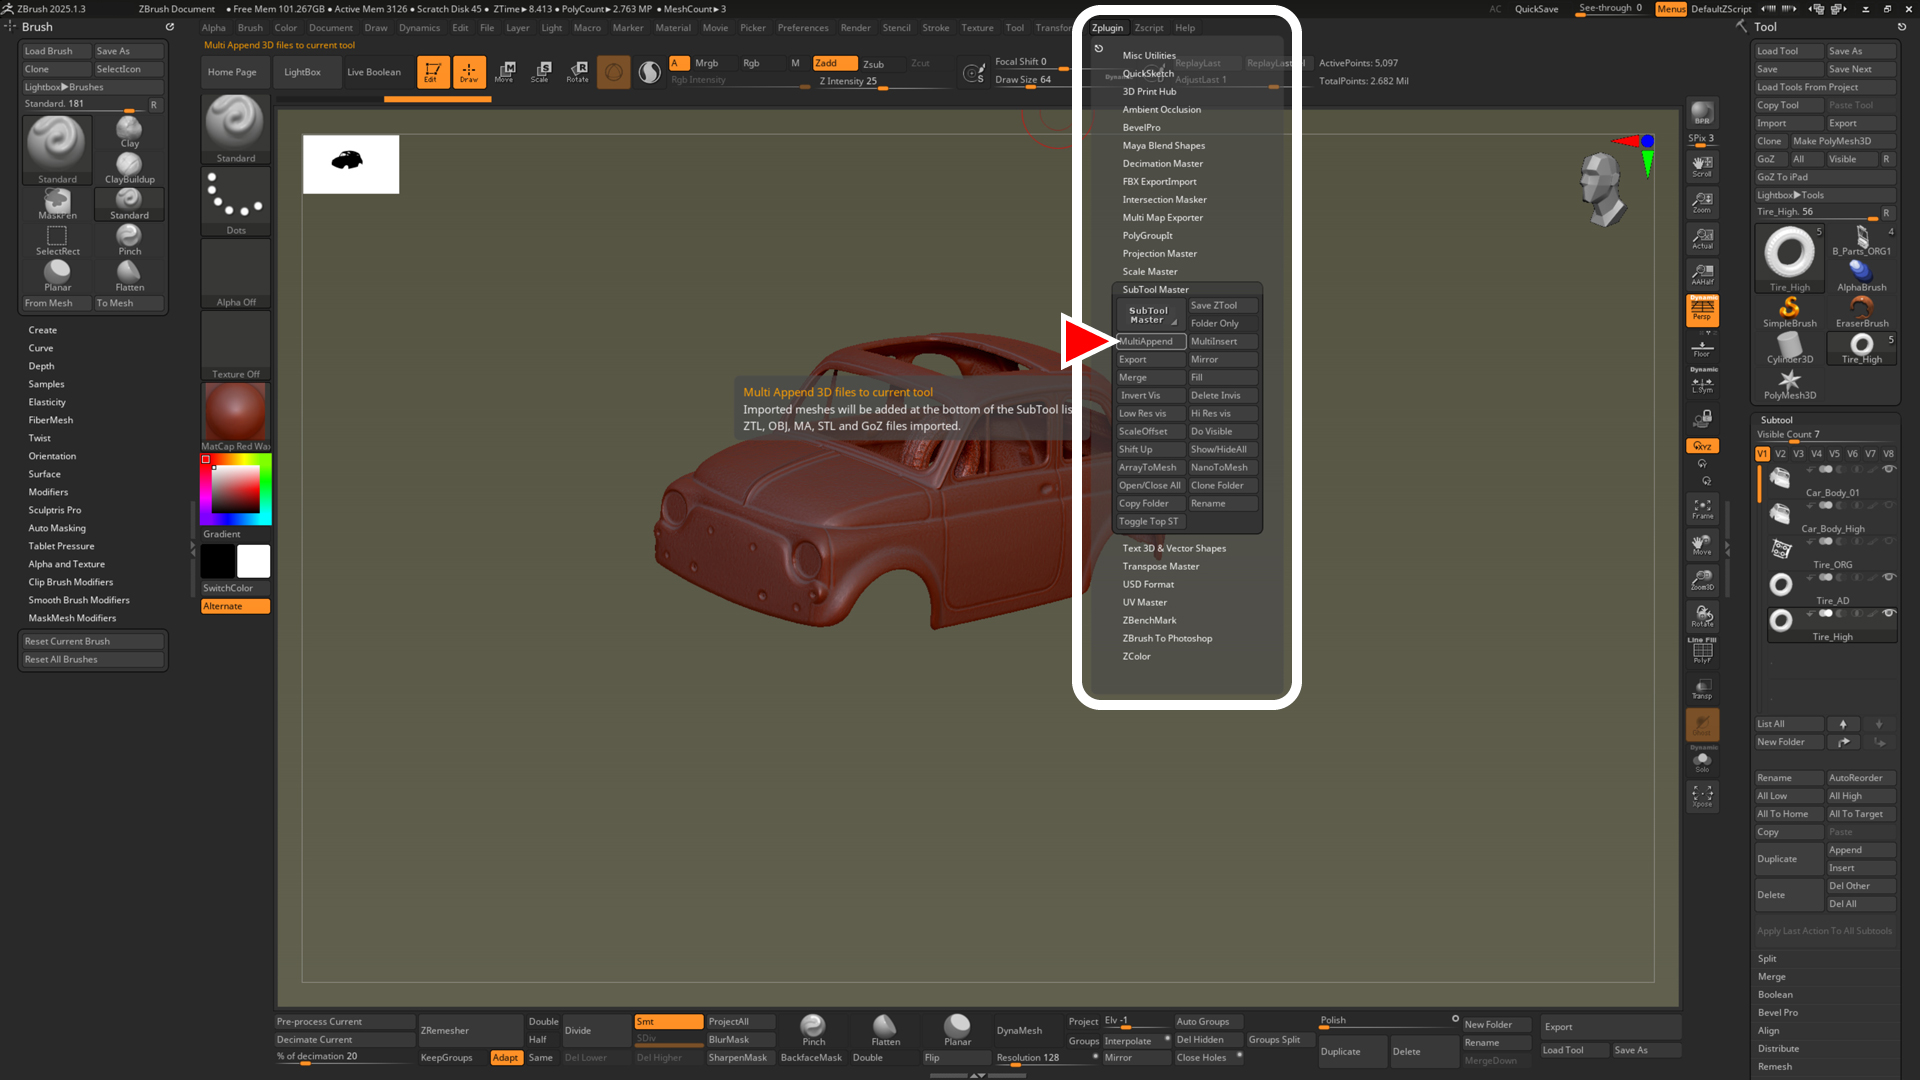
ZProject(ZPR)の保存方法について
ZProject で保存すると
ZProject(ZPR)で保存すると、
ZTool(ZTL)の情報 ( Tool に読み込まれているすべてのPolyMesh3D ) に加えて、
シーンの情報(ドキュメントサイズ、背景色など)が追加で保存されます。
そのため、データ容量が多くなります。
- ZProject(ZPR)の保存方法
[ File ] パレット の [ Save As ] ボタンをクリックして保存します。 - ZProject(ZPR)のロード方法
[ File ] パレット の [ Open ] ボタンをクリックして、ZPR ファイルを選択します。![]()
![[ Zbrush ] UIをカスタムする方法について](https://www.plamophy.com/wp-content/uploads/ZBrush_ui-customization_01-300x169.jpg)
![[ Substance 3D Painter ] マテリアル、テクスチャのインポート方法](https://www.plamophy.com/wp-content/uploads/substance3dpainter-ec-resource-import-01-150x150.jpg)
![[ Substance 3D Painter ] 新規作成とノーマルに関する設定項目](https://www.plamophy.com/wp-content/uploads/substance3dpainter-ec-newproject-creation-01-150x150.jpg)
![[ Substance 3D Painter ] シンメトリーを使用したペイント方法](https://www.plamophy.com/wp-content/uploads/substance3dpainter-ec-painting-brush-symmetry-01-150x150.jpg)
![[ Substance 3D Painter ] マテリアル、テクスチャのインポート方法](https://www.plamophy.com/wp-content/uploads/substance3dpainter-ec-resource-import-01-300x125.jpg)
![[ Substance 3D Painter ] ベイクの手順と共通設定](https://www.plamophy.com/wp-content/uploads/substance3dpainter-ec-baking-mode-01-300x125.png)
![[ Substance 3D Painter ] テクスチャエクスポートの設定方法](https://www.plamophy.com/wp-content/uploads/substance3dpainter-ec-export-textures-01-300x125.jpg)
![[ Substance 3D Painter ] 半透明マテリアルのシェーダー設定方法](https://www.plamophy.com/wp-content/uploads/substance3dpainter-ec-shader-settings-alpha-blending-01-300x125.png)
![[ Substance 3D Painter ] ペイントブラシの設定方法](https://www.plamophy.com/wp-content/uploads/substance3dpainter-ec-painting-brush-setting-01-300x125.jpg)
![[ Substance 3D Painter ] シンメトリーを使用したペイント方法](https://www.plamophy.com/wp-content/uploads/substance3dpainter-ec-painting-brush-symmetry-01-300x125.jpg)
![[ Substance 3D Painter ] ポリゴン塗りつぶしツールを使用したマスキング方法](https://www.plamophy.com/wp-content/uploads/substance3dpainter-ec-masking-polygon-fill-01-300x125.jpg)
![[ Substance 3D Painter ] 色相の変更とグラデーションの作成方法](https://www.plamophy.com/wp-content/uploads/substance3dpainter-ec-painting-color-variations-01-300x125.jpg)
![[ Substance 3D Painter ] 環境マップの設定と明るさの調整方法](https://www.plamophy.com/wp-content/uploads/substance3dpainter-ec-display-settings-01-300x125.jpg)
![[ Substance 3D Painter ] レンダリングの設定項目](https://www.plamophy.com/wp-content/uploads/substance3dpainter-ec-rendering-01-300x125.jpg)
![[ Zbrush ] データの保存とロード方法について](https://www.plamophy.com/wp-content/uploads/ZBrush_data_storage_format_01-300x169.jpg)
![[ Zbrush ] 起動時に LihgtBox を非表示にする設定方法](https://www.plamophy.com/wp-content/uploads/ZBrush_lightbbox_01-300x169.jpg)
![[ Zbrush ] スカルプトするまでの手順](https://www.plamophy.com/wp-content/uploads/ZBrush_3d-edit-mode_03-300x169.jpg)
![[ Zbrush ] ドキュメントサイズの設定方法](https://www.plamophy.com/wp-content/uploads/ZBrush_document-size_10-300x169.jpg)