![[ Substance 3D Painter ] シンメトリーを使用したペイント方法](https://www.plamophy.com/wp-content/uploads/substance3dpainter-ec-painting-brush-symmetry-01.jpg)
![[ Substance 3D Painter ] 半透明マテリアルのシェーダー設定方法](https://www.plamophy.com/wp-content/uploads/substance3dpainter-ec-shader-settings-alpha-blending-01.png)

![[ Substance 3D Designer 入門 ] Substance 3D Painter に出力するまでの基本的な手順について](https://www.plamophy.com/wp-content/uploads/substance3ddesigner-ec-camouflage-01.jpg)
![[ Substance 3D Painter ] レンダリングの設定項目](https://www.plamophy.com/wp-content/uploads/substance3dpainter-ec-rendering-01.jpg)
![[ Zbrush ] UIをカスタムする方法について](https://www.plamophy.com/wp-content/uploads/ZBrush_ui-customization_01.jpg)
![[ Zbrush ] データの保存とロード方法について](https://www.plamophy.com/wp-content/uploads/ZBrush_data_storage_format_01.jpg)
![[ Youtube ] おすすめの一覧です](https://www.plamophy.com/wp-content/uploads/youtube-recommended-list.jpg)
![[ Substance 3D Painter ] Texture Set List(テクスチャセットリスト) の表示内容について](https://www.plamophy.com/wp-content/uploads/substance3dpainter-ec-texture-set-list-01.jpg)
モデルの読み込みをすると、画面の右上に Texture Set List が表示されます。
バージョン 8.3.1 以降では、この Texture Set List からテクスチャ解像度とシェーダーの変更もできるようになり便利になりました。
本記事では、Texture Set List の以下の項目について確認したいと思います。
・表示内容について
・テクスチャ解像度とシェーダーの変更方法について
テクスチャセットリストの表示内容について
初期設定の UI では、モデルの読み込みをすると、画面の右上に Texture Set List が表示されます。
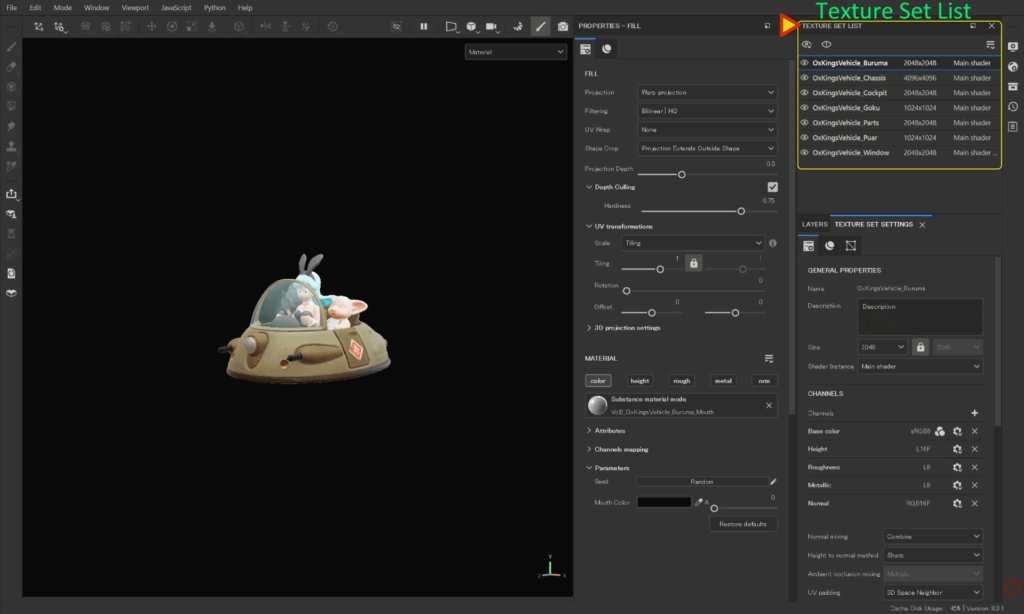
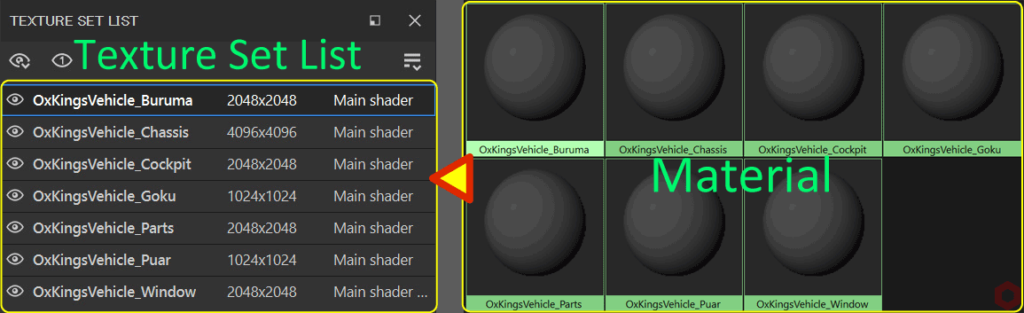
Texture Set List は、リストの左側から 3D アプリケーションでメッシュに割り当てられたマテリアル名、中央にテクスチャ解像度、右側にシェーダー名が表示されています。
この Texture Set List からひとつ選択して、テクスチャを作成していくことになります。
テクスチャ解像度とシェーダーの変更方法
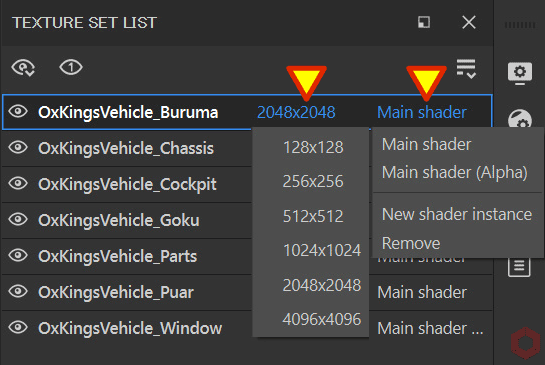
バージョン 8.3.1 以降では、この Texture Set List から解像度とシェーダーの変更ができるようになりました。
それ以前は、Texture Set Settings から変更する必要があったので、便利になりました!
変更方法は簡単で、解像度またはシェーダー名を 左クリック するとプルダウンメニューが表示されますので、そこから変更することができます。
シェーダーは変更するだけでなく、作成することもできます。
シェーダーの作成方法については、詳しくはこちらのページをご参照ください。
まとめ
Texture Set List の表示内容と、テクスチャ解像とシェーダーの変更方法について確認いたしました。
3Dアプリケーションで作成したマテリアル名と関連しているので、識別しやすいマテリアル名にしておくことで作業しやすくなります!
次のページでは、Texture Set Settings(テクスチャセット設定)について確認します!
次のページへ Let’s go!
![[ Substance 3D Painter ] 環境マップの設定と明るさの調整方法](https://www.plamophy.com/wp-content/uploads/substance3dpainter-ec-display-settings-01-300x125.jpg)
![[ Substance 3D Painter ] Texture Set Settings(テクスチャセット設定)について](https://www.plamophy.com/wp-content/uploads/substance3dpainter-ec-texture-set-settings-01-300x125.jpg)
![[ Substance 3D Painter ] Hard Surface 素材を使用してノーマルにペイントする方法](https://www.plamophy.com/wp-content/uploads/substance3dpainter-ec-painting-brush-normal-01.jpg)
![[ Unreal Engine 5.3.1 ] Procedural Content Generation (PCG) の使用方法について](https://www.plamophy.com/wp-content/uploads/unrealengine-ec-pcg-01.png)
![[ Zbrush ] データの保存とロード方法について](https://www.plamophy.com/wp-content/uploads/ZBrush_data_storage_format_01-150x150.jpg)
![[ Substance 3D Designer 入門 ] Substance 3D Painter に出力するまでの基本的な手順について](https://www.plamophy.com/wp-content/uploads/substance3ddesigner-ec-camouflage-01-150x150.jpg)
![[ Substance 3D Painter ] テクスチャエクスポートの設定方法](https://www.plamophy.com/wp-content/uploads/substance3dpainter-ec-export-textures-01-150x150.jpg)
![[ Zbrush ] ZBrushで使用する用語について](https://www.plamophy.com/wp-content/uploads/ZBrush_document-size_10-150x150.jpg)
![[ Substance 3D Painter ] マテリアル、テクスチャのインポート方法](https://www.plamophy.com/wp-content/uploads/substance3dpainter-ec-resource-import-01-300x125.jpg)
![[ Substance 3D Painter ] ベイクの手順と共通設定](https://www.plamophy.com/wp-content/uploads/substance3dpainter-ec-baking-mode-01-300x125.png)
![[ Substance 3D Painter ] テクスチャエクスポートの設定方法](https://www.plamophy.com/wp-content/uploads/substance3dpainter-ec-export-textures-01-300x125.jpg)
![[ Substance 3D Painter ] 半透明マテリアルのシェーダー設定方法](https://www.plamophy.com/wp-content/uploads/substance3dpainter-ec-shader-settings-alpha-blending-01-300x125.png)
![[ Substance 3D Painter ] ペイントブラシの設定方法](https://www.plamophy.com/wp-content/uploads/substance3dpainter-ec-painting-brush-setting-01-300x125.jpg)
![[ Substance 3D Painter ] シンメトリーを使用したペイント方法](https://www.plamophy.com/wp-content/uploads/substance3dpainter-ec-painting-brush-symmetry-01-300x125.jpg)
![[ Substance 3D Painter ] ポリゴン塗りつぶしツールを使用したマスキング方法](https://www.plamophy.com/wp-content/uploads/substance3dpainter-ec-masking-polygon-fill-01-300x125.jpg)
![[ Substance 3D Painter ] 色相の変更とグラデーションの作成方法](https://www.plamophy.com/wp-content/uploads/substance3dpainter-ec-painting-color-variations-01-300x125.jpg)
![[ Substance 3D Painter ] レンダリングの設定項目](https://www.plamophy.com/wp-content/uploads/substance3dpainter-ec-rendering-01-300x125.jpg)
![[ Zbrush ] データの保存とロード方法について](https://www.plamophy.com/wp-content/uploads/ZBrush_data_storage_format_01-300x169.jpg)
![[ Zbrush ] UIをカスタムする方法について](https://www.plamophy.com/wp-content/uploads/ZBrush_ui-customization_01-300x169.jpg)
![[ Zbrush ] 起動時に LihgtBox を非表示にする設定方法](https://www.plamophy.com/wp-content/uploads/ZBrush_lightbbox_01-300x169.jpg)
![[ Zbrush ] スカルプトするまでの手順](https://www.plamophy.com/wp-content/uploads/ZBrush_3d-edit-mode_03-300x169.jpg)
![[ Zbrush ] ドキュメントサイズの設定方法](https://www.plamophy.com/wp-content/uploads/ZBrush_document-size_10-300x169.jpg)