![[ Youtube ] おすすめの一覧です](https://www.plamophy.com/wp-content/uploads/youtube-recommended-list.jpg)
![[ Zbrush ] データの保存とロード方法について](https://www.plamophy.com/wp-content/uploads/ZBrush_data_storage_format_01.jpg)
![[ Substance 3D Painter ] ペイントブラシの設定方法](https://www.plamophy.com/wp-content/uploads/substance3dpainter-ec-painting-brush-setting-01.jpg)
![[ Zbrush ] UIをカスタムする方法について](https://www.plamophy.com/wp-content/uploads/ZBrush_ui-customization_01.jpg)
![[ Substance 3D Painter ] 半透明マテリアルのシェーダー設定方法](https://www.plamophy.com/wp-content/uploads/substance3dpainter-ec-shader-settings-alpha-blending-01.png)
![[ Substance 3D Designer 入門 ] Substance 3D Painter に出力するまでの基本的な手順について](https://www.plamophy.com/wp-content/uploads/substance3ddesigner-ec-camouflage-01.jpg)
![[ Substance 3D Painter ] シンメトリーを使用したペイント方法](https://www.plamophy.com/wp-content/uploads/substance3dpainter-ec-painting-brush-symmetry-01.jpg)
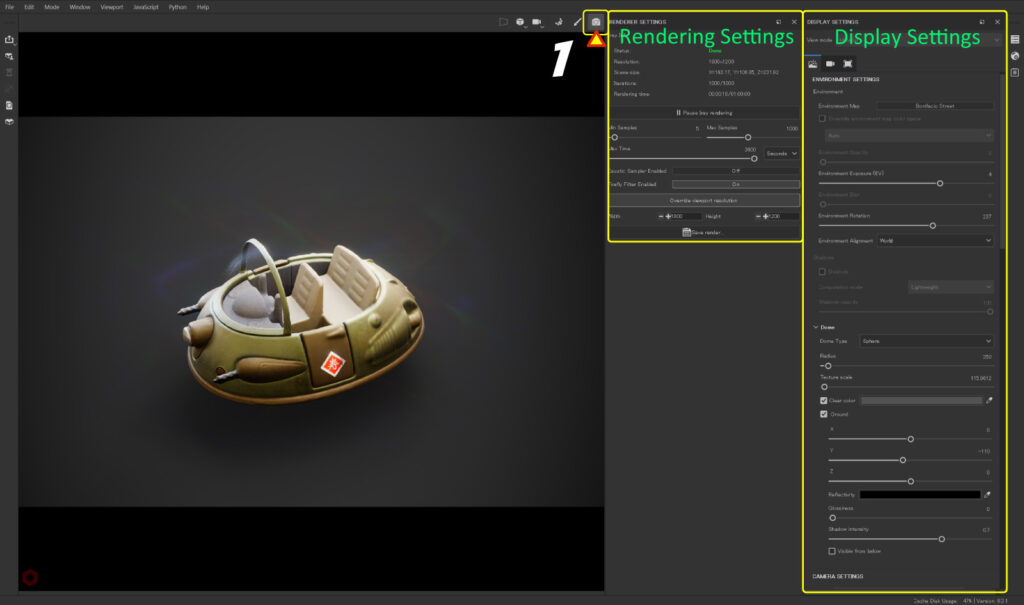
![[ Substance 3D Painter ] レンダリングの設定項目](https://www.plamophy.com/wp-content/uploads/substance3dpainter-ec-rendering-01.jpg)
Substance 3D Painter では Iray を使用したレンダリングを行うことができます。背景の色を変えたり、被写界深度、ポストエフェクトを使用して高解像度の画像を作成することができます。
本記事では、レンダリングの設定項目について確認したいと思います。
レンダリングの設定項目
Iray を起動するには、画面上部の [ カメラ ] のアイコン をクリックします。
環境マップ、背景色に関する設定
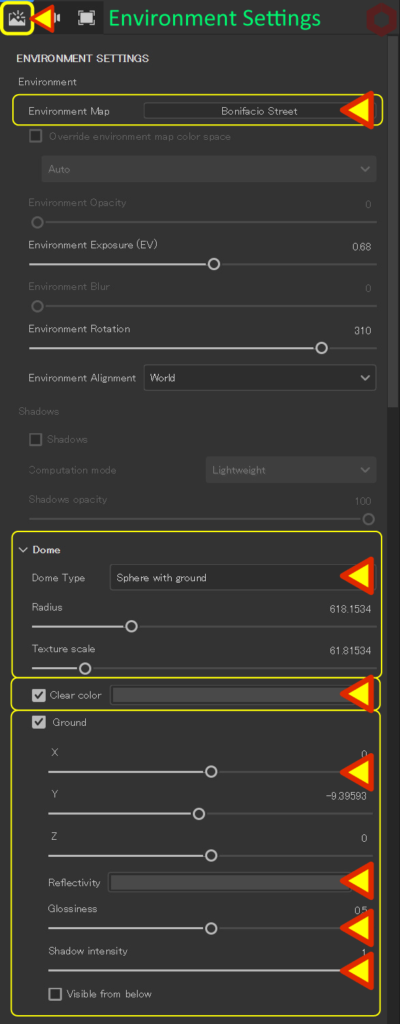
[ Display Settings ] から、背景・被写界深度・エフェクトなどの設定を変更します。
・ Environment map
環境マップを変更できます。
・Dome
環境マップの投影方法と、位置を調整できます。
・Clear color
背景色を設定できます。
・Ground X Y Z
地面の位置を調整できます。
・Reflectivity
反射の強度と色を設定できます。
白色に近づけると反射されるようになります。
・Glossiness
反射の光沢を設定できます。
・Shadow intensity
影の濃さを調整できます。
被写界深度(カメラ)に関する設定
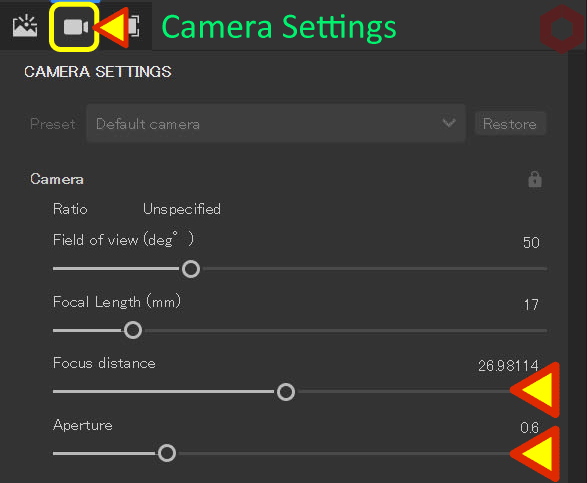
▼ Focus distance(焦点距離)
焦点が合う位置を設定できます。
Ctrl + 中クリックで、クリックした位置に焦点が合うようになります。
▼ Aperture(絞り)
カメラのピント(ぼけ具合)を調整できます。
数値を大きくすると、ぼけ具合が強くなります。
ポスト エフェクトに関する設定
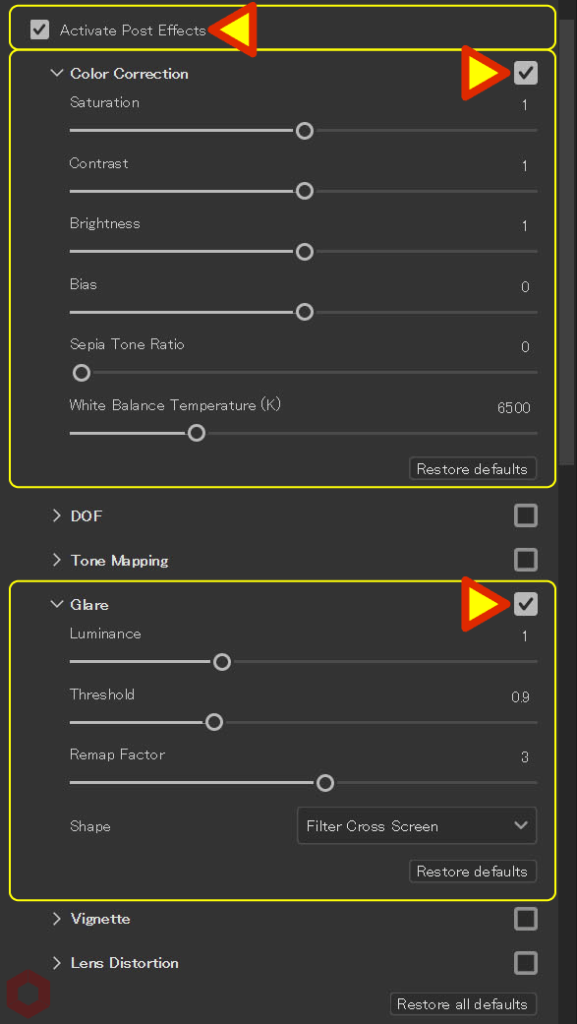
▼ Activate Post Effects
ポストエフェクトを有効にします。
▼ Color Correction
色補正をすることができます。
▼ Glare
レンズフレア や ブルーム などのグレアを調整
することができます。
グレアの種類は、[ Shape ] から選択できます。
レンダリング品質に関する設定
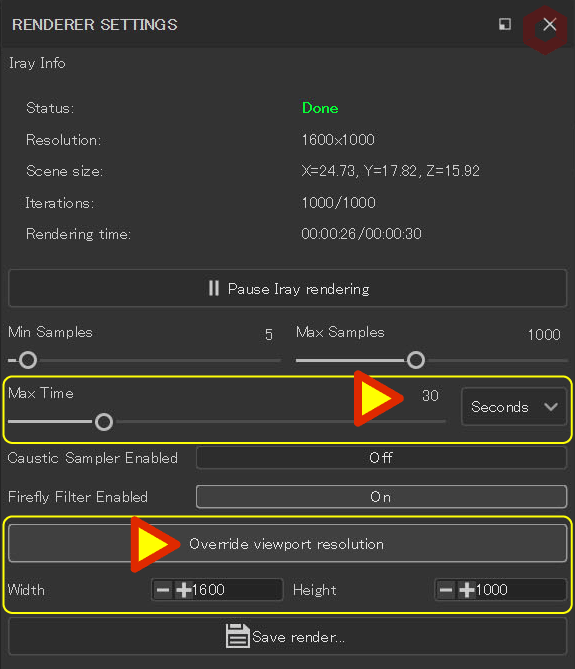
[ Renderer Settings ] から、レンダリング品質を設定します。
▼ Max Time
レンダリングの最大時間上げることによって、
レンダリング品質を上げることができます。
▼ Override viewport resolution
[ Override viewport resolution ] ボタンを
クリックして有効にすることで、
[ Width ] [ Height ] から画像サイズを
変更できます。
まとめ
レンダリングする方法について確認いたしました。
ポストエフェクトやカメラの画角の設定は、通常のペイント画面でも反映されますので、レンダリングの確認後は元に戻しておきます。または、Display Settings からも設定を戻すことができます。
次回は、シンプルなブランクキャンパスの作り方を紹介予定です!
![[ Substance 3D Painter ] テクスチャエクスポートの設定方法](https://www.plamophy.com/wp-content/uploads/substance3dpainter-ec-export-textures-01-300x125.jpg)
![[ Unreal Engine 5.3.1 ] Procedural Content Generation (PCG) の使用方法について](https://www.plamophy.com/wp-content/uploads/unrealengine-ec-pcg-01-300x125.png)
![[ Substance 3D Painter ] Hard Surface 素材を使用してノーマルにペイントする方法](https://www.plamophy.com/wp-content/uploads/substance3dpainter-ec-painting-brush-normal-01.jpg)

![[ Unreal Engine 5.3.1 ] Procedural Content Generation (PCG) の使用方法について](https://www.plamophy.com/wp-content/uploads/unrealengine-ec-pcg-01.png)
![[ Substance 3D Designer 入門 ] Substance 3D Painter に出力するまでの基本的な手順について](https://www.plamophy.com/wp-content/uploads/substance3ddesigner-ec-camouflage-01-150x150.jpg)
![[ Substance 3D Painter ] テクスチャエクスポートの設定方法](https://www.plamophy.com/wp-content/uploads/substance3dpainter-ec-export-textures-01-150x150.jpg)
![[ Substance 3D Painter ] ハイトマップの追加と調整方法](https://www.plamophy.com/wp-content/uploads/substance3dpainter-ec-painting-height-map-01-150x150.png)
![[ Substance 3D Painter ] 環境マップの設定と明るさの調整方法](https://www.plamophy.com/wp-content/uploads/substance3dpainter-ec-display-settings-01-150x150.jpg)
![[ Substance 3D Painter ] マテリアル、テクスチャのインポート方法](https://www.plamophy.com/wp-content/uploads/substance3dpainter-ec-resource-import-01-300x125.jpg)
![[ Substance 3D Painter ] ベイクの手順と共通設定](https://www.plamophy.com/wp-content/uploads/substance3dpainter-ec-baking-mode-01-300x125.png)
![[ Substance 3D Painter ] 半透明マテリアルのシェーダー設定方法](https://www.plamophy.com/wp-content/uploads/substance3dpainter-ec-shader-settings-alpha-blending-01-300x125.png)
![[ Substance 3D Painter ] ペイントブラシの設定方法](https://www.plamophy.com/wp-content/uploads/substance3dpainter-ec-painting-brush-setting-01-300x125.jpg)
![[ Substance 3D Painter ] シンメトリーを使用したペイント方法](https://www.plamophy.com/wp-content/uploads/substance3dpainter-ec-painting-brush-symmetry-01-300x125.jpg)
![[ Substance 3D Painter ] ポリゴン塗りつぶしツールを使用したマスキング方法](https://www.plamophy.com/wp-content/uploads/substance3dpainter-ec-masking-polygon-fill-01-300x125.jpg)
![[ Substance 3D Painter ] 色相の変更とグラデーションの作成方法](https://www.plamophy.com/wp-content/uploads/substance3dpainter-ec-painting-color-variations-01-300x125.jpg)
![[ Substance 3D Painter ] 環境マップの設定と明るさの調整方法](https://www.plamophy.com/wp-content/uploads/substance3dpainter-ec-display-settings-01-300x125.jpg)
![[ Substance 3D Painter ] レンダリングの設定項目](https://www.plamophy.com/wp-content/uploads/substance3dpainter-ec-rendering-01-300x125.jpg)
![[ Zbrush ] データの保存とロード方法について](https://www.plamophy.com/wp-content/uploads/ZBrush_data_storage_format_01-300x169.jpg)
![[ Zbrush ] UIをカスタムする方法について](https://www.plamophy.com/wp-content/uploads/ZBrush_ui-customization_01-300x169.jpg)
![[ Zbrush ] 起動時に LihgtBox を非表示にする設定方法](https://www.plamophy.com/wp-content/uploads/ZBrush_lightbbox_01-300x169.jpg)
![[ Zbrush ] スカルプトするまでの手順](https://www.plamophy.com/wp-content/uploads/ZBrush_3d-edit-mode_03-300x169.jpg)
![[ Zbrush ] ドキュメントサイズの設定方法](https://www.plamophy.com/wp-content/uploads/ZBrush_document-size_10-300x169.jpg)