![[ Zbrush ] UIをカスタムする方法について](https://www.plamophy.com/wp-content/uploads/ZBrush_ui-customization_01.jpg)
![[ Substance 3D Painter ] Hard Surface 素材を使用してノーマルにペイントする方法](https://www.plamophy.com/wp-content/uploads/substance3dpainter-ec-painting-brush-normal-01.jpg)

![[ Unreal Engine 5.3.1 ] Procedural Content Generation (PCG) の使用方法について](https://www.plamophy.com/wp-content/uploads/unrealengine-ec-pcg-01.png)
![[ Zbrush ] データの保存とロード方法について](https://www.plamophy.com/wp-content/uploads/ZBrush_data_storage_format_01.jpg)
![[ Substance 3D Painter ] 半透明マテリアルのシェーダー設定方法](https://www.plamophy.com/wp-content/uploads/substance3dpainter-ec-shader-settings-alpha-blending-01.png)
![[ Substance 3D Painter ] シンメトリーを使用したペイント方法](https://www.plamophy.com/wp-content/uploads/substance3dpainter-ec-painting-brush-symmetry-01.jpg)
![[ Substance 3D Designer 入門 ] Substance 3D Painter に出力するまでの基本的な手順について](https://www.plamophy.com/wp-content/uploads/substance3ddesigner-ec-camouflage-01.jpg)
![[ Substance 3D Painter ] 金属質感のフィルターの追加方法](https://www.plamophy.com/wp-content/uploads/substance3dpainter-ec-painting-filter-01.jpg)
金属質のテクスチャを作成している場合は、Assets に金属のフィルターがいくつか用意されていますので、この金属質感のフィルターを追加することで、さらにノーマル、ラフネスに微妙な変化を加えることができます。
本記事では、金属質感のフィルターの追加方法ついて確認したいと思います。
金属質感のフィルター追加方法
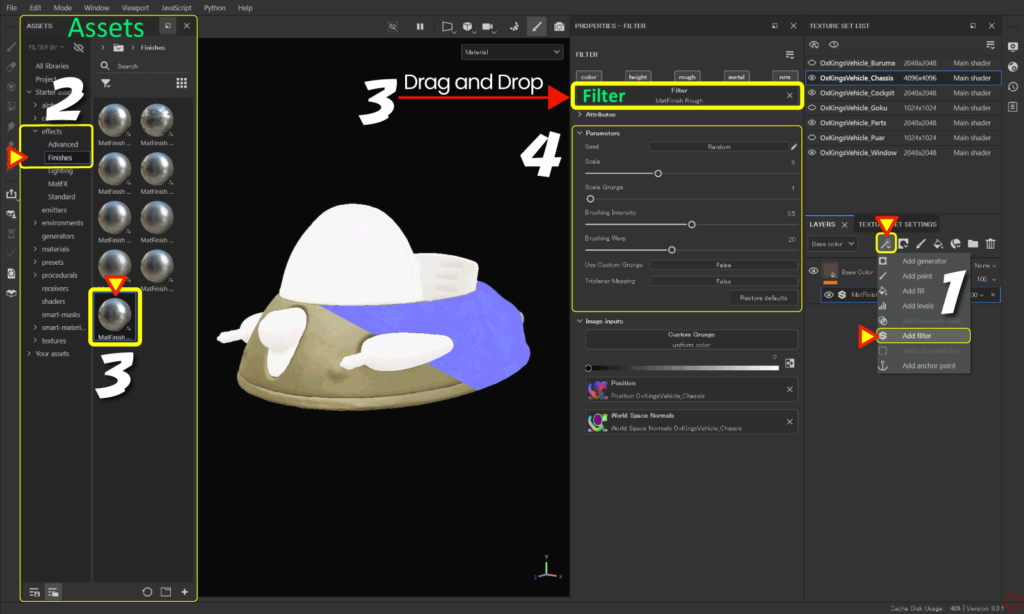
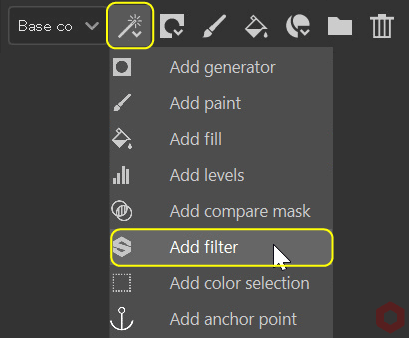
- 編集するレイヤーを選択した状態で、
[ Add effect ] のアイコンをクリックして [ Add filter ] を選択します。![]()
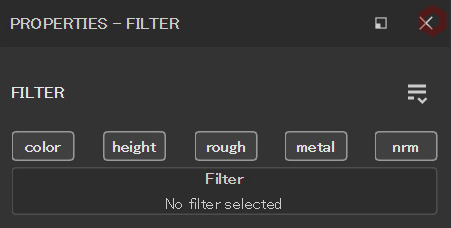
- [ Assets ] から [ effects > Finishes ] を選択します。
- 任意の金属素材を [ Filter ] にドラッグアンドドロップします。
![]()
例:ここでは [ MatFinish Rough ] を使用してます。 - パラメータを調整します。
金属のフィルターのパラメータ [ Intensity ] の数値は、小さめに調整するのがコツになります。
薄くニュアンスをいれて効果を引き出します!
まとめ
金属質感のフィルターを Assets から追加する方法を確認いたしました。
金属質感のフィルターを追加することで、ノーマル、ラフネスに微妙な変化を加えることができます。
[ C ] キーでノーマル、またはラフネスのチャンネルに切り替えることで、調整具合を確認できます!
次のページでは、グランジ素材を使用してラフネスを調整する方法について確認します!
次のページへ Let’s go!
![[ Substance 3D Painter ] 塗りつぶしレイヤーの作成方法](https://www.plamophy.com/wp-content/uploads/substance3dpainter-ec-painting-filllayer-02-300x125.jpg)
![[ Substance 3D Painter ] グランジ素材を使用してラフネスを調整する方法](https://www.plamophy.com/wp-content/uploads/substance3dpainter-ec-painting-roughness-add-01-300x125.jpg)
![[ Youtube ] おすすめの一覧です](https://www.plamophy.com/wp-content/uploads/youtube-recommended-list.jpg)
![[ Substance 3D Painter ] ペイントブラシの設定方法](https://www.plamophy.com/wp-content/uploads/substance3dpainter-ec-painting-brush-setting-01.jpg)
![[ Substance 3D Painter ] プロジェクションツールを使用したペイント方法](https://www.plamophy.com/wp-content/uploads/substance3dpainter-ec-painting-brush-projection-01-150x150.jpg)
![[ Substance 3D Painter ] グランジ素材を使用してラフネスを調整する方法](https://www.plamophy.com/wp-content/uploads/substance3dpainter-ec-painting-roughness-add-01-150x150.jpg)
![[ Substance 3D Painter ] ベイクの手順と共通設定](https://www.plamophy.com/wp-content/uploads/substance3dpainter-ec-baking-mode-01-150x150.png)
![[ Substance 3D Painter ] インポートしたマテリアルの設定方法](https://www.plamophy.com/wp-content/uploads/substance3dpainter-ec-painting-decal-import-01-150x150.jpg)
![[ Substance 3D Painter ] マテリアル、テクスチャのインポート方法](https://www.plamophy.com/wp-content/uploads/substance3dpainter-ec-resource-import-01-300x125.jpg)
![[ Substance 3D Painter ] ベイクの手順と共通設定](https://www.plamophy.com/wp-content/uploads/substance3dpainter-ec-baking-mode-01-300x125.png)
![[ Substance 3D Painter ] テクスチャエクスポートの設定方法](https://www.plamophy.com/wp-content/uploads/substance3dpainter-ec-export-textures-01-300x125.jpg)
![[ Substance 3D Painter ] 半透明マテリアルのシェーダー設定方法](https://www.plamophy.com/wp-content/uploads/substance3dpainter-ec-shader-settings-alpha-blending-01-300x125.png)
![[ Substance 3D Painter ] ペイントブラシの設定方法](https://www.plamophy.com/wp-content/uploads/substance3dpainter-ec-painting-brush-setting-01-300x125.jpg)
![[ Substance 3D Painter ] シンメトリーを使用したペイント方法](https://www.plamophy.com/wp-content/uploads/substance3dpainter-ec-painting-brush-symmetry-01-300x125.jpg)
![[ Substance 3D Painter ] ポリゴン塗りつぶしツールを使用したマスキング方法](https://www.plamophy.com/wp-content/uploads/substance3dpainter-ec-masking-polygon-fill-01-300x125.jpg)
![[ Substance 3D Painter ] 色相の変更とグラデーションの作成方法](https://www.plamophy.com/wp-content/uploads/substance3dpainter-ec-painting-color-variations-01-300x125.jpg)
![[ Substance 3D Painter ] レンダリングの設定項目](https://www.plamophy.com/wp-content/uploads/substance3dpainter-ec-rendering-01-300x125.jpg)
![[ Substance 3D Painter ] 環境マップの設定と明るさの調整方法](https://www.plamophy.com/wp-content/uploads/substance3dpainter-ec-display-settings-01-300x125.jpg)
![[ Zbrush ] データの保存とロード方法について](https://www.plamophy.com/wp-content/uploads/ZBrush_data_storage_format_01-300x169.jpg)
![[ Zbrush ] UIをカスタムする方法について](https://www.plamophy.com/wp-content/uploads/ZBrush_ui-customization_01-300x169.jpg)
![[ Zbrush ] 起動時に LihgtBox を非表示にする設定方法](https://www.plamophy.com/wp-content/uploads/ZBrush_lightbbox_01-300x169.jpg)
![[ Zbrush ] スカルプトするまでの手順](https://www.plamophy.com/wp-content/uploads/ZBrush_3d-edit-mode_03-300x169.jpg)
![[ Zbrush ] ドキュメントサイズの設定方法](https://www.plamophy.com/wp-content/uploads/ZBrush_document-size_10-300x169.jpg)