![[ Zbrush ] UIをカスタムする方法について](https://www.plamophy.com/wp-content/uploads/ZBrush_ui-customization_01.jpg)
![[ Substance 3D Painter ] ペイントブラシの設定方法](https://www.plamophy.com/wp-content/uploads/substance3dpainter-ec-painting-brush-setting-01.jpg)
![[ Unreal Engine 5.3.1 ] Procedural Content Generation (PCG) の使用方法について](https://www.plamophy.com/wp-content/uploads/unrealengine-ec-pcg-01.png)
![[ Zbrush ] データの保存とロード方法について](https://www.plamophy.com/wp-content/uploads/ZBrush_data_storage_format_01.jpg)
![[ Substance 3D Designer 入門 ] Substance 3D Painter に出力するまでの基本的な手順について](https://www.plamophy.com/wp-content/uploads/substance3ddesigner-ec-camouflage-01.jpg)
![[ Substance 3D Painter ] 半透明マテリアルのシェーダー設定方法](https://www.plamophy.com/wp-content/uploads/substance3dpainter-ec-shader-settings-alpha-blending-01.png)
![[ Substance 3D Painter ] Hard Surface 素材を使用してノーマルにペイントする方法](https://www.plamophy.com/wp-content/uploads/substance3dpainter-ec-painting-brush-normal-01.jpg)
![[ Youtube ] おすすめの一覧です](https://www.plamophy.com/wp-content/uploads/youtube-recommended-list.jpg)
![[ Substance 3D Painter ] ジェネレータ Dirt の作成方法](https://www.plamophy.com/wp-content/uploads/substance3dpainter-ec-painting-dirt-01.png)
Curvature(エッジウェア)と同じジェネレータのひとつに Dirt があります。
Dirt はベイク処理された AO と曲率に基づいて、くぼんだ部分のエッジとコーナーを際立たせることができ、またメッシュの表面に汚れた表現を追加することができます。
本記事では、Dirt の作成方法と、Assets の素材を使用してブレンドする方法について確認したいと思います。
ジェネレータ Dirt の作成方法について
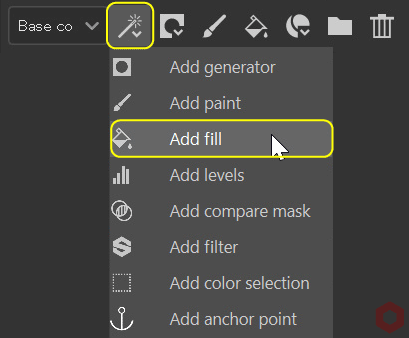
まず始めに、塗りつぶしレイヤーを追加します。
- [ Add Fill layer ] のアイコンをクリックして塗りつぶしレイヤーを追加します。
![]()
![]()
ジェネレータDirt のベースとなる色、質感などを設定します。
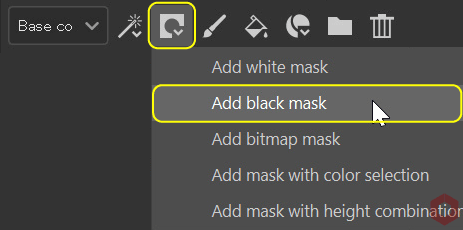
塗りつぶしレイヤーについては、詳しくはこちらのページをご参照ください。 - [ Add mask ] のアイコンをクリックして [ Add black mask ] を選択します。
![]()
![]()
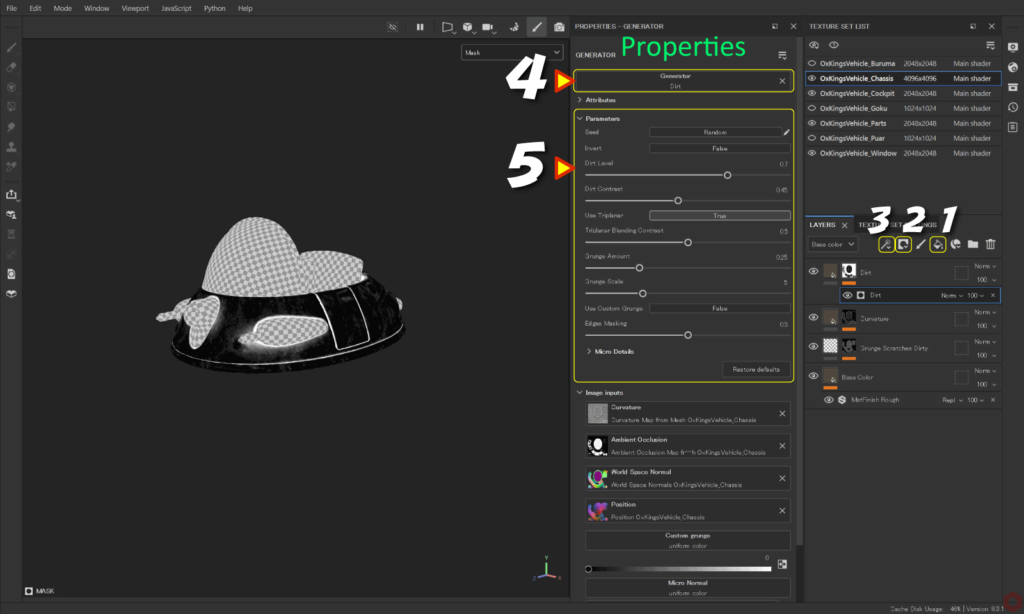
- [ Add effect ] のアイコンをクリックして [ Add generator ] を選択します。
![]()
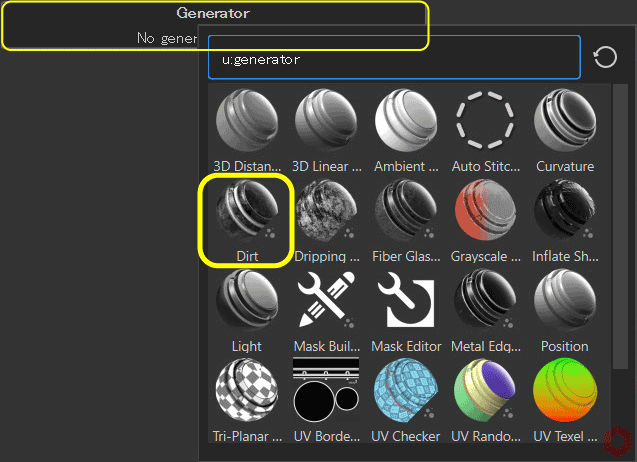
- [ Generator ] ボタンをクリックして [ Dirt ] を選択します。
![]()
- パラメータを調整します。
- 色やラフネスなどの再調整は、塗りつぶしレイヤーに戻ってから行うことができます。
![]()


ブレンド方法について
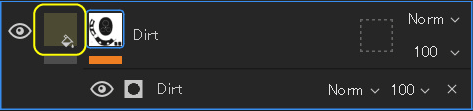
- マスクを選択した状態から、
![]()
[ Add effect ] のアイコンをクリックして [ Add fill ] を選択します。![]()
![]()
![]()
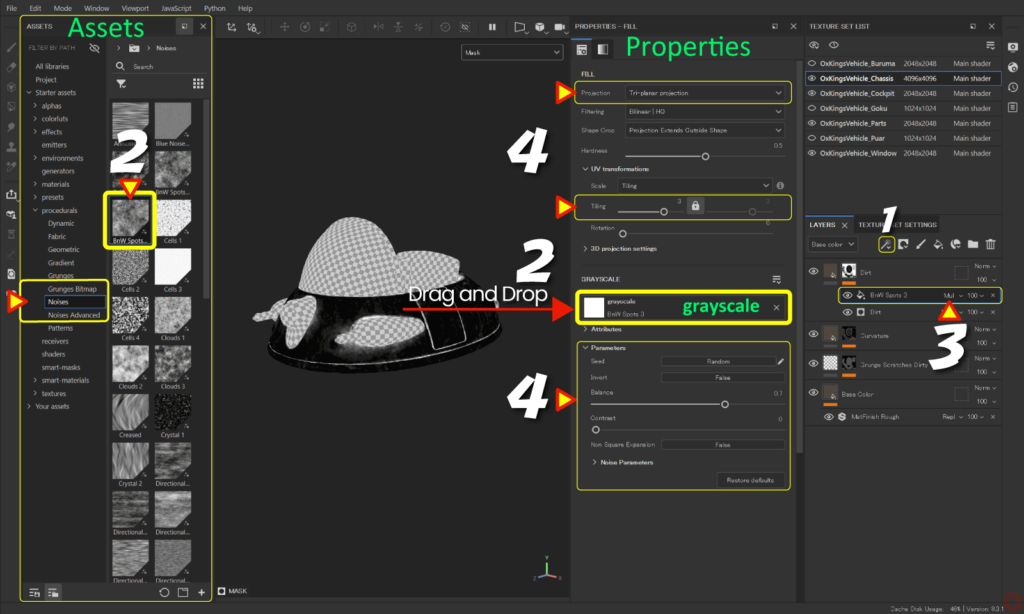
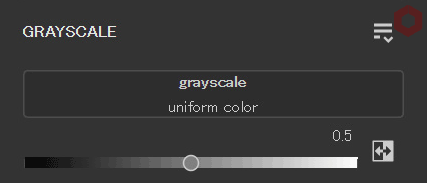
- [ Assets ] から [ procedurals > Noises ] を選択して、
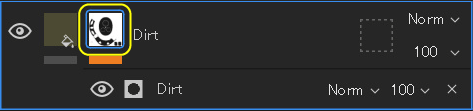
任意の素材を [ grayscale ] にドラッグアンドドロップします。![]()
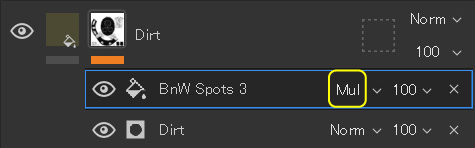
例:ここでは [ Bnw Spots 3 ] を使用してます。 - ブレンドモードを変更します。
![]()
例:ここでは [ Multiply ] を使用してます。![]()
- パラメータの調整、テクスチャ投影方法の変更、位置の調整、またタイリングなど調整します。
例:ここでは投影方法を Tri-planar projection にしてます。


[ C ] キーでマスク、ラスネスのチャンネルに切り替えつつ状態を確認するとパラメータの調整しやすくなります。
[ M ] キーで元の状態に戻ります。
まとめ
ジェネレータ Dirt の作成方法について確認いたしました。Dirt を使用することで、くぼんだ部分をグッと引き締まった印象にすることができます。さらにメッシュ表面に泥や土などの汚れの表現を追加することができます。
次のページでは、色相の変更とグラデーションの作成方法について確認します!
次のページへ Let’s go!
![[ Substance 3D Painter ] Curvature(エッジ ウェア)の作成方法](https://www.plamophy.com/wp-content/uploads/substance3dpainter-ec-painting-curvature-01-300x125.png)
![[ Substance 3D Painter ] 色相の変更とグラデーションの作成方法](https://www.plamophy.com/wp-content/uploads/substance3dpainter-ec-painting-color-variations-01-300x125.jpg)
![[ Substance 3D Painter ] シンメトリーを使用したペイント方法](https://www.plamophy.com/wp-content/uploads/substance3dpainter-ec-painting-brush-symmetry-01.jpg)

![[ Substance 3D Painter ] ステンシルを使用したペイント方法](https://www.plamophy.com/wp-content/uploads/substance3dpainter-ec-painting-brush-stencil-01-150x150.jpg)
![[ Substance 3D Painter ] 環境マップの設定と明るさの調整方法](https://www.plamophy.com/wp-content/uploads/substance3dpainter-ec-display-settings-01-150x150.jpg)
![[ Substance 3D Painter ] テクスチャエクスポートの設定方法](https://www.plamophy.com/wp-content/uploads/substance3dpainter-ec-export-textures-01-150x150.jpg)
![[ Substance 3D Painter ] マテリアル、テクスチャのインポート方法](https://www.plamophy.com/wp-content/uploads/substance3dpainter-ec-resource-import-01-300x125.jpg)
![[ Substance 3D Painter ] ベイクの手順と共通設定](https://www.plamophy.com/wp-content/uploads/substance3dpainter-ec-baking-mode-01-300x125.png)
![[ Substance 3D Painter ] テクスチャエクスポートの設定方法](https://www.plamophy.com/wp-content/uploads/substance3dpainter-ec-export-textures-01-300x125.jpg)
![[ Substance 3D Painter ] 半透明マテリアルのシェーダー設定方法](https://www.plamophy.com/wp-content/uploads/substance3dpainter-ec-shader-settings-alpha-blending-01-300x125.png)
![[ Substance 3D Painter ] ペイントブラシの設定方法](https://www.plamophy.com/wp-content/uploads/substance3dpainter-ec-painting-brush-setting-01-300x125.jpg)
![[ Substance 3D Painter ] シンメトリーを使用したペイント方法](https://www.plamophy.com/wp-content/uploads/substance3dpainter-ec-painting-brush-symmetry-01-300x125.jpg)
![[ Substance 3D Painter ] ポリゴン塗りつぶしツールを使用したマスキング方法](https://www.plamophy.com/wp-content/uploads/substance3dpainter-ec-masking-polygon-fill-01-300x125.jpg)
![[ Substance 3D Painter ] 環境マップの設定と明るさの調整方法](https://www.plamophy.com/wp-content/uploads/substance3dpainter-ec-display-settings-01-300x125.jpg)
![[ Substance 3D Painter ] レンダリングの設定項目](https://www.plamophy.com/wp-content/uploads/substance3dpainter-ec-rendering-01-300x125.jpg)
![[ Zbrush ] データの保存とロード方法について](https://www.plamophy.com/wp-content/uploads/ZBrush_data_storage_format_01-300x169.jpg)
![[ Zbrush ] UIをカスタムする方法について](https://www.plamophy.com/wp-content/uploads/ZBrush_ui-customization_01-300x169.jpg)
![[ Zbrush ] 起動時に LihgtBox を非表示にする設定方法](https://www.plamophy.com/wp-content/uploads/ZBrush_lightbbox_01-300x169.jpg)
![[ Zbrush ] スカルプトするまでの手順](https://www.plamophy.com/wp-content/uploads/ZBrush_3d-edit-mode_03-300x169.jpg)
![[ Zbrush ] ドキュメントサイズの設定方法](https://www.plamophy.com/wp-content/uploads/ZBrush_document-size_10-300x169.jpg)