![[ Unreal Engine 5.3.1 ] Procedural Content Generation (PCG) の使用方法について](https://www.plamophy.com/wp-content/uploads/unrealengine-ec-pcg-01.png)
![[ Zbrush ] UIをカスタムする方法について](https://www.plamophy.com/wp-content/uploads/ZBrush_ui-customization_01.jpg)
![[ Substance 3D Painter ] 半透明マテリアルのシェーダー設定方法](https://www.plamophy.com/wp-content/uploads/substance3dpainter-ec-shader-settings-alpha-blending-01.png)
![[ Zbrush ] データの保存とロード方法について](https://www.plamophy.com/wp-content/uploads/ZBrush_data_storage_format_01.jpg)
![[ Substance 3D Painter ] ペイントブラシの設定方法](https://www.plamophy.com/wp-content/uploads/substance3dpainter-ec-painting-brush-setting-01.jpg)
![[ Substance 3D Designer 入門 ] Substance 3D Painter に出力するまでの基本的な手順について](https://www.plamophy.com/wp-content/uploads/substance3ddesigner-ec-camouflage-01.jpg)

![[ Substance 3D Painter ] シンメトリーを使用したペイント方法](https://www.plamophy.com/wp-content/uploads/substance3dpainter-ec-painting-brush-symmetry-01.jpg)
ブラシのペイント方法のひとつに、シンメトリーがあります。シンメトリーを使用すると、同時に複数の場所にペイントすることができます。シンメトリーには、ミラー(対称)と ラジアル(放射状)の2種類の方法があります。
本記事では、シンメトリーを使用した以下のペイント方法について確認したいと思います。
・ミラー(対称)のシンメトリーの使用方法
・ラジアル(放射状)のシンメトリーの使用方法
ミラー(対称)の使用方法について
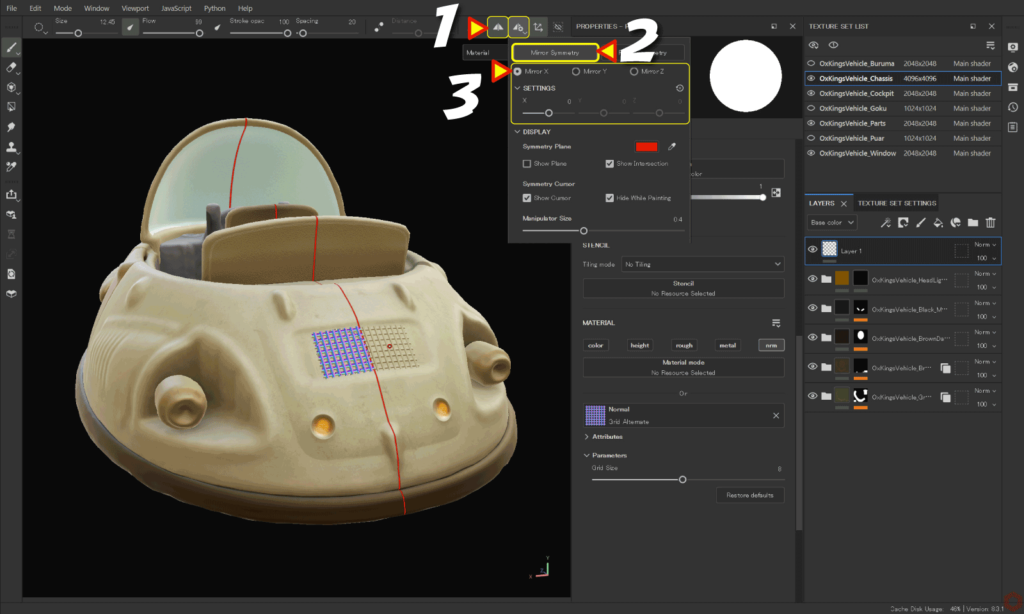
- 画面上部の [ Symmetry ] のアイコン をクリックします。
![]()
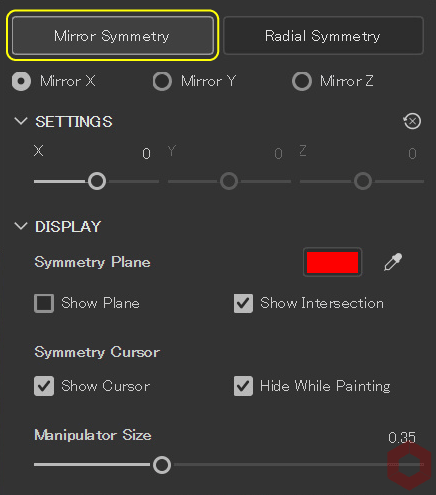
- [ Symmetry Option ] のアイコン をクリックして、
![]()
[ Mirror Symmetry ] を選択します。![]()
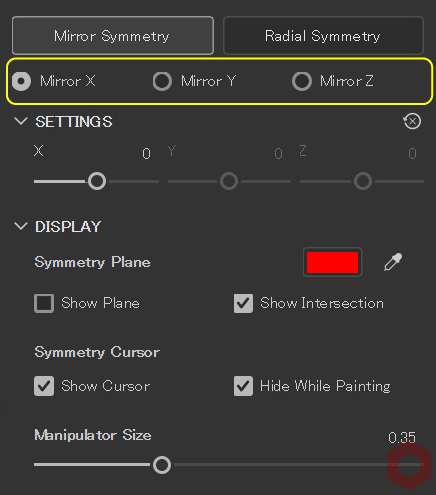
- [ Mirror X ] [ Mirror Y] [ Mirror Z ] から対称となる軸を選択します。
![]()
軸の位置を調整したい場合は、オフセット値の調整を行います。
[ Show/Hide Manipulator ] のアイコン をクリックすると、ビューポート上から、視覚的に移動することができます。![]()
- ブラシのサイズ、角度を調整してペイントします。
ラジアル(放射状)の使用方法について
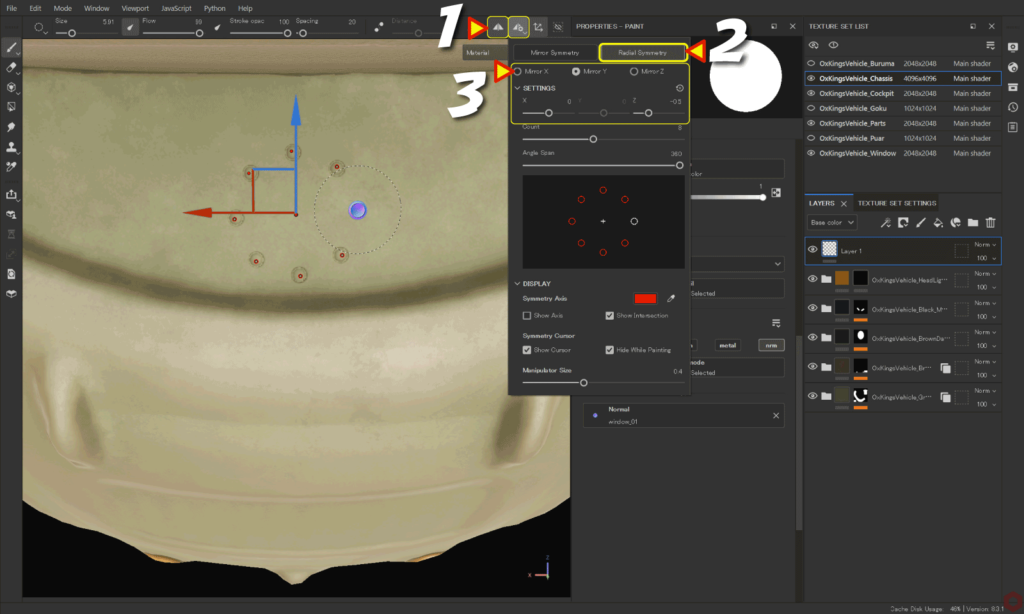
- 画面上部の [ Symmetry ] のアイコン をクリックします。
![]()
- [ Symmetry Option ] のアイコン をクリックして、
![]()
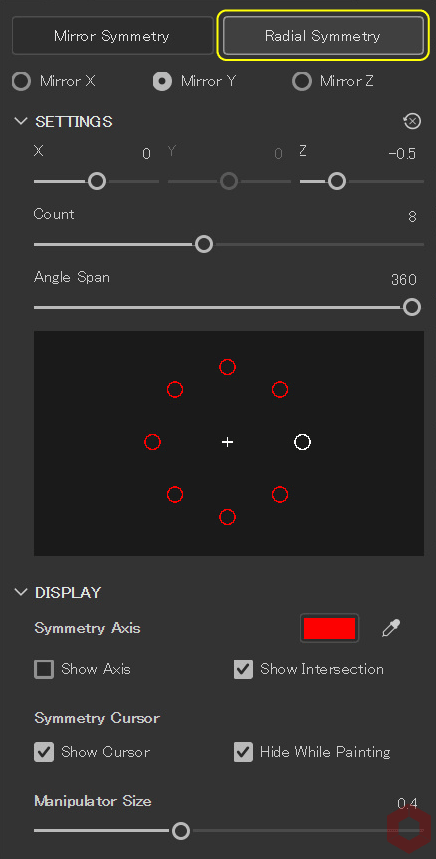
[ Radial Symmetry ] を選択します。![]()
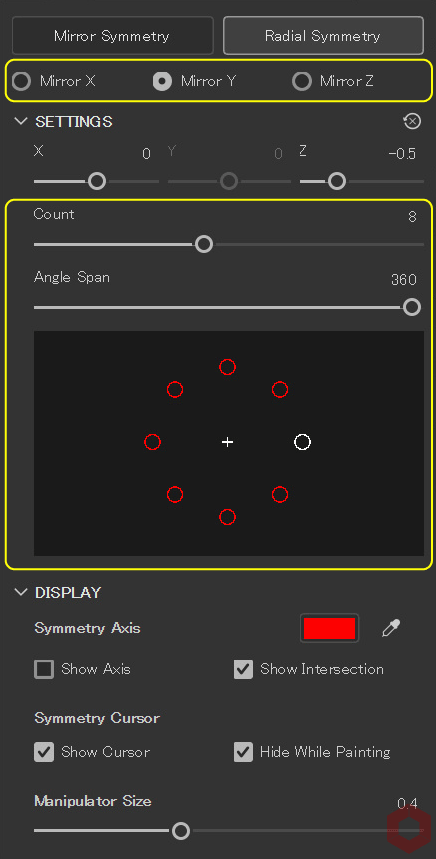
- [ Mirror X ] [ Mirror Y] [ Mirror Z ] から対称となる軸を選択します。
また、[ Count ] と [ Angle Span ] の値を設定して、数を調整します。![]()
中心の位置を調整したい場合は、オフセット値の調整を行います。
[ Show/Hide Manipulator ] のアイコン をクリックすると、ビューポート上から、視覚的に移動することができます。![]()
まとめ
ミラー(対称)と ラジアル(放射状)の 2 種類のシンメトリーを使用したペイント方法について確認いたしました。
次のページでは、Hard surface 素材を使用したノーマルに AO(陰影)をつける方法について確認します!
次のページへ Let’s go!
![[ Substance 3D Painter ] Hard Surface 素材を使用してノーマルにペイントする方法](https://www.plamophy.com/wp-content/uploads/substance3dpainter-ec-painting-brush-normal-01-300x125.jpg)
![[ Substance 3D Painter ] Hard surface 素材を使用したノーマルに AO(陰影)をつける方法](https://www.plamophy.com/wp-content/uploads/substance3dpainter-ec-painting-filter-ao-01-300x125.png)
![[ Youtube ] おすすめの一覧です](https://www.plamophy.com/wp-content/uploads/youtube-recommended-list.jpg)
![[ Substance 3D Painter ] Hard Surface 素材を使用してノーマルにペイントする方法](https://www.plamophy.com/wp-content/uploads/substance3dpainter-ec-painting-brush-normal-01.jpg)
![[ Substance 3D Painter ] レンダリングの設定項目](https://www.plamophy.com/wp-content/uploads/substance3dpainter-ec-rendering-01.jpg)
![[ Substance 3D Painter ] ペイントブラシの選択方法](https://www.plamophy.com/wp-content/uploads/substance3dpainter-ec-painting-brush-select-01-150x150.jpg)
![[ Substance 3D Painter ] 新規作成とノーマルに関する設定項目](https://www.plamophy.com/wp-content/uploads/substance3dpainter-ec-newproject-creation-01-150x150.jpg)
![[ Substance 3D Painter ] レンダリングの設定項目](https://www.plamophy.com/wp-content/uploads/substance3dpainter-ec-rendering-01-150x150.jpg)
![[ Unreal Engine 5.3.1 ] Procedural Content Generation (PCG) の使用方法について](https://www.plamophy.com/wp-content/uploads/unrealengine-ec-pcg-01-150x150.png)
![[ Substance 3D Painter ] マテリアル、テクスチャのインポート方法](https://www.plamophy.com/wp-content/uploads/substance3dpainter-ec-resource-import-01-300x125.jpg)
![[ Substance 3D Painter ] ベイクの手順と共通設定](https://www.plamophy.com/wp-content/uploads/substance3dpainter-ec-baking-mode-01-300x125.png)
![[ Substance 3D Painter ] テクスチャエクスポートの設定方法](https://www.plamophy.com/wp-content/uploads/substance3dpainter-ec-export-textures-01-300x125.jpg)
![[ Substance 3D Painter ] 半透明マテリアルのシェーダー設定方法](https://www.plamophy.com/wp-content/uploads/substance3dpainter-ec-shader-settings-alpha-blending-01-300x125.png)
![[ Substance 3D Painter ] ペイントブラシの設定方法](https://www.plamophy.com/wp-content/uploads/substance3dpainter-ec-painting-brush-setting-01-300x125.jpg)
![[ Substance 3D Painter ] シンメトリーを使用したペイント方法](https://www.plamophy.com/wp-content/uploads/substance3dpainter-ec-painting-brush-symmetry-01-300x125.jpg)
![[ Substance 3D Painter ] ポリゴン塗りつぶしツールを使用したマスキング方法](https://www.plamophy.com/wp-content/uploads/substance3dpainter-ec-masking-polygon-fill-01-300x125.jpg)
![[ Substance 3D Painter ] 色相の変更とグラデーションの作成方法](https://www.plamophy.com/wp-content/uploads/substance3dpainter-ec-painting-color-variations-01-300x125.jpg)
![[ Substance 3D Painter ] 環境マップの設定と明るさの調整方法](https://www.plamophy.com/wp-content/uploads/substance3dpainter-ec-display-settings-01-300x125.jpg)
![[ Substance 3D Painter ] レンダリングの設定項目](https://www.plamophy.com/wp-content/uploads/substance3dpainter-ec-rendering-01-300x125.jpg)
![[ Zbrush ] データの保存とロード方法について](https://www.plamophy.com/wp-content/uploads/ZBrush_data_storage_format_01-300x169.jpg)
![[ Zbrush ] UIをカスタムする方法について](https://www.plamophy.com/wp-content/uploads/ZBrush_ui-customization_01-300x169.jpg)
![[ Zbrush ] 起動時に LihgtBox を非表示にする設定方法](https://www.plamophy.com/wp-content/uploads/ZBrush_lightbbox_01-300x169.jpg)
![[ Zbrush ] スカルプトするまでの手順](https://www.plamophy.com/wp-content/uploads/ZBrush_3d-edit-mode_03-300x169.jpg)
![[ Zbrush ] ドキュメントサイズの設定方法](https://www.plamophy.com/wp-content/uploads/ZBrush_document-size_10-300x169.jpg)