![[ Substance 3D Painter ] レンダリングの設定項目](https://www.plamophy.com/wp-content/uploads/substance3dpainter-ec-rendering-01.jpg)
![[ Substance 3D Painter ] Hard Surface 素材を使用してノーマルにペイントする方法](https://www.plamophy.com/wp-content/uploads/substance3dpainter-ec-painting-brush-normal-01.jpg)
![[ Unreal Engine 5.3.1 ] Procedural Content Generation (PCG) の使用方法について](https://www.plamophy.com/wp-content/uploads/unrealengine-ec-pcg-01.png)

![[ Zbrush ] UIをカスタムする方法について](https://www.plamophy.com/wp-content/uploads/ZBrush_ui-customization_01.jpg)
![[ Substance 3D Designer 入門 ] Substance 3D Painter に出力するまでの基本的な手順について](https://www.plamophy.com/wp-content/uploads/substance3ddesigner-ec-camouflage-01.jpg)
![[ Substance 3D Painter ] シンメトリーを使用したペイント方法](https://www.plamophy.com/wp-content/uploads/substance3dpainter-ec-painting-brush-symmetry-01.jpg)
![[ Substance 3D Painter ] ペイントブラシの設定方法](https://www.plamophy.com/wp-content/uploads/substance3dpainter-ec-painting-brush-setting-01.jpg)
テクスチャ作成を進めてくると、ブラシを使用してマスクを調整したりなど、ペイントでの調整が必要になってきます。
ペイントブラシを使用するには、まずはペイントレイヤーを追加する必要があります。
本記事では、ペイントレイヤーの追加方法とあわせて、以下のブラシの設定方法について確認したいと思います。
・ブラシと消しゴムの切り替え方法について
・ブラシサイズ、角度、ぼかし、不透明度などの設定方法
ブラシの選択方法(種類)については、詳しくはこちらのページをご参照ください。
ペイントレイヤーを追加する方法
まず始めに、ペイントレイヤーを追加して、ブラシでペイントできる状態にします。
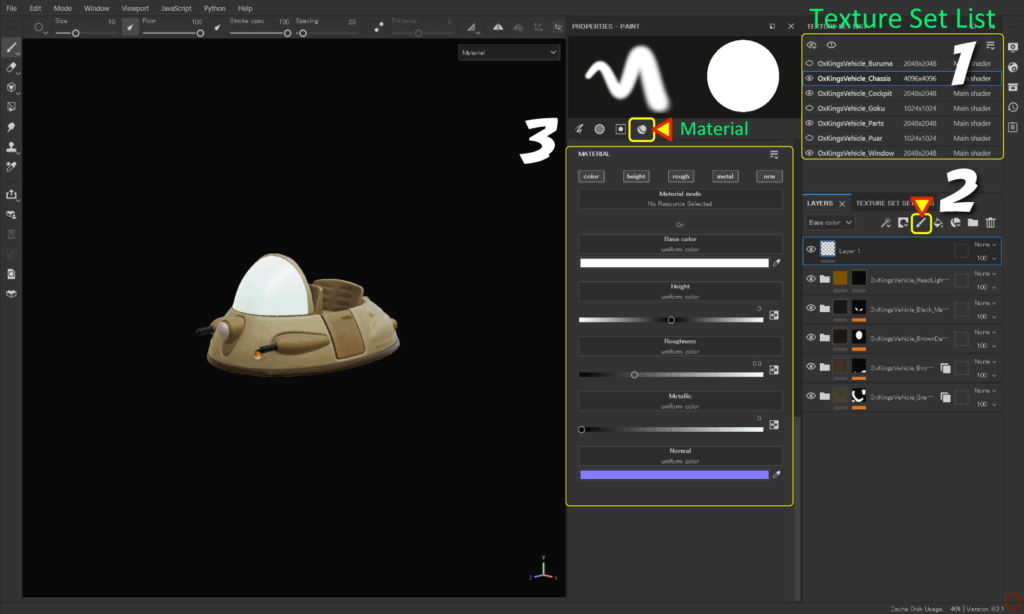
- [ Texture Set List ] から、編集するテクスチャセットを選択します。
- [ Add layer ] のアイコン をクリックして、ペイントレイヤーを追加します。
![]()
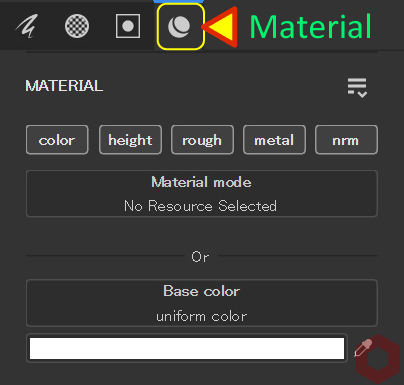
- [ Material ] アイコンをクリックして、ベースとなる色、質感などを設定します。
![]()
ペイントレイヤーは [ Add effect ] のアイコンをクリックして [ Add paint ] から追加する方法もあります。
使用例はこちらのページをご参照ください。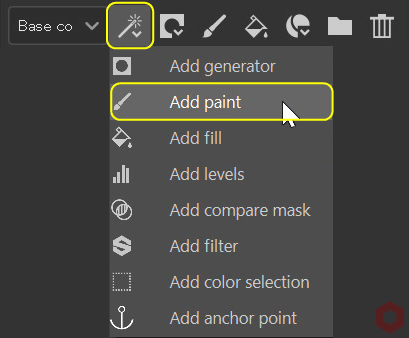
ブラシと消しゴムの切り替え方法
ペイントができる状態になると、画面左側の Tools が使用できるようになります。
・ブラシ
画面左側の [ Paint ] アイコン を選択します。
[ 1 ] キーでペイントに切り替わります。
・消しゴム
画面左側の [ Eraser ] アイコン を選択します。
[ 2 ] キーで消しゴムに切り替わります。
ブラシのサイズ
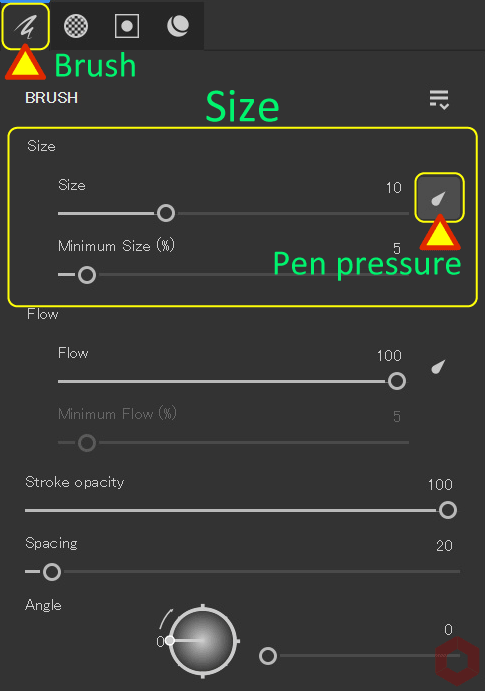
[ Brush ] アイコンをクリックすると、
ブラシの設定項目に移動します。
・Size
ブラシのサイズを変更できます。
[ Pen pressure ] を有効にすると、
ペンタブレットの筆圧で制御できるようになります。
ショートカットはこちらになります。
Ctrl + 右クリック + 左右にスライド
ブラシの不透明度(強度)
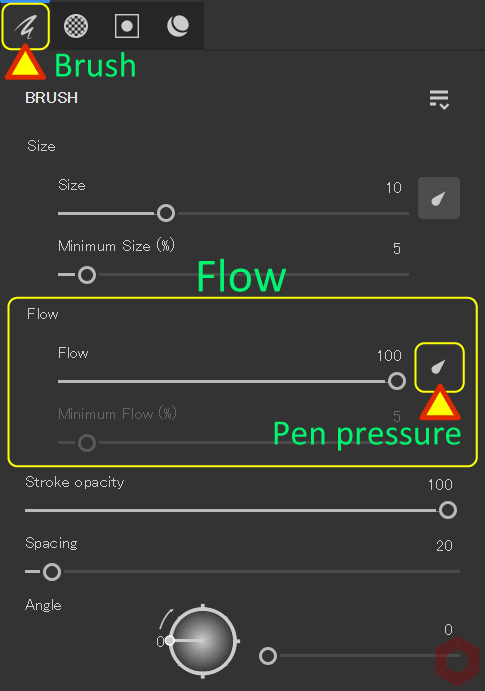
・Flow
ブラシスの不透明度(強度)を調整できます。
[ Pen pressure ] を有効にすると、
ペンタブレットの筆圧で制御できるようになります。
ショートカットはこちらになります。
Ctrl + 左クリック + 左右にスライド
ブラシの不透明度

・Stroke opacity
ブラシスの不透明度を調整できます。
こちらの不透明度は、ペンタブレットの筆圧では制御できません。
ブラシの間隔
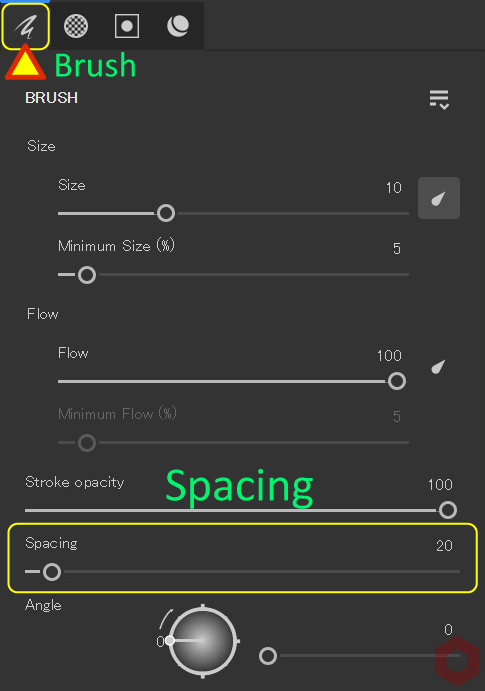
・Spacing
ブラシストロークの間隔を調整できます。
値を小さくすると滑らかな線になり、
値を大きくすると間隔をあけて線を描くことができます。
ブラシの角度
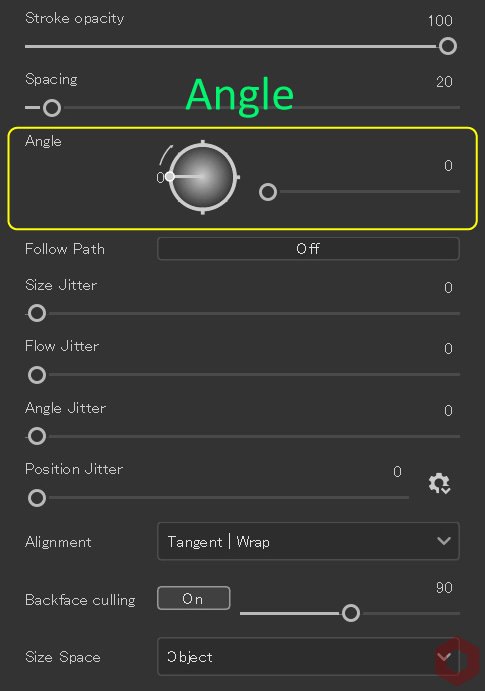
・Angle
ブラシの角度を調整できます。
ショートカットはこちらになります。
Ctrl + 左クリック + 上下にスライド
フォローパス
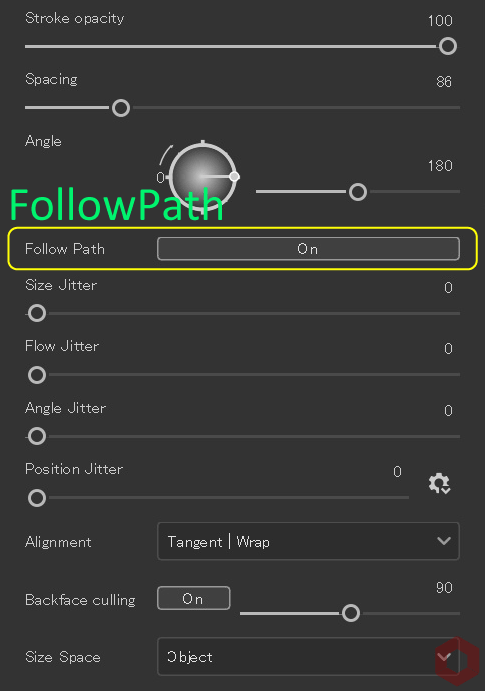
・Follow Path
[ On ] にすると、ペイント方向に沿ってブラシの向きを調整できます。
ブラシの間隔 [ Spacing ] の数値とあわせて調整すると、うまく描くことができます。
ジッター(ランダム性)
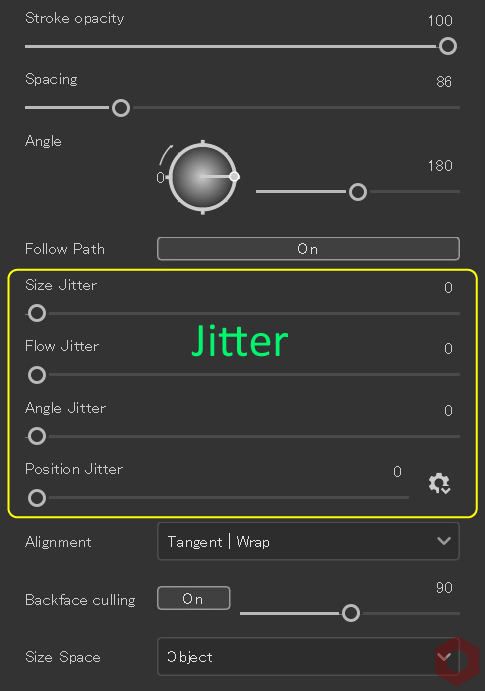
・Size Jitter
ブラシサイズをランダムに変更します。
・Flow Jitter
ブラシの強度をランダムに変更します。
・Angle Jitter
ブラシの角度をランダムに変更します。
・Position Jitter
ブラシの位置をランダムに変更します。
アルファ(ブラシの形状)
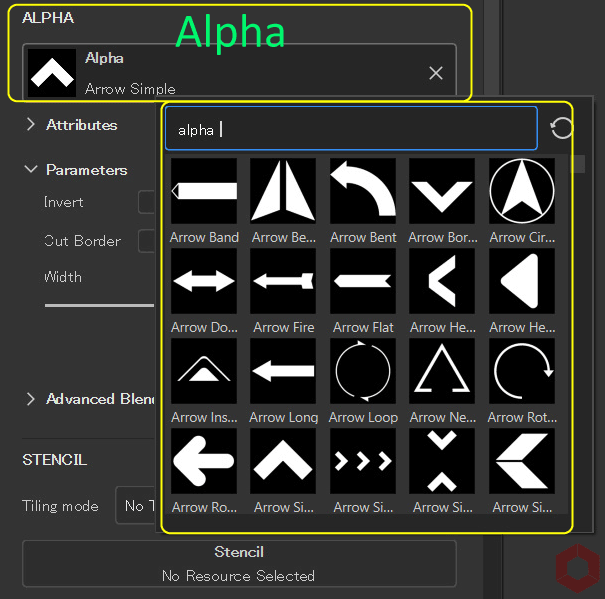
・Alpha
[ Alpha ] ボタンからアルファ画像を選択できます。
ブラシのぼかし具合
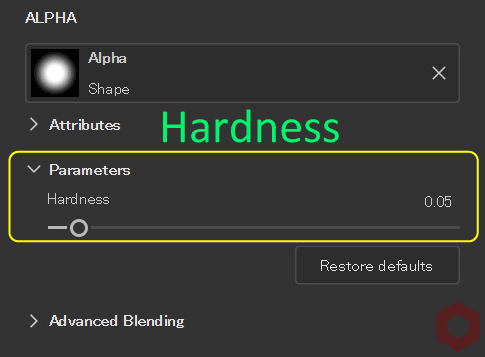
・Hardness
ブラシのぼかし具合を調整できます。
ショートカットはこちらになります。
Ctrl + 右クリック + 上下にスライド
まとめ
ペイントレイヤーの追加方法とブラシの設定方法について確認いたしました。
ブラシで使用するショートカットは以下の4つになります。
・サイズを変更 Ctrl + 右クリック + 左右にスライド
・ぼかし具合を調整 Ctrl + 右クリック + 上下にスライド
・不透明度を調整 Ctrl + 左クリック + 左右にスライド
・角度を調整 Ctrl + 左クリック + 上下にスライド
次のページでは、ペイントブラシの選択方法について確認します!
次のページへ Let’s go!
![[ Substance 3D Painter ] マテリアルをビューポート上で ID Map に直接追加する方法](https://www.plamophy.com/wp-content/uploads/substance3dpainter-ec-painting-filllayer-id-map-01-300x125.png)
![[ Substance 3D Painter ] ペイントブラシの選択方法](https://www.plamophy.com/wp-content/uploads/substance3dpainter-ec-painting-brush-select-01-300x125.jpg)
![[ Substance 3D Painter ] 半透明マテリアルのシェーダー設定方法](https://www.plamophy.com/wp-content/uploads/substance3dpainter-ec-shader-settings-alpha-blending-01.png)
![[ Youtube ] おすすめの一覧です](https://www.plamophy.com/wp-content/uploads/youtube-recommended-list.jpg)
![[ Zbrush ] データの保存とロード方法について](https://www.plamophy.com/wp-content/uploads/ZBrush_data_storage_format_01.jpg)
![[ Substance 3D Painter ] Texture Set List(テクスチャセットリスト) の表示内容について](https://www.plamophy.com/wp-content/uploads/substance3dpainter-ec-texture-set-list-01-150x150.jpg)
![[ Substance 3D Painter ] ポリゴン塗りつぶしツールを使用したマスキング方法](https://www.plamophy.com/wp-content/uploads/substance3dpainter-ec-masking-polygon-fill-01-150x150.jpg)
![[ Substance 3D Painter ] ペイントブラシの選択方法](https://www.plamophy.com/wp-content/uploads/substance3dpainter-ec-painting-brush-select-01-150x150.jpg)
![[ Substance 3D Painter ] ベイクの手順と共通設定](https://www.plamophy.com/wp-content/uploads/substance3dpainter-ec-baking-mode-01-150x150.png)
![[ Substance 3D Painter ] マテリアル、テクスチャのインポート方法](https://www.plamophy.com/wp-content/uploads/substance3dpainter-ec-resource-import-01-300x125.jpg)
![[ Substance 3D Painter ] ベイクの手順と共通設定](https://www.plamophy.com/wp-content/uploads/substance3dpainter-ec-baking-mode-01-300x125.png)
![[ Substance 3D Painter ] テクスチャエクスポートの設定方法](https://www.plamophy.com/wp-content/uploads/substance3dpainter-ec-export-textures-01-300x125.jpg)
![[ Substance 3D Painter ] 半透明マテリアルのシェーダー設定方法](https://www.plamophy.com/wp-content/uploads/substance3dpainter-ec-shader-settings-alpha-blending-01-300x125.png)
![[ Substance 3D Painter ] ペイントブラシの設定方法](https://www.plamophy.com/wp-content/uploads/substance3dpainter-ec-painting-brush-setting-01-300x125.jpg)
![[ Substance 3D Painter ] シンメトリーを使用したペイント方法](https://www.plamophy.com/wp-content/uploads/substance3dpainter-ec-painting-brush-symmetry-01-300x125.jpg)
![[ Substance 3D Painter ] ポリゴン塗りつぶしツールを使用したマスキング方法](https://www.plamophy.com/wp-content/uploads/substance3dpainter-ec-masking-polygon-fill-01-300x125.jpg)
![[ Substance 3D Painter ] 色相の変更とグラデーションの作成方法](https://www.plamophy.com/wp-content/uploads/substance3dpainter-ec-painting-color-variations-01-300x125.jpg)
![[ Substance 3D Painter ] 環境マップの設定と明るさの調整方法](https://www.plamophy.com/wp-content/uploads/substance3dpainter-ec-display-settings-01-300x125.jpg)
![[ Substance 3D Painter ] レンダリングの設定項目](https://www.plamophy.com/wp-content/uploads/substance3dpainter-ec-rendering-01-300x125.jpg)
![[ Zbrush ] データの保存とロード方法について](https://www.plamophy.com/wp-content/uploads/ZBrush_data_storage_format_01-300x169.jpg)
![[ Zbrush ] UIをカスタムする方法について](https://www.plamophy.com/wp-content/uploads/ZBrush_ui-customization_01-300x169.jpg)
![[ Zbrush ] 起動時に LihgtBox を非表示にする設定方法](https://www.plamophy.com/wp-content/uploads/ZBrush_lightbbox_01-300x169.jpg)
![[ Zbrush ] スカルプトするまでの手順](https://www.plamophy.com/wp-content/uploads/ZBrush_3d-edit-mode_03-300x169.jpg)
![[ Zbrush ] ドキュメントサイズの設定方法](https://www.plamophy.com/wp-content/uploads/ZBrush_document-size_10-300x169.jpg)