![[ Substance 3D Painter ] How to add a metal filter](https://www.plamophy.com/wp-content/uploads/substance3dpainter-ec-painting-filter-01.jpg)
If you're creating metal textures, Assets offers several metal filters.
Adding this metal filter allows you to make more subtle changes to normals and roughness.
In this article, I would like to check how to add a metal filter.
How to add a metal filter
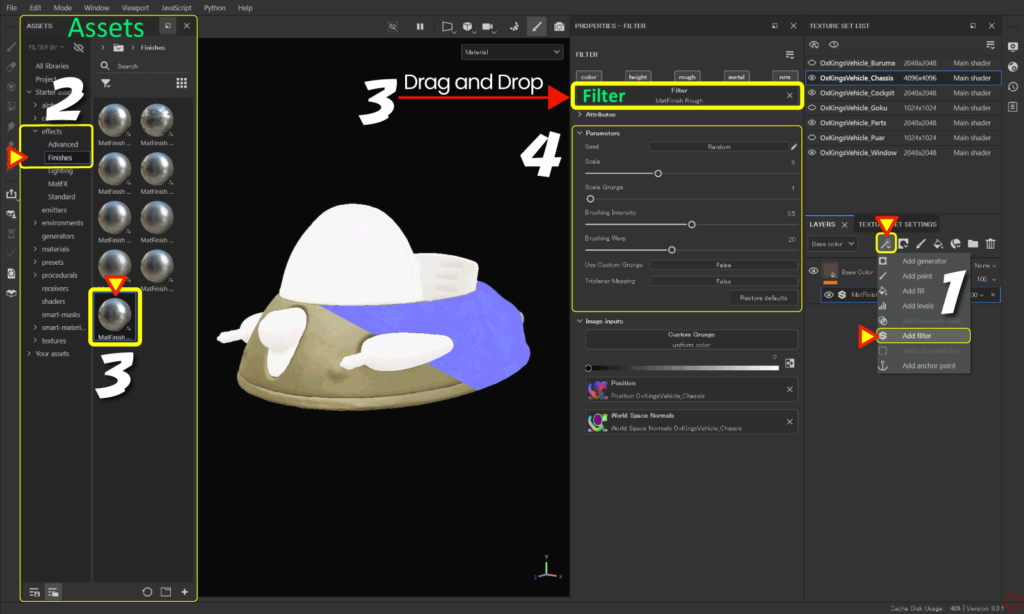
- With the layer to be edited selected,
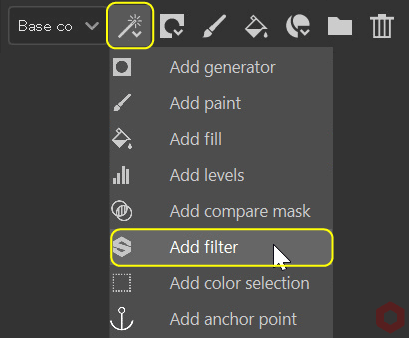
Click the [ Add effect ] icon and select [ Add filter ].![]()
- Select [ effects > Finishes ] from [ Assets ].
- Drag and drop any metal filter to [ Filter ].
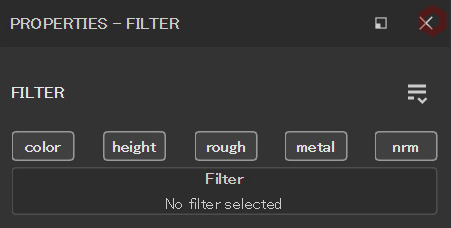
![]()
Example: Here I am using [ MatFinish Rough ]. - Adjust parameters.
The trick is to adjust the parameter [ Intensity ] of the metal filter to a smaller value.
Summary
We have confirmed how to add a metal filter from Assets.
By adding a metal filter, you can add subtle changes to normals and roughness.
You can check the adjustment status by switching to the normal or roughness channel using the [ C ] key!
On the next page, we'll see how to adjust roughness using grunge materials!
Next page Let’s go!
![[ Substance 3D Painter ] How to create a fill layer](https://www.plamophy.com/wp-content/uploads/substance3dpainter-ec-painting-filllayer-02-300x125.jpg)
![[ Substance 3D Painter ] How to adjust roughness using grunge material](https://www.plamophy.com/wp-content/uploads/substance3dpainter-ec-painting-roughness-add-01-300x125.jpg)
![[ Substance 3D Painter ] Masking method using Geometry mask](https://www.plamophy.com/wp-content/uploads/substance3dpainter-ec-masking-geometry-mask-01-150x150.png)
![[ Introduction to Substance 3D Designer ] Basic steps to output to Substance 3D Painter](https://www.plamophy.com/wp-content/uploads/substance3ddesigner-ec-camouflage-01-150x150.jpg)
![[ Substance 3D Painter ] How to add and adjust height map](https://www.plamophy.com/wp-content/uploads/substance3dpainter-ec-painting-height-map-01-150x150.png)
![[ Substance 3D Painter ] How to use the clone tool and blend mode Passthrough](https://www.plamophy.com/wp-content/uploads/substance3dpainter-ec-painting-brush-clone-01-150x150.jpg)
![[ Substance 3D Painter ] マテリアル、テクスチャのインポート方法](https://www.plamophy.com/wp-content/uploads/substance3dpainter-ec-resource-import-01-300x125.jpg)
![[ Substance 3D Painter ] ベイクの手順と共通設定](https://www.plamophy.com/wp-content/uploads/substance3dpainter-ec-baking-mode-01-300x125.png)
![[ Substance 3D Painter ] テクスチャエクスポートの設定方法](https://www.plamophy.com/wp-content/uploads/substance3dpainter-ec-export-textures-01-300x125.jpg)
![[ Substance 3D Painter ] 半透明マテリアルのシェーダー設定方法](https://www.plamophy.com/wp-content/uploads/substance3dpainter-ec-shader-settings-alpha-blending-01-300x125.png)
![[ Substance 3D Painter ] ペイントブラシの設定方法](https://www.plamophy.com/wp-content/uploads/substance3dpainter-ec-painting-brush-setting-01-300x125.jpg)
![[ Substance 3D Painter ] シンメトリーを使用したペイント方法](https://www.plamophy.com/wp-content/uploads/substance3dpainter-ec-painting-brush-symmetry-01-300x125.jpg)
![[ Substance 3D Painter ] ポリゴン塗りつぶしツールを使用したマスキング方法](https://www.plamophy.com/wp-content/uploads/substance3dpainter-ec-masking-polygon-fill-01-300x125.jpg)
![[ Substance 3D Painter ] 色相の変更とグラデーションの作成方法](https://www.plamophy.com/wp-content/uploads/substance3dpainter-ec-painting-color-variations-01-300x125.jpg)
![[ Substance 3D Painter ] 環境マップの設定と明るさの調整方法](https://www.plamophy.com/wp-content/uploads/substance3dpainter-ec-display-settings-01-300x125.jpg)
![[ Substance 3D Painter ] レンダリングの設定項目](https://www.plamophy.com/wp-content/uploads/substance3dpainter-ec-rendering-01-300x125.jpg)

![[ Introduction to Substance 3D Designer ] Basic steps to output to Substance 3D Painter](https://www.plamophy.com/wp-content/uploads/substance3ddesigner-ec-camouflage-01-300x125.jpg)
![[ Unreal Engine 5.3.1 ] How to use Procedural Content Generation (PCG)](https://www.plamophy.com/wp-content/uploads/unrealengine-ec-pcg-01-300x125.png)
![[ Substance 3D Painter ] How to use the stencil](https://www.plamophy.com/wp-content/uploads/substance3dpainter-ec-painting-brush-stencil-01-300x125.jpg)