![[ Substance 3D Painter ] How to use the stencil](https://www.plamophy.com/wp-content/uploads/substance3dpainter-ec-painting-brush-stencil-01.jpg)
This article explains how to create decals, but you can also create decals in a similar way by painting with stencil.
Stencils let you paint an alpha image to match the camera's perspective.
In this article, I would like to check how to paint using this stencil.
How to use the stencil
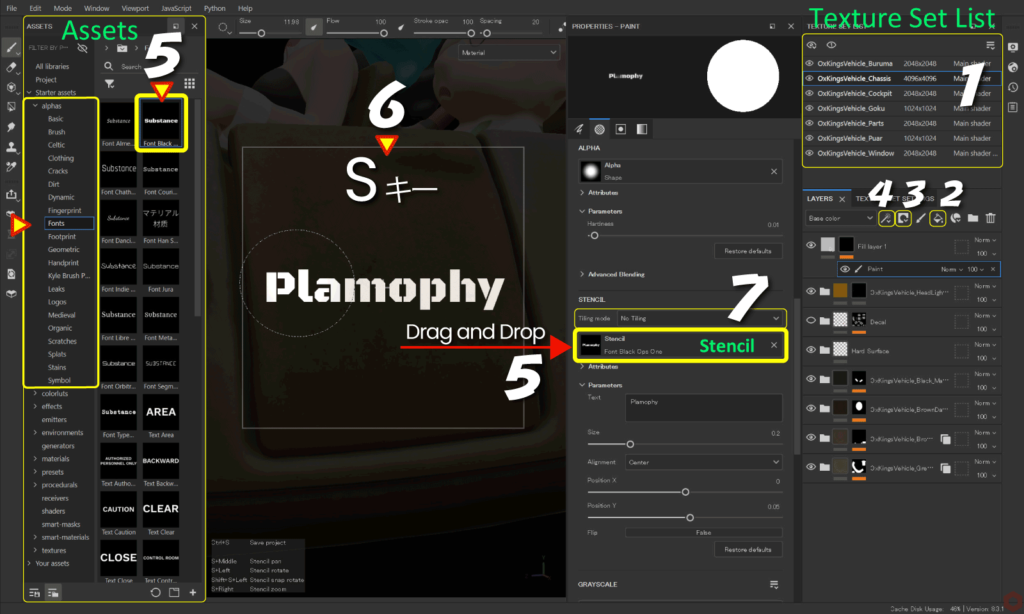
- Select the texture set you want to edit from [ Texture Set List ].
- Click the [ Add Fill layer ] icon to add a fill layer.
![]()
Set the base color, texture, etc. of the stencil.
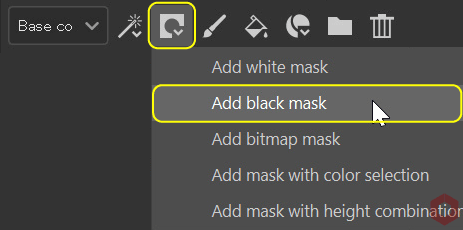
For more information on fill layers, please see this page. - Click the [ Add mask ] icon and select [ Add black mask ].
![]()
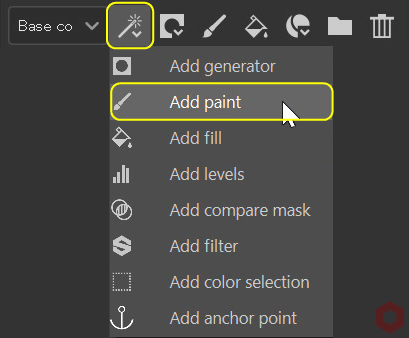
- Click the [ Add effect ] icon and select [ Add paint ].
![]()
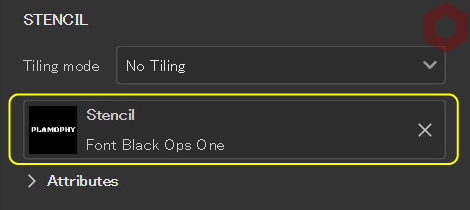
- Select [ alphas > Fonts ] from [ Assets ] and drag and drop any font to [ Stencil ].
![]()
Example: Here I am using [ Font Black Ops One ].
[ Font Black Ops One ] can change the text content. - You can adjust the position, angle, and scale of the projection by holding down the [ S ] key while in the viewport in combination with the following mouse buttons:
・change position
[ S ] key + middle click
・adjust scale
[ S ] key + right click
・adjust the angle
[ S ] key + left click
・snap angle
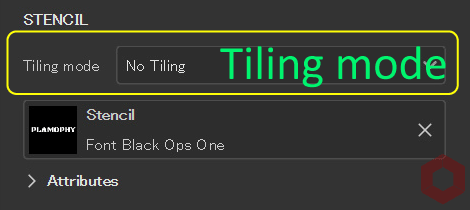
[ S ] key + left click + Shift - If tiling is required, set it here.
![]()
- Select [ presets > brushes ] from [ Assets ] and select the brush you want.
Set the brush size, opacity, angle, blur level, etc.
For information on how to select brushes, see this page.
For more information on how to set up brushes, please see this page.
When you are finished painting, click the [×] button on the [ Stencil ] button to delete the stencil.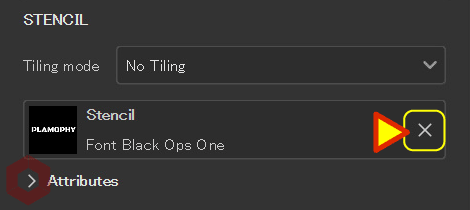
・Brush size
Ctrl + right click + slide left/right
・Brush blur level
Ctrl + right click + slide up/down
・Brush opacity
Ctrl + left click + slide left/right
・Brush angle
Ctrl + left click + slide up/down
Stencil display settings
You can change the stencil display settings from the [ Display Settings ] icon on the right side of the screen.
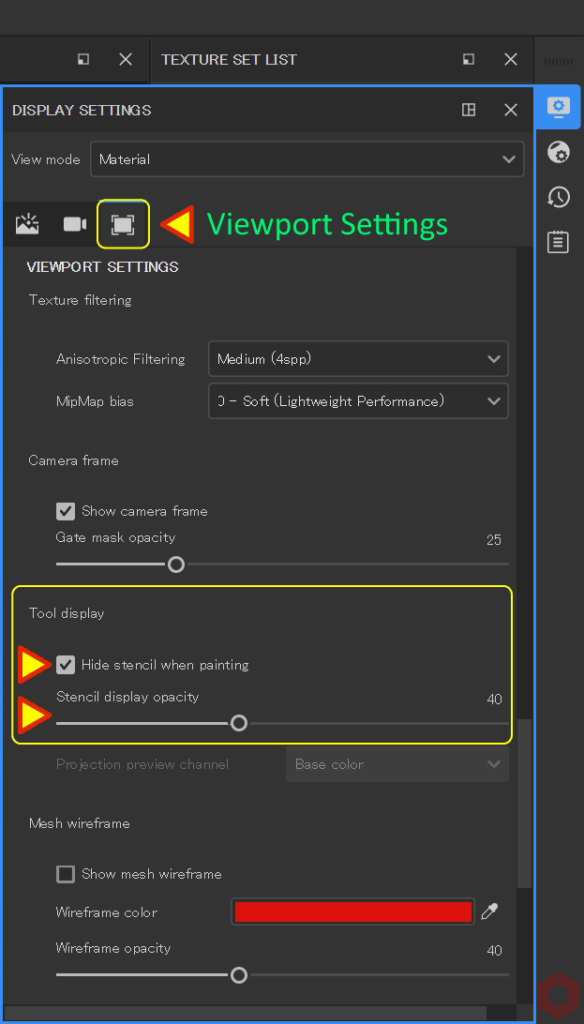
・ Hide stencil when painting
You can show or hide stencils while painting.
・ Stencil display opacity
You can change the opacity of the stencil.
Summary
We have confirmed how to paint using stencils and display settings.
By overlaying the grunge material on the stencil you created, you can add a faded look.
For more information on how to blend grunge materials, please see this page.
Check out how to set up texture export on the next page!
Next page Let’s go!
![[ Substance 3D Painter ] How to paint using projection tools](https://www.plamophy.com/wp-content/uploads/substance3dpainter-ec-painting-brush-projection-01-300x125.jpg)
![[ Substance 3D Painter ] How to set up texture export](https://www.plamophy.com/wp-content/uploads/substance3dpainter-ec-export-textures-01-300x125.jpg)
![[ Substance 3D Painter ] Setting items related to New creation and Normal](https://www.plamophy.com/wp-content/uploads/substance3dpainter-ec-newproject-creation-01-150x150.jpg)
![[ Substance 3D Painter ] How to set the environment map and adjust brightness](https://www.plamophy.com/wp-content/uploads/substance3dpainter-ec-display-settings-01-150x150.jpg)
![[ Substance 3D Painter ] About layer instancing](https://www.plamophy.com/wp-content/uploads/substance3dpainter-ec-painting-layer-instancing-01-150x150.jpg)
![[ Substance 3D Painter ] How to change the hue and create a gradient](https://www.plamophy.com/wp-content/uploads/substance3dpainter-ec-painting-color-variations-01-150x150.jpg)
![[ Substance 3D Painter ] マテリアル、テクスチャのインポート方法](https://www.plamophy.com/wp-content/uploads/substance3dpainter-ec-resource-import-01-300x125.jpg)
![[ Substance 3D Painter ] ベイクの手順と共通設定](https://www.plamophy.com/wp-content/uploads/substance3dpainter-ec-baking-mode-01-300x125.png)
![[ Substance 3D Painter ] 半透明マテリアルのシェーダー設定方法](https://www.plamophy.com/wp-content/uploads/substance3dpainter-ec-shader-settings-alpha-blending-01-300x125.png)
![[ Substance 3D Painter ] ペイントブラシの設定方法](https://www.plamophy.com/wp-content/uploads/substance3dpainter-ec-painting-brush-setting-01-300x125.jpg)
![[ Substance 3D Painter ] シンメトリーを使用したペイント方法](https://www.plamophy.com/wp-content/uploads/substance3dpainter-ec-painting-brush-symmetry-01-300x125.jpg)
![[ Substance 3D Painter ] ポリゴン塗りつぶしツールを使用したマスキング方法](https://www.plamophy.com/wp-content/uploads/substance3dpainter-ec-masking-polygon-fill-01-300x125.jpg)
![[ Substance 3D Painter ] 色相の変更とグラデーションの作成方法](https://www.plamophy.com/wp-content/uploads/substance3dpainter-ec-painting-color-variations-01-300x125.jpg)
![[ Substance 3D Painter ] 環境マップの設定と明るさの調整方法](https://www.plamophy.com/wp-content/uploads/substance3dpainter-ec-display-settings-01-300x125.jpg)
![[ Substance 3D Painter ] レンダリングの設定項目](https://www.plamophy.com/wp-content/uploads/substance3dpainter-ec-rendering-01-300x125.jpg)

![[ Introduction to Substance 3D Designer ] Basic steps to output to Substance 3D Painter](https://www.plamophy.com/wp-content/uploads/substance3ddesigner-ec-camouflage-01-300x125.jpg)
![[ Unreal Engine 5.3.1 ] How to use Procedural Content Generation (PCG)](https://www.plamophy.com/wp-content/uploads/unrealengine-ec-pcg-01-300x125.png)
![[ Substance 3D Painter ] How to use the stencil](https://www.plamophy.com/wp-content/uploads/substance3dpainter-ec-painting-brush-stencil-01-300x125.jpg)